Say Hello to My Twitter Friend
July 30, 2017Every day when I launch the blue bird I am flabbergasted by the breadth of conversations taking place and the streams of information being shared, all in some shape or form of 140 characters.
Twitter, to me, is a pipeline that transports thoughts straight from the brain directly to the internet.
The best part about the Twitter pipeline is the fact that there is no one gatekeeper restricting access. You can connect to it however you’d like and follow any interest.
And while you can get a fairly good idea of someone’s interests from their timeline (especially if they are extwitverts), I don’t think it paints the entire picture.
A person’s interest graph is often more apparent by observing whom they follow and the tweets they favorite. You get a chance to see things from their perspective as they lend a hand in training their interest-algorithm.
This is why I have built my first twitter bot. To bring the underbelly of my Twitter fingers to light.
Which brings us to this post. The primary reason for this post is to share a how-to adventure with you, just in case you ever want to bring your interest bot to life.
Getting Setup
We will be using Python for the script, and we’ll need to install Tweepy to communicate with the Twitter platform through its API. I suggest setting up Python with HomeBrew.
Before we begin, you will want to create a new Python project folder on your computer. For simplicity sake, lets name it python_projects. Then within the python_projects folder, let’s create another folder to house our script. Let’s name this folder twitter_bot.
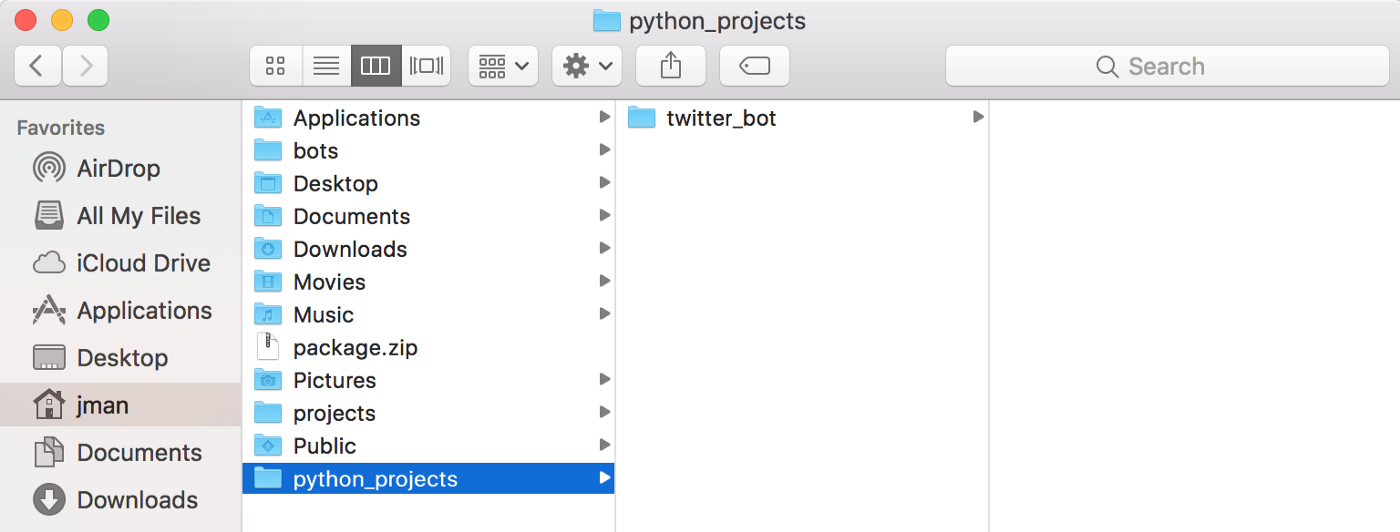
Once the folders are created, head to your terminal and run the following commands to make twitter_bot the current working directory so you can open the script and run it from your editor.
mkdir twitter_bot
cd twitter_bot
Register for Twitter API
First things first, you will need to have two Twitter accounts to make this work. One account where the favoriting is taking place, and the other for the bot to feast. Once you have your bot account created, head to the Twitter Apps Dev page and click Create New App.

From there you need to fill out some basic information. I’m not entirely sure what Twitter does with this info but its rather easy to put in some fluff. Once you’ve filled out the form go ahead and click Create your Twitter application.
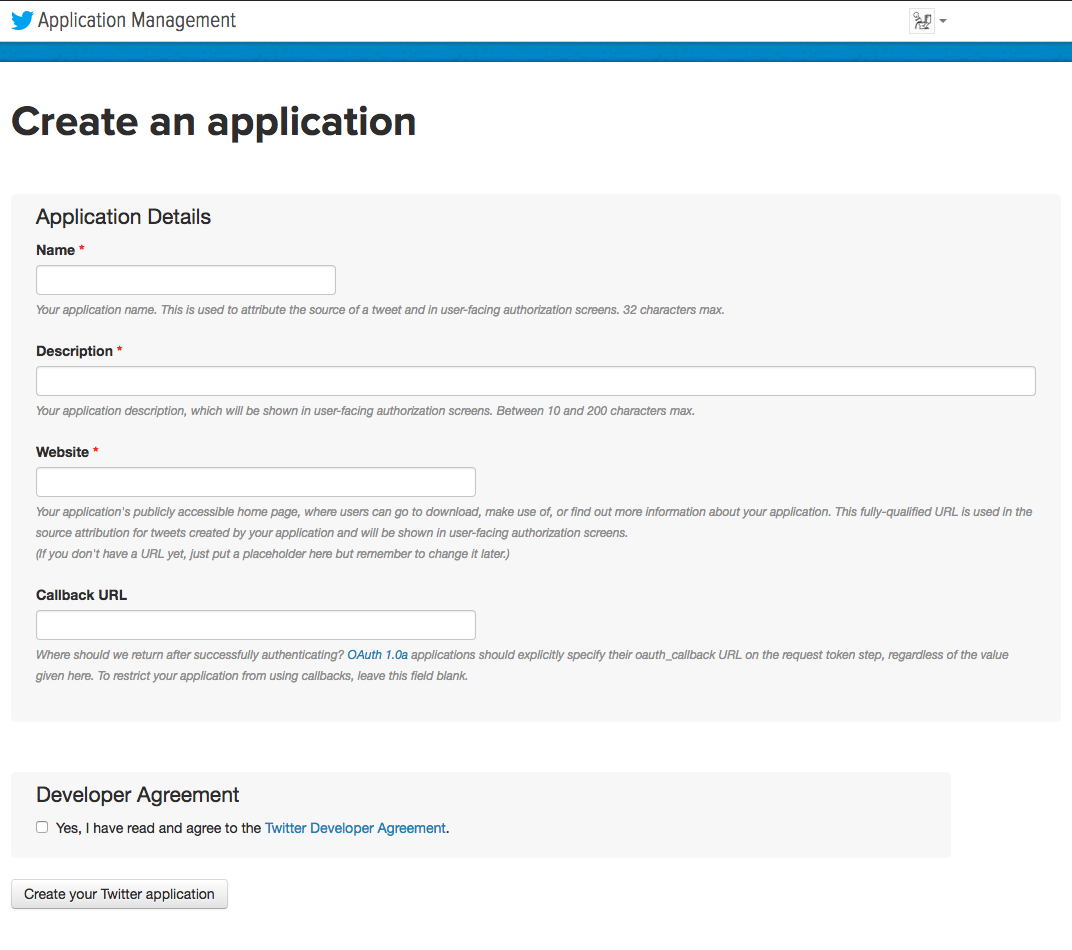
Once you’re in and your app is created, you’ll want to navigate to the Keys and Access Tokens tab.
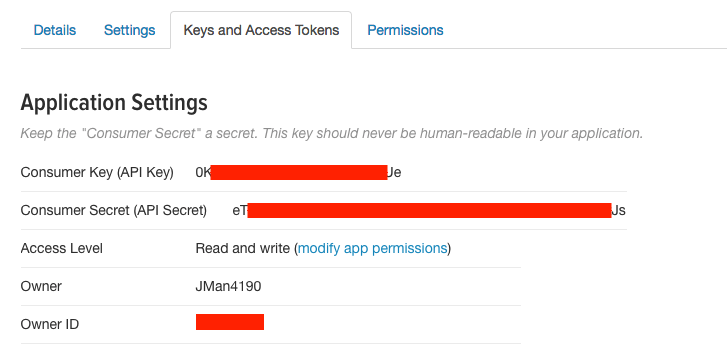
Fire up a TextEditor and go ahead and copy+paste your Consumer Key (API Key) and your Consumer Secret (API Secret). We’re going to need to use these keys in our script to let us authenticate, or verify, our identity with Twitter.
Once you have these stored somewhere, head down to the Token Actionsarea and click Create my access token.

Just like before, you will want to copy your Access Token and Access Token Secret to the same TextEditor. We’ll be pasting these strings into the code soon.
Great. You have all of the information you need from Twitter. Now let’s package it up so Tweepy can do some stuff with it.
Write Python Script
Heads up that I am using plain old Sublime Text to write these Python scripts. It’s super easy to download.
The only dependency we will need for this script is Tweepy. To install the Tweepy module, type the following code in your terminal:
pip install tweepyI can’t stress how important it is to correctly set up your environment. The amount of time I spent on StackOverflow just trying to learn how to install modules (that in the end could be imported with a measly line of code) was staggering. It wasn’t until I got a new computer that I had a clean slate and second chance to do things the right way (with the help of a friend of course).
Once the dependency is installed we can write our first line of code. Create a new python file in the folder we created earlier. To begin, we need to import the Tweepy library with the following line.
import tweepyNext, let’s drop all of our API information that we stored in the TextEditor into four different variables. Make sure the strings are in quotes.
api_key = ‘your_api_key’
api_secret = ‘your_api_secret’
access_token = ‘your_access_token’
access_secret = ‘your_access_secret’
Then, let’s authenticate with Twitter by logging in via code. Create a variable called auth for authentication, and use Tweepy’s OAuthHandlermethod. This method takes two arguments, the consumer api_key and the consumer api_secret. Then we call the set_access_token method on the authvariable. This method takes two arguments, the access_token and the access_secret.
auth = tweepy.OAuthHandler(api_key, api_secret)
auth.set_access_token(access_token, access_secret)
You’ll notice we could have directly inserted the strings into the above methods, but what if our API information changes? Using variables is an efficient way to make easy changes throughout your script.
Next, let’s create the main variable from which we will do all of the Twittering. We will call it api and assign it a value from the tweepy.API method which takes a single authentication argument.
api = tweepy.API(auth)Dope. We’re now able to ping the API with our bot account and use a variety of methods. Once this is working properly we can move forward by adding the code which checks for tweets that are favorited, and then retweets those tweets.
To check my favorites all we have to do is call api.favorites using Tweepy. Because I typically favorite more than once per day we will need to write a for loop to loop over multiple tweets.
for tweet in api.favorites(‘your_handle’):You’ll notice this is where we want to add the username for our actual account. The one where your Twitter fingers go to work.
Once the for loop has all of the tweets that our account favorited, we want to do something with them. In this case, we will retweet them from the bot account we granted API access to.
for tweet in api.favorites(‘your_handle’):
	api.retweet(tweet.id)
And that’s it! We have a working Twitter bot. One thing I noticed after putting this together was that it worked flawlessly on the first go around, but upon running it again, it was error city. It turns out Tweepy will get a little confused if it has already retweeted a tweet.
To create a workaround, I found on StackOverflow that I needed to add the following to my script to raise an exception (basically tell it, proceed no matter what!)
for tweet in api.favorites(‘jman4190’):
	try:
    	api.retweet(tweet.id)
    except tweepy.TweepError as e:
    # add here a more complex error handling
    print(e)
And voila! Now we have a working Twitter bot. Congrats!

import tweepy
api_key = ‘your_api_key’
api_secret = ‘your_api_secret’
access_token = ‘your_access_token’
access_secret = ‘your_access_secret’
auth = tweepy.OAuthHandler(api_key, api_secret)
auth.set_access_token(access_token, access_secret)
api = tweepy.API(auth)
for tweet in api.favorites(‘your_username’):
    try:
        api.retweet(tweet.id)
    except tweepy.TweepError as e:
    # add here a more complex error handling
        print(e)
print('Done retweeting the likes!')
From here, you can run the script from the terminal and you should see constant success. If not, feel free to contact me (although StackOverflow will certainly have better answers than my novice self).
You may be saying to yourself, “this is great, but I favorite tweets all the time. How am I going to run this script constantly to keep up with it?” In the past, I had set up a cron job to run the script on a frequent basis, but realized it would only work if my computer was awake. After consulting with a friend, he recommended that I set up an AWS Lambda Function that runs on a CloudWatch Event.
I must warn you, this is my first time interacting with AWS and I am way out of my league. With that being said, I was able to get it working so feel free to follow my lead. Apologies in advance if I don’t provide any useful color commentary surrounding each step as I’m still not entirely sure what is happening under the hood.
Set up AWS Lambda Function
This part is tricky so I will have to defer to the AWS documentation for most of it, but hopefully you’re enthused that I rounded up all of the information you’ll need to bring the bot to life.
First things first, you’ll need to set up an AWS account. The good news is, we get a free year of compute power! (Assuming you don’t start the next Netflix).
Once you’re all set up, navigate over to the Lambda link under the Compute section.
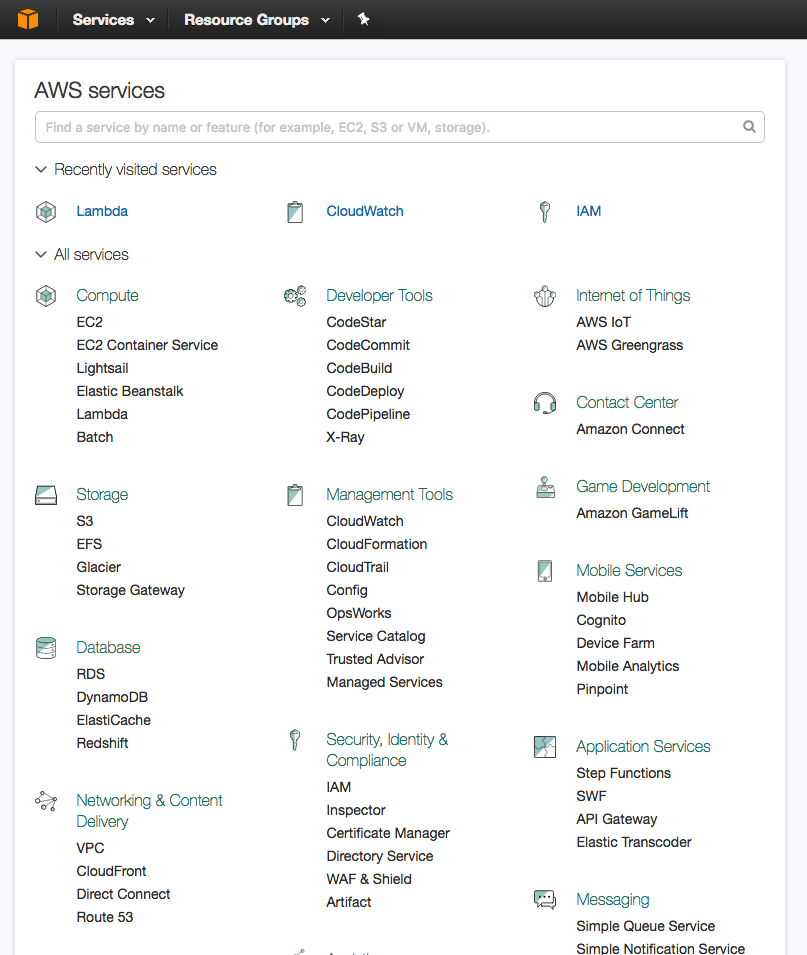
We are going to Create a Lambda function by clicking that big blue button in the top left.
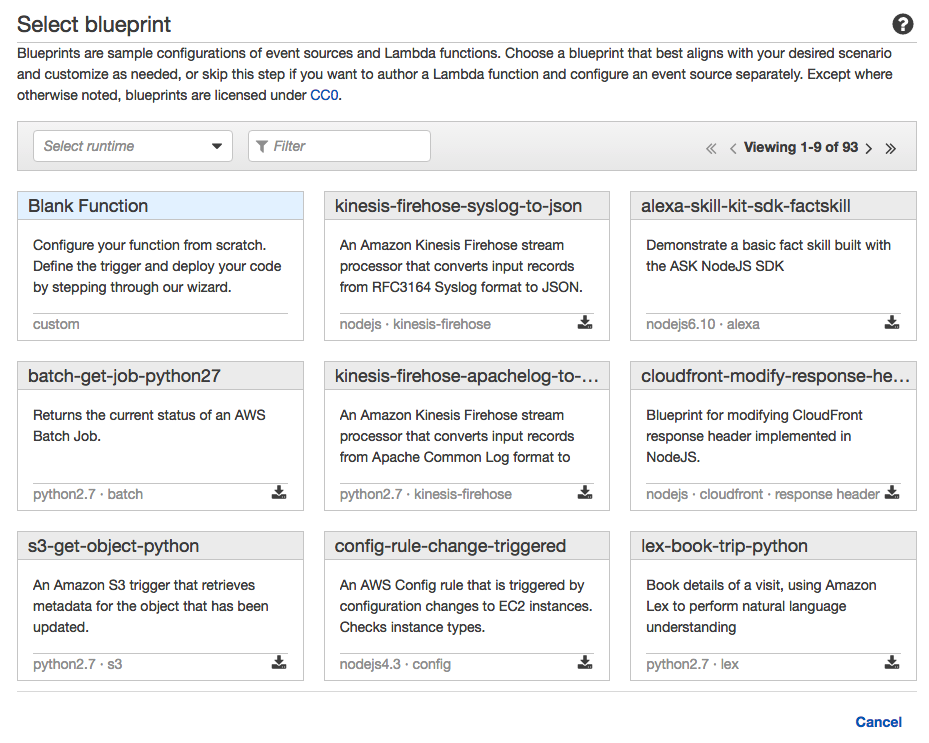
We will use the Blank Function blueprint for our script.
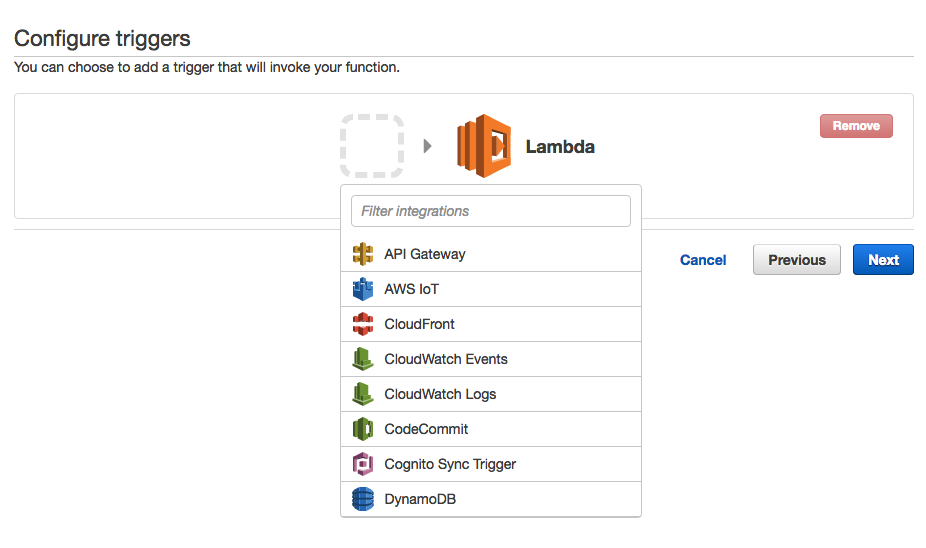
Before we upload the script, let’s create the trigger. Similar to Google Tag Manager, we need to create a trigger event which launches the script. In this instance, click the blank box and choose the CloudWatch Eventsoption.
We are going to create a new rule.
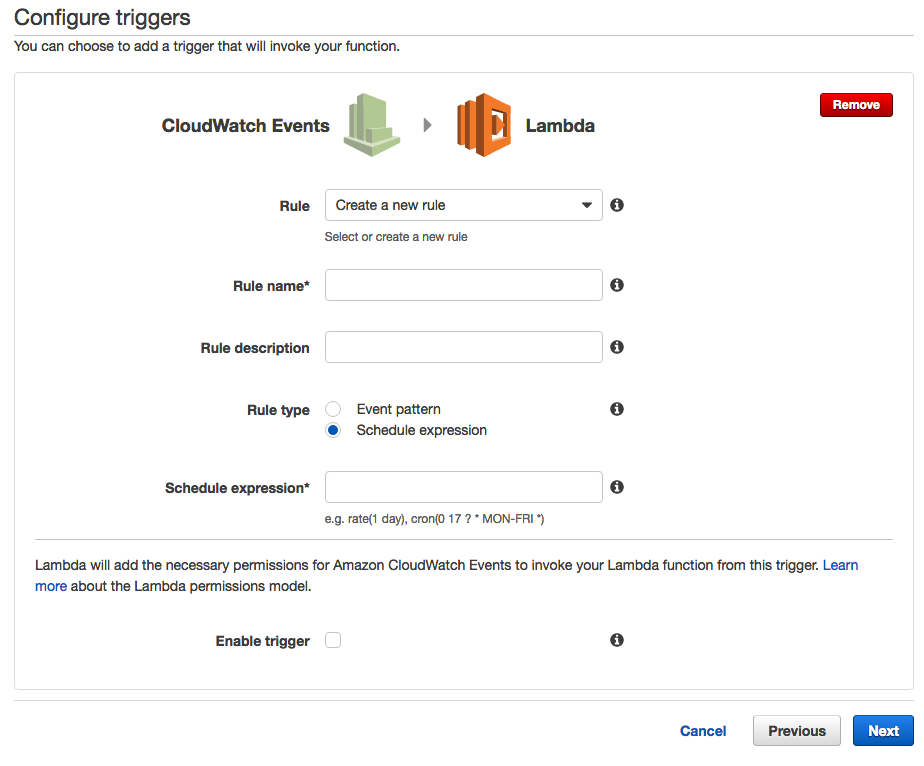
Go ahead and name your rule and provide a distinct description. From creating a ton of custom Facebook Audiences in my day job, I’ve come to appreciate just how helpful a description can be. Also, use the rule name to be as clear as you can (without being obnoxious).
We are going to use the schedule expression rule type, and then in the mandatory Schedule expression* box is where we will write in how often we want our event to fire. Since I am a Twitter addict, I decided to run my script on the hour. To do this, simply follow the example listed below the box and write the following
rate(1 hour)Great, after creating the trigger you will be brought to the Configure function page.
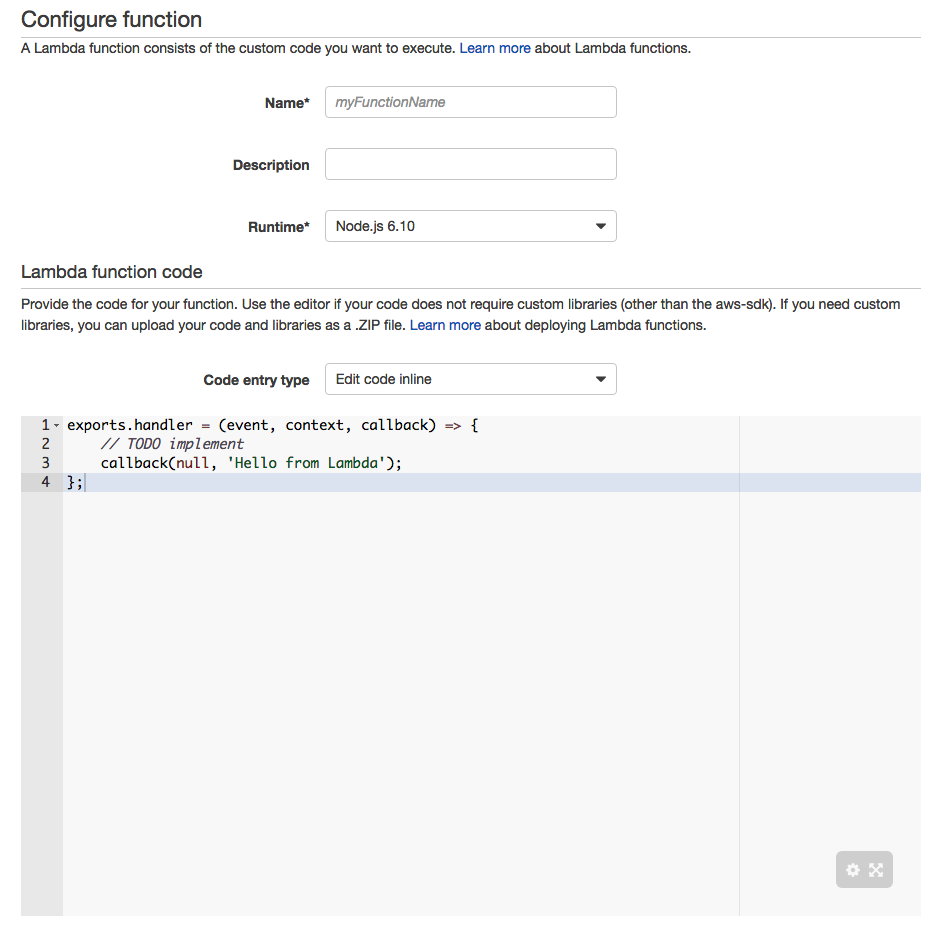
Under the Lambda function code area, go ahead and move to the Code entry type dropdown. Change the option to Upload a .ZIP file

It’s now when we are going to pause and jump out of AWS for a jiffy.
If you are lost, take a deep breath and try and find where you dropped off. If you’re still with me, I apologize if things get dicey here. I needed help from a friend to execute this next part, but it’s pretty straight forward when I look back on it.
This link is going to be your best friend: http://docs.aws.amazon.com/lambda/latest/dg/lambda-python-how-to-create-deployment-package.html
To create our .ZIP file, we need to package up our code with the Tweepy module.
But first, let’s jump back into our original code for a second to add one new line which allows AWS Lambda to access our script.
Simply add this line above the for loop and tab everything beneath it over once.
def lambda_handler(event, context):
	for tweet in api.favorites('jman4190'):
    	try:
        	api.retweet(tweet.id)
        except tweepy.TweepError as e:
        # add here a more complex error handling
        	print(e)
Go ahead and save the updated file.
Ok, now we need to create an isolated Python environment using the Virtualenv tool. Let’s head to the terminal again and create a virtual environment by running the following.
virtualenv path/to/my/virtual-envThen we activate the virtualenv with the following command
source path/to/my/virtual-env/bin/activateNext, we install the Tweepy module in our environment
pip install tweepyNow, to create a deployment package, we follow these steps:
- Copy your python script into your virtualenv folder
- Select ALL the site-packages content along with your python script and compress it with a right click
- Rename your .zip file so it’s easily recognizable
Boom. You are ready to rock and roll.
Head back over to the AWS tab. Next to the Function package* option, go ahead and upload the .zip file we just created.
On to the Lambda function handler and role. Choose an existing role and make that existing role the lambda_basic_execution. If you don’t see it as an option, feel free to type it out.

Now, one last important caveat. For the Handler, make sure you name it the following
your_python_script.lambda_handlerThis is where that magical line we added to the python script comes into play and probably why Amazon is taking over the world. I have no idea what it denotes, but it works.
Cool. From here we are basically done. Go ahead and test your trigger and function to make sure you don’t see an error.
One last watch out is if your code times out on the default 3 seconds, go ahead and click the Advanced Settings under Configuration to add more seconds to the timeout.

And that my friends, is a Twitter bot. Now just sit back and favorite any tweet that catches your attention.

Before anyone treats this post like the gospel, please know that I am an extreme beginner and there is probably a bagillion different and better ways to do this. Please leave any feedback you may have or feel free to pass this along if you found it helpful.
The internet is a wonderful place full of tutorials for how to accomplish anything you can dream up. Sometimes it is just fragmented across disparate web pages.
I am a firm believer in online learning and wanted to use this blog post as a dress rehearsal for an online class. Please let me know if there is anything I can do to make it more effective or easier to follow along. I’d imagine video would be a bonus!
Feel free to follow me or my bot.
Links that I used or inspired me:
Tweepy Get List of Favorites for a Specific User
Getting started - tweepy 3.5.0 documentation
Error handling errors while using api.retweet() Tweepy 3.5/ Python3
New posts delivered to your inbox
Get updates whenever I publish something new. If you're not ready to smash subscribe just yet, give me a test drive on Twitter.