How To Build an AWS Lambda Function to Email Yourself a Daily Quote
March 24, 2022Learn how to connect to Google Sheets and Gmail with python to send yourself a daily email with your favorite quotes
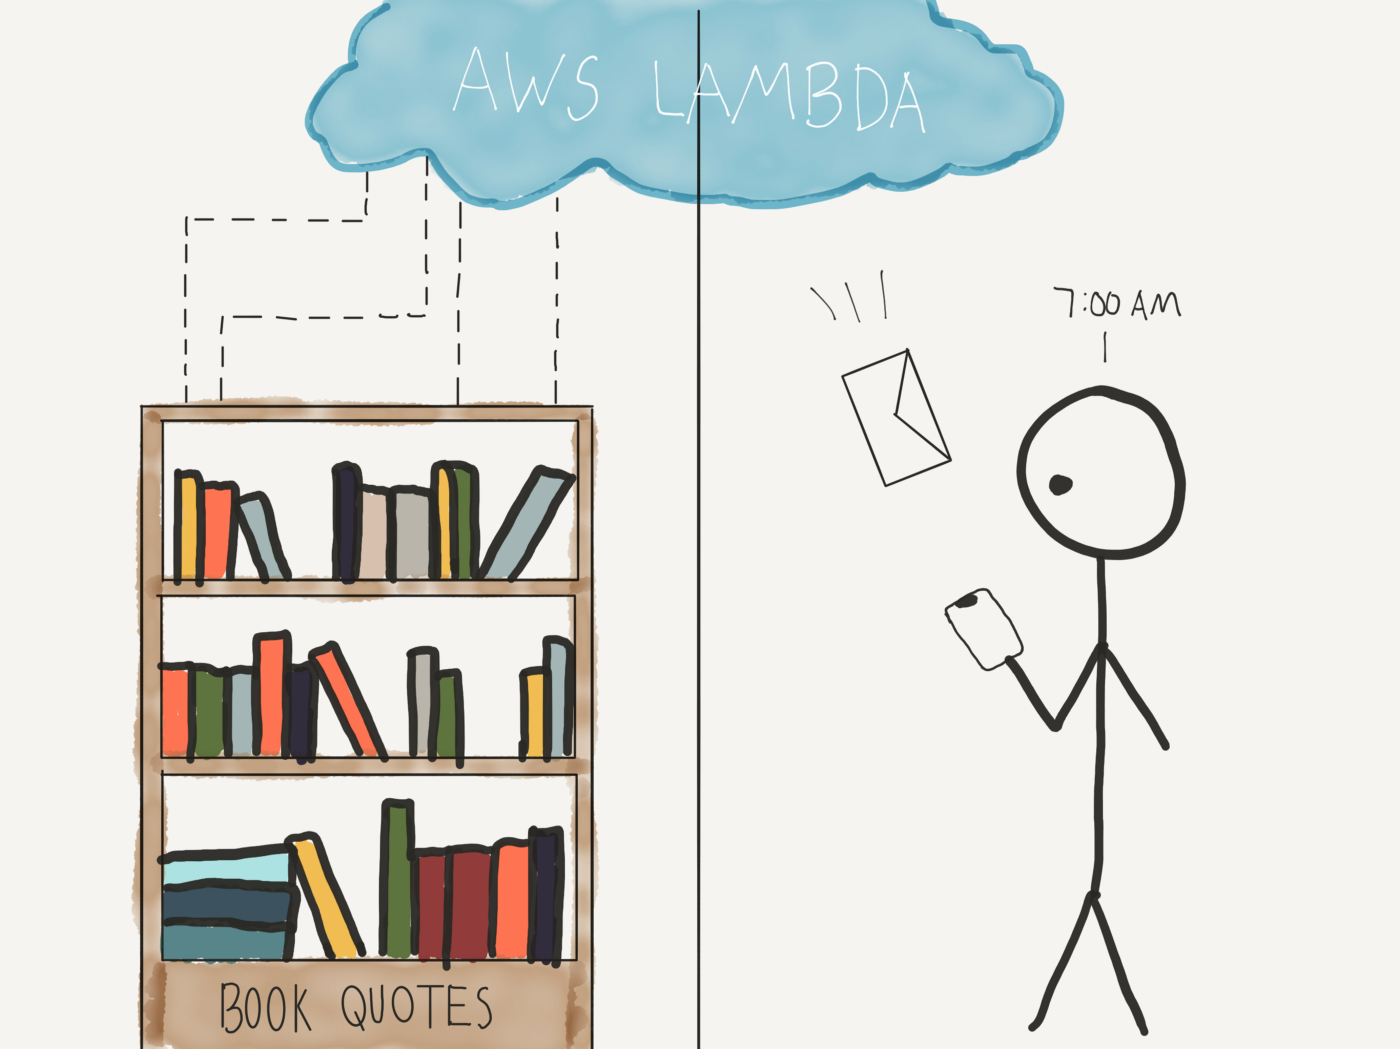
Have you ever found yourself highlighting paragraph after paragraph of a great kindle book? The book is filled with great quotes from cover to cover but you never seem to return to the highlights…This was me for so long until I decided to get my hands dirty and build a little script to send myself a daily email with a random quote. I’ve decided its time to share this with the world! Well, I actually published a version of this a long time ago but no one read that. I’ve also come a long way in my coding journey so lets give it another try!
As always, if you prefer to watch instead of read, you can follow along with the YouTube tutorial.
Requirements
- Python 3.6 or newer
- Google Drive Account
- Google Cloud Platform
- GitHub account
- Visual Studio Code
- Paid AWS account
- Google Sheet full of your favorite quotes
Creating a google sheet with quotes
Before we get to the juicy python part, you need a google sheet full of your favorite quotes! To make it easy you can copy my sheet here.
I am someone who reads 90% of his books on the Kindle app, so it is super easy to highlight my favorite quotes and then revisit them on the web via Your Highlights. From there I use a tool, Bookcision, to download all the quotes to a text file. Sprinkle in some Tiago Forte progressive summarization and voila, I have a google sheet full of quotes.
It’s always fun to see how a younger version of yourself interpreted a quote.
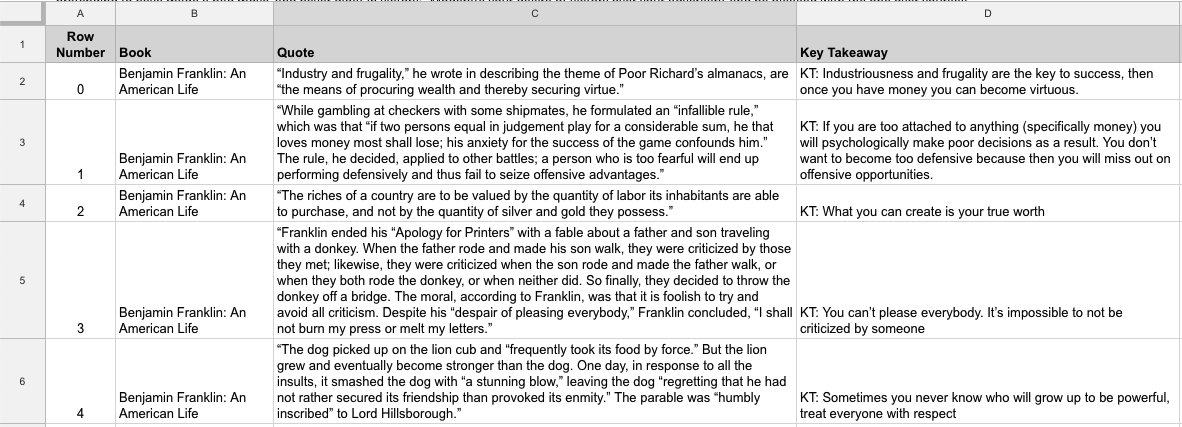
I titled the workbook ‘Daily Quote Email’ and the worksheet ‘Quotes’ — both of which will be referenced in our script.
Getting Started
Creating a new GitHub Repo
Open the GitHub desktop app and in the menu bar at the top you should see the option to create a ‘New Repository’ under file
From there we will give it a name and then use the option to open it in VSCode. Let’s call it “aws-daily-email”. Before you hit Create Repository, make sure to add a python Git Ignore file. This will prevent us from uploading our virtual environment to Github as well as our .env file that contains any and all of our super secret API access tokens.
After you hit Create Repository you will see the option to open the repository in an external editor. If you have Visual Studio Code installed, it should be the default option. Go ahead and click that button.
Great. We are nearly ready to start writing our code!
Using a Virtual Environment
Your future self will thank you for using a virtual environment whenever possible. It helps to keep code contained and make it more replicable since all the dependencies and site packages are in one place. People set up virtual environments numerous ways, but here are the commands I follow:
Create virtual environment
$ python3 -m venv venvActivate virtual environment
$ source venv/bin/activateYou will notice a (venv) in your terminal which indicates you are in your virtual environment.
Downloading and Installing Packages
Within VS Code we are going to launch our Terminal. At the top menu bar you will see Terminal. Go to the dropdown and select New Terminal. A window will pop up within your VS Code Editor.
Let’s make sure we are in one of the latest python interpreters. Go to the command palette and type in python: select interpreter. From there you can choose which local version you want to run.
Downloading a package is very easy with pip. Simply go to your terminal and make sure you are in your virtual environment, then tell pip to download the package you want by typing the following:
$ pip3 install <package>Let’s run through the package we need to install:
$ pip3 install gspread python-dotenvInstead of using the Google Sheets API directly, I used gspread, which is a Python API wrapper for Google sheets. Their documentation is very clear, but I will add some commentary to make it more enjoyable.
We also need to install python-dotenv which is what we will use locally to manage our environment variables. This is so we don’t upload any important private keys to github.
Connecting to Google Sheets
Since this is a daily email we will treat it as a bot which will use a service account. A service account is a special type of Google account intended to represent a non-human who needs to authenticate and be authorized to access data in Google APIs.
Since it is a separate service account, we need to share access to the sheet. To do this we first need to get a client email for our bot service account. Here are the steps we will take.
- Enable API Access for a Project if you haven’t done it yet.
- Go to “APIs & Services > Credentials” and choose “Create credentials > Service account key”.
- Fill out the form
- Click “Create” and “Done”.
- Press “Manage service accounts” above Service Accounts.
- Press on ⋮ near recently created service account and select “Manage keys” and then click on “ADD KEY > Create new key”.
- Select JSON key type and press “Create”.
- Very important! Go to your spreadsheet and share it with a client_email from the step above. Just like you do with any other Google account. If you don’t do this, you’ll get a gspread.exceptions.SpreadsheetNotFound exception when trying to access this spreadsheet from your application or a script.
- Move the downloaded file to the correct path. gc = gspread.service_account(filename=’path/to/the/downloaded/file.json’)
Enable API Access for a Project
Head to Google Developers Console and create a new project.
On the left hand side, find the APIs & Services option. Select it and then click “+ Enable APIs and Services”.
We want to search for and enable both “Google Drive API” and “Google Sheets API”.
Create Credentials
Back under the APIs & Services we will see a Credentials option. Choose “Create credentials > Service account key”.
We need to fill out the form with the appropriate information and then hit create and continue.
Create New Key
Next you need to select “Manage service accounts” above the recently created service account from the previous step.
Click on the … and then go to manage keys.
From here you can Add Key and create a new key.
Be sure to select JSON as the key type and then click create.
After hitting create you will automatically download a JSON file with credentials.
It may look like this:
{
“type”: “service_account”,
“project_id”: “api-project-XXX”,
“private_key_id”: “2cd … ba4”,
“private_key”: “ — — -BEGIN PRIVATE KEY — — -\nNrDyLw … jINQh/9\n — — -END PRIVATE KEY — — -\n”,
“client_email”: “473000000000-yoursisdifferent@developer.gserviceaccount.com”,
“client_id”: “473 … hd.apps.googleusercontent.com”,
…}
Sharing Sheet with Service Account Email
Very important! Go to your spreadsheet and share it with a “client_email” from the step above. Just like you do with any other Google account. If you don’t do this, you’ll get a gspread.exceptions.SpreadsheetNotFound exception when trying to access this spreadsheet from your application or a script.
Adding json file to GitHub
Our daily email bot will need to reference this JSON file so we need to add it to our repo folder. In the .gitignore file we want to add .json so we don’t upload our json file to GitHub.You can add the following line to your .gitignore file and then drag and drop your secret key into the Github Repo folder.
Great. Now when we want to authenticate we will specify the path to the service_account.json in service_account():
gc = gspread.service_account(filename=’path/to/the/downloaded/aws-daily-email-9252a74d8923.json’)Getting Info From the Google Sheet
That was a lot of upfront work but we are finally ready to write some code. Alas, we have arrived at the meat and bones of the project. Thank you for your patience up until now. If you have skipped ahead and are just joining me now, welcome.
At a high level, this part of the python script will:
- Connect to our google sheet full of quotes
- Select a random row
- Read in columns from the row (i.e. the quotes)
Let’s dive into the Google Sheet portion of this.
Import Necessary Modules
First thing we want to do in VS Code is create a new python file for our daily email. Let’s call it daily_email.py.
At the top of that file we need to import the modules we will need. That means gspread to connect to google sheets, and then a handful of other default modules that will help us. Aside from gspread, we will need smtplib to send the email and randomint to generate a random number. If these aren’t in your standard python library, then you can install them in the virtual environment with pip.
import gspread
from random import randint
from httplib2 import Http
import smtplib
Authorize gspread to access our google sheet
We’ll need to connect to google sheets and authorize the credentials with the service_account() function from gspread. Since we are storing the credentials in our github folder, we need to specify the path to the json file:
gc = gspread.service_account(filename=’aws-daily-email-9252a74d8923.json’)Our file is in the same tree level as our newly created python file so we don’t need to add any folder structure.
Select a Spreadsheet
Next we will open the worksheet with gc.open_by_key() and then call the sheet by key id. We get the key from the URL in between the /d and before the /edit. We will save it into a wks variable which we can reference.
wks = gc.open_by_key(“1HVhCY50QerrshEmFWsGN3_XyiCP6Fb86oijoDO81psk”)You can also open by the name of the Google Sheet using gc.open() or by the URL using gc.open_by_url()
Select a Worksheet
Once we have the spreadsheet, we need one of the worksheets aka tabs. Gspread provides numerous ways to do this, either by index or title. Let’s go with index in this case since we will always have it in the first position which is index 0.
sheet = wks.get_worksheet(0)We are referencing the worksheet using the wks variable and saving it to a new sheet variable.
Generate a Random Number
We’ll use one column to get the length of the sheet. If you have a sheet with 15 rows filled out then it will be 16 (15 plus the column name). If you have 250 rows filled out then the length will be 251.
Let’s save it into a variable ‘x’ so we can use it as the upper bound for our random row generator. This means on any given day we will access a random row that is filled out, but never a blank row.
x = len(sheet.col_values(1))
randomRow = randint(0,x)
Get cell values
After we’ve selected a random row, we will read the cell values for the columns of our choosing. We will save these into their own variables so we can call them in the email function we build. We will reference the random row and then pass in column 1 since it starts at 1 and the quote is in the second column which would be position 2.
quote = sheet.cell(randomRow, 2).valueLet’s print this to make sure everything is working as expected up to this point.
print(quote)Awesome. We get one of the random quotes!
Sending Values via Email
The final portion of our script will need to do the following:
- Open a SMTP connection
- Authenticate with gmail
- Send outbound email to self address with column values
Open SMTP connection
Next comes the outbound email to yourself. I recommend using SMTP and gmail to handle this. Create an insecure connection and then upgrade to TLS. This is done using the .starttls() method.
smtpObj = smtplib.SMTP(‘smtp.gmail.com’, 587)
smtpObj.ehlo()
smtpObj.starttls()
Authenticate with gmail
You just need your email and password. However, if you have 2-step verification enabled (hopefully you do), then you may need an app specific password. If that’s the case, you can learn more here.
If successful in following these steps, you should be provided a new 16 character app password that we will use in the gmail_password variable below.
We will use our .env file to import our gmail and password. This means we need to export our username and password in that file.
export GMAIL_USERNAME = “YOUREMAIL@GMAIL.COM”
export GMAIL_PASSWORD = “YOURPASSWORD”
In our script, we can import in dotenv and reference the two variables.
gmail_username = os.getenv(‘GMAIL_USERNAME’)
gmail_password = os.getenv(‘GMAIL_PASSWORD’)
Then we login using the info provided.
smtpObj.login(gmail_username, gmail_password)Create & Send the email
Once authenticated, we insert our variables from above into the body.
sent_from = ‘mannelly.john@gmail.com’
to = [‘mannelly.john@gmail.com’]
body = ‘Subject: Daily Quote\n\n %s’ % (quote)
Final step is to call the .sendmail() method with the fields we filled out above. At the end I recommend ending the connection.
sendmailStatus = smtpObj.sendmail(sent_from, to, body.encode(‘utf-8’))
if sendmailStatus != {}:
	print(‘There was an error sending daily email’)smtpObj.quit()
Let’s do a test run and check if we received it! Our final script should look like this:
import gspread
from random import randint
#from httplib2 import Http
import smtplib
import os

from dotenv import load_dotenv
load_dotenv()

# gc = gspread.service_account(filename=’path/to/the/downloaded/file.json’)
gc = gspread.service_account(filename=’aws-daily-email-9252a74d8923.json’)
wks = gc.open_by_key(“1HVhCY50QerrshEmFWsGN3_XyiCP6Fb86oijoDO81psk”)
sheet = wks.get_worksheet(0)
x = len(sheet.col_values(1))
randomRow = randint(0,x)
quote = sheet.cell(randomRow, 2).value
#print(quote)

smtpObj = smtplib.SMTP(‘smtp.gmail.com’, 587)
smtpObj.ehlo()
smtpObj.starttls()

gmail_username = os.getenv(‘GMAIL_USERNAME’)
gmail_password = os.getenv(‘GMAIL_PASSWORD’)
smtpObj.login(gmail_username, gmail_password)

sent_from = ‘mannelly.john@gmail.com’
to = [‘mannelly.john@gmail.com’]
body = ‘Subject: Daily Quote\n\n %s’ % (quote)
sendmailStatus = smtpObj.sendmail(sent_from, to, body.encode(‘utf-8’))

if sendmailStatus != {}:
	print(‘There was an error sending daily email’)
smtpObj.quit()
Making it a Daily Lambda Function on AWS
Great job so far! Now that we have the script working locally on our machine, we are going to turn it into an AWS Lambda Function so we can run it daily from the cloud.
Create Function
Sign in to AWS and head to the Lambda Management Console. You may be overwhelmed by the sheer number of AWS services but we are going to zero in on Lambda.
Choose Create Function.
Then select the Author From Scratch option.
From here we need to fill out some basic information. That includes giving our function a name that is somewhat descriptive and choosing the latest Python runtime, which will be 3.9 in this case. Under permissions we are going to use the default which will create a new role with basic Lambda permissions.
No need to play around with the advanced settings. From here we can click Create function. After that we should see a green success metric and be taken to a screen that looks like the following:
Configure Trigger
The first step we want to do for our function is configure the function to add a trigger from a predefined list. In the dropdown you should see EventBridge which was formerly called CloudWatch Events.
After selecting EventBridge we will create a new rule and call it daily_email_trigger. Make sure to add a brief description and then choose the Schedule expression Rule Type so we can create a cron job to run each morning at the same time.
Function Code
Next, we are going to upload our function code that we worked on previously. But, before we do that, let’s go back to our script and add more more line of code to make it so AWS can handle everything on its end.
We need to select our code and turn it into an AWS Lambda function by adding this line:
def lambda_handler(event, context):We add it to the top and then tab over all our code underneath it so it’s part of the function.
We are doing this because we plan to upload a zip file rather than writing the code directly into the AWS console.
Uploading a Zip File using a virtual environment
This part is a little tricky, but I have found a version that works for me. Please note there could be a better way to do this, so feel free to leave recommendations in the comments.
You can find AWS instructions here. I followed these pretty closely. We have to upload a deployment package with dependencies since we added in non-standard packages and modules such as gspread. We also will do it using a virtual environment.
As a reminder, our current directory structure looks like this
aws-daily-email$
| daily_email.py
| aws-daily-email-9252a74d8923.json
| venv
All of our dependencies are in the site-packages folder within the venv folder. So within our activated virtual environment, let’s deactivate with the following command:
(venv) ~/my-function$ deactivateThen we will recreate a deployment package with the installed libraries at the root. Note the python3.9 needs to match your runtime.
$cd venv/lib/python3.9/site-packages
zip -r ../../../../my-deployment-package.zip .
You should now see a new zip file to the root of our aws-daily-email directory. Great!
Lastly, we need to add our daily_email.py function and json to the root of our deployment package.
$ cd ../../../../
$ zip -g my-deployment-package.zip daily_email.py aws-daily-email-9252a74d8923.json
Success! Everything is now in our zip file and ready to upload to AWS Lambda.
Before we go any further, stop what you are doing and add .zip to your gitignore file.
Let’s upload the zipped deployment package file and save it.
One last thing we need to update in the Lambda console is the Handler info in our runtime settings.
Since we didn’t call our file lambda_function.py but instead daily_email.py we need to have that reflected in this handler info. Let’s go ahead and update accordingly.
What is the Handler? AWS help describes it as:
The filename.handler-method value in your function. For example, “main.handler” calls the handler method defined in main.py.
Adding Environment Variables
If you look at our code you will see we used dotenv to access two environment variables for gmail.
gmail_username = os.getenv(“GMAIL_USERNAME”)
gmail_password = os.getenv(“GMAIL_PASSWORD”)
I am not aware if Lambda can handle dotenv so let’s add these as environment variables within the configuration tab of the console.
We will add our gmail username and password here.
Time to test it out!
If you get the opposite version that is red, I’d recommend revisiting the steps above. If you still can’t figure it out, leave me a note and I will try to answer any specific questions.
Enjoy your daily email!
And there you have it. One of your favorite quotes, emailed right to your inbox daily. The best part is you start your day with a new dot to connect. Sometimes the quote will feel timely and relevant to your day ahead, other times it will seem completely random. Either way, it’s a fun daily activity that really gets you reading and highlighting more so you can contribute to your google sheet.
Enjoy the gift that keeps on giving!
Cheers,
Jabe
New posts delivered to your inbox
Get updates whenever I publish something new. If you're not ready to smash subscribe just yet, give me a test drive on Twitter.