How To Build a GPT-3 Web App with Python
June 7, 2021We are going to create a Codenames Web App to help Spymasters give clues with the help of OpenAI’s GPT3. This is not man VS machine but rather man AND machine.
This is the in depth written tutorial but if you want to watch me go through these steps you can find my video tutorial here:
What is Codenames?
Codenames is a fun game to play at couples gamenight. The premise of the game is pretty straightforward.
“Two teams compete by each having a “spymaster” give one-word clues that can point to multiple words on the board. The other players on the team attempt to guess their team’s words while avoiding the words of the other team.”
You can play online as well, which may make it easier to fire up this helpful web app.
This tutorial is meant to help the spymasters give clues. Often times you may find yourself in a pickle where you need to connect three or four seemingly random words. We will build it so you just type those words into a webpage and GPT3 uses its massive internet noggin to help generate a one-word clue to get you out of the jam.
Requirements
- OpenAI API Key (beta invite)
- >= Python 3
- yarn (install via npm)
- Github account
Getting Started
We will piggy back off of this wonderful GPT3 Sandbox github repo from shreyashankar. She has a README.md file with very solid documentation. I will merely build on top of it while making some slight modifications.
Clone github repo
In your projects folder, or wherever you give birth to your side projects, you’ll want to clone or fork the repository. You can run the following command in your terminal:
$ git clone https://github.com/shreyashankar/gpt3-sandbox.gitCreating a Virtual Environment
I highly recommend using a Virtual Environment for this project. A virtual environment is a copy of the Python interpreter into which you can install packages privately, without affecting the global Python interpreter installed in your system. Your future self will thank you for using a virtual environment whenever possible. It helps to keep code contained and make it more replicable since all the dependencies and site packages are in one place.
People set up virtual environments numerous ways, but here are the commands I follow.
We are going to call our virtual environment ‘venv’. The `-m venv` option runs the venv package from the standard library as a standalone script, passing the desired name as an argument.
Again, you’ll see around the internet that most people use ‘venv’ as the virtual environment folder name but feel free to name it whatever. Make sure your current directory is set to gpt3-sandbox and run this command.
$ python -m venv venvAfter the command completes, you’ll have a subdirectory with the name venv inside gpt3-sandbox.
Now we need to activate the virtual environment. To do so, run the following command:
$ source venv/bin/activateGreat. Now we are all set up. Make sure you always activate your virtual environment before making any changes to our code, or else you will run into some errors.
Again, the beauty of the virtual environment is that we can install all packages and dependencies in one place, making it easy to share and update. We will use the pip command to get the packages we want.
Downloading a package is very easy with pip. Simply go to your terminal and make sure you are in your virtual environment, then tell pip to download the package you want by typing the following:
pip install <package>Let’s run through all the packages we need to install:
(venv) $ pip install openai
(venv) $ pip install python-dotenv
Wait, that’s it?!
Not quite.
Since we are using a cloned github repo, there is a requirements file (nested within the api folder) that has everything else we need. To get our virtual environment up to speed we can run the following:
pip install -r api/requirements.txtAwesome.
Installing Yarn
The next thing we need is Yarn which is a package manager for JavaScript. You can think of it as the pip equivalent for python. We need this since our front end is going to use React.
It is recommended to install Yarn through the npm package manager, which comes bundled with Node.js when you install it on your system.
npm install yarnIf you run into any troubles with this command, using Homebrew is usually a surefire way to get out of environment trouble. You can install Yarn through the Homebrew package manager. This will also install Node.js if it is not already installed.
brew install yarnAfter you installed yarn you will run `yarn install` in the root directory. You just need to do this once and you will be all set.
Generating the OpenAI API Key
In order to access GPT3 and all of it’s awesomeness, you need an API key from OpenAI. I magically obtained one after pitching Learn With Jabe via a Tweet at Greg Brockman (@gdb) who was kind enough to hand out beta invites after the launch. You can now apply on their site although I am unsure how long it takes to get accepted.
Funny story. In one of my recent GPT3 videos I published my API key and a week later saw an unexpected bill from OpenAI where I had somehow made thousands of API calls…Lesson learned!
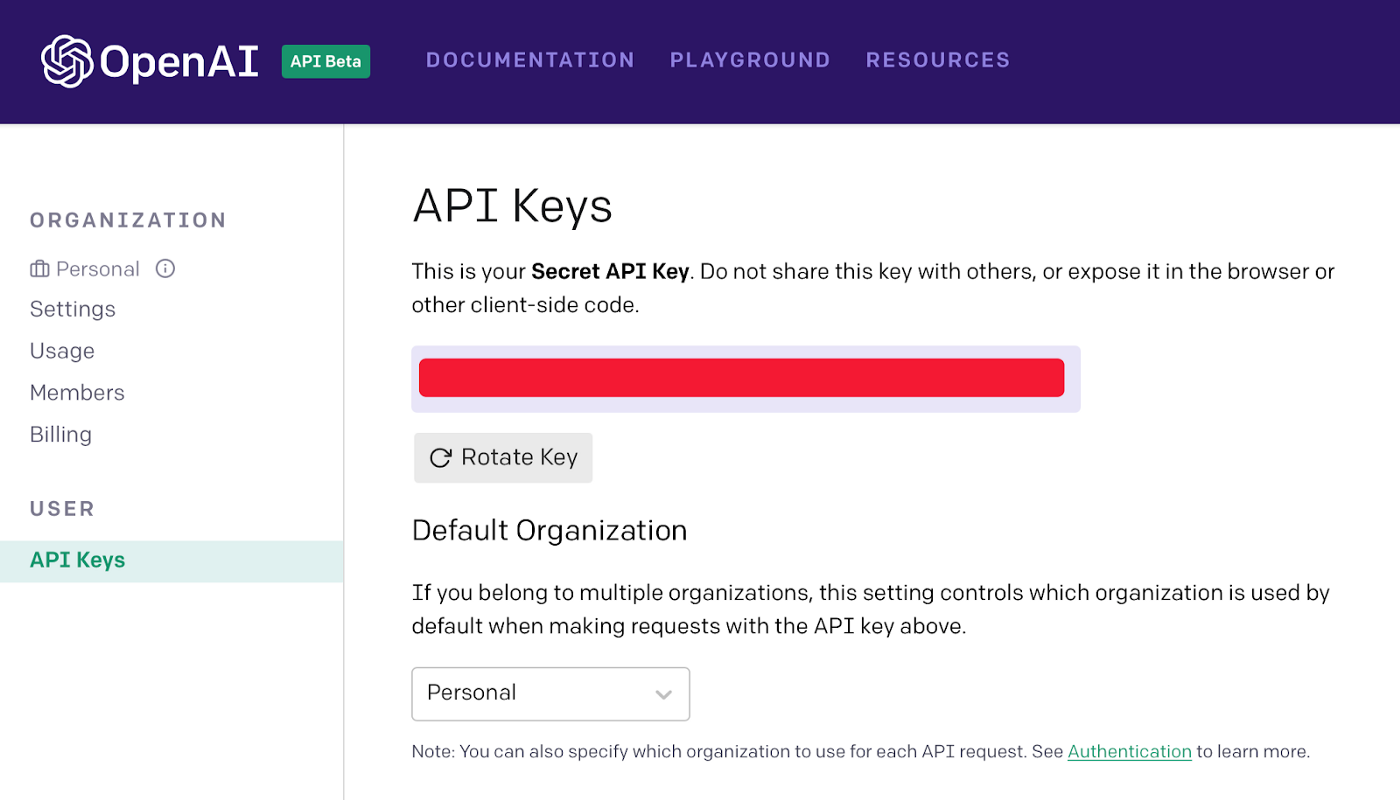
Fast forward to when you’ve been accepted and you will want to copy your secret API key within your Account Settings.
Our Codenames web app will need to reference this API key so we need to add it to a new .env file.
Adding our Secret Key to .env
In the github README file we are instructed to use a config file. This can definitely work but I usually rely on a .env file to store any secret API keys.
The reason we are hiding it behind an .env file is because it’s a secret key and we don’t want anyone stealing it and using it for evil which we will have to pay for. By putting it in an .env file (short form environment) we can import it as a variable. Note that the .env file is only step one and step two is including it in our gitignore file we will create when uploading to GitHub.
In our project folder we can create a new .env file (note the leading dot). From there we will add this line of code, but replace your-super-secret-api-key with your actual API key.
export OPENAI_KEY=your-super-secret-api-keyWhen we eventually upload our files to GitHub we will use a gitignore to not upload our .env file. I will say it one more time, MAKE SURE YOU DO NOT EXPOSE YOUR SECRET API KEY TO THE PUBLIC.
Creating a new GitHub Repo
Speaking of GitHub, let’s create a new repo for our web app.
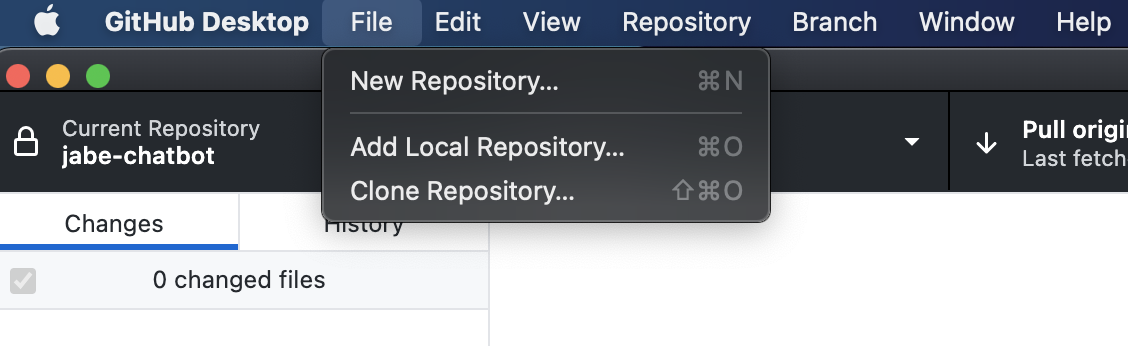
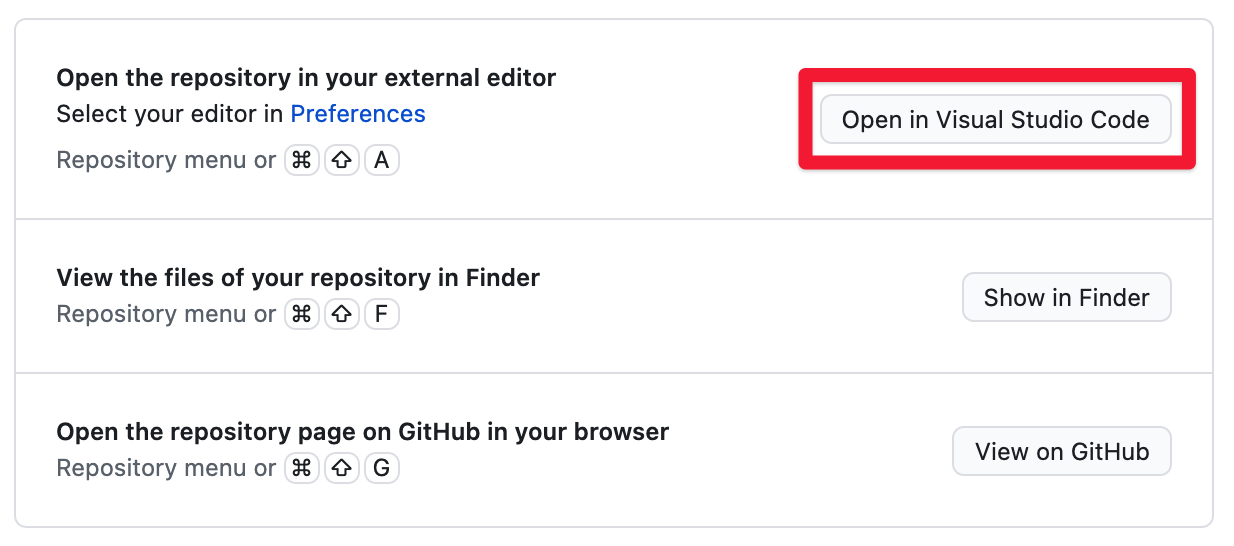
Open the GitHub desktop app and in the menu bar at the top you should see the option to create a ‘New Repository’ under file
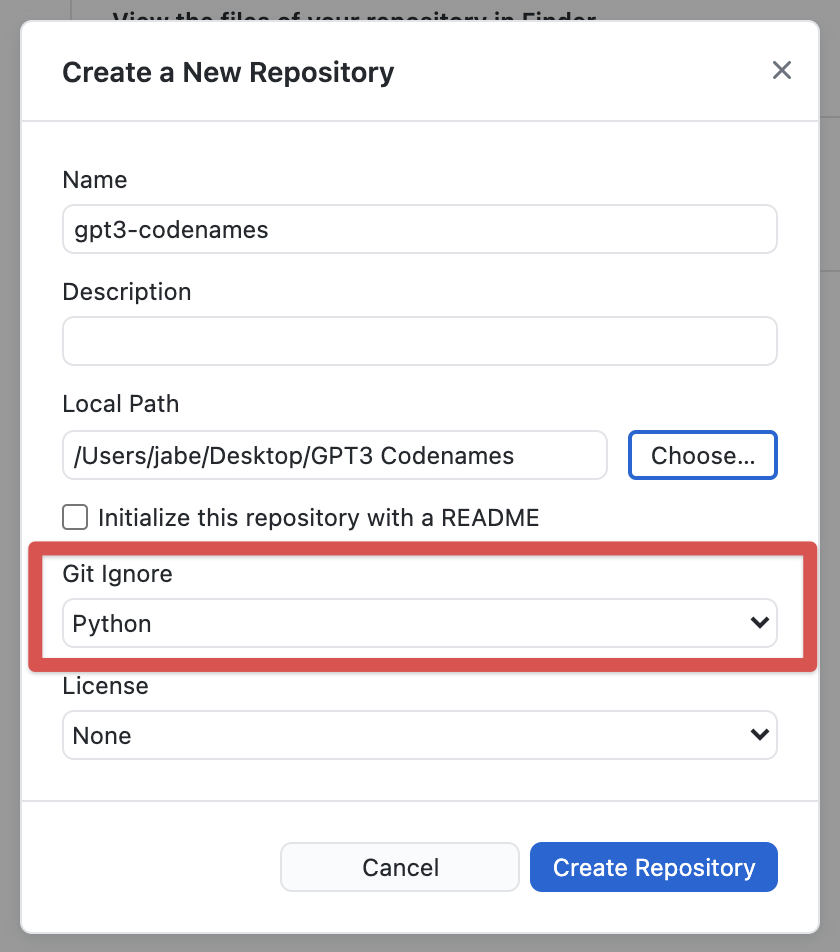
From there we will give it a name and then use the option to open it in VSCode. Let’s call it gpt3-codenames. Before you hit create repository, make sure to add a python gitignore file. This will prevent us from uploading our virtual environment to Github as well as our .env file that contains our super secret API access tokens.
After you launch the Desktop app you will see the option to open the repository in an external editor. If you have Visual Studio Code installed, it should be the default option. Go ahead and click that button.
Great. We are nearly ready to start writing our code!
Intro to GPT3
I am not going to spend a lot of time going over exactly what GPT3 is or how it works. Partially because I still don’t understand it and mostly because there is a ton of literature out there if you want to learn more. I will pull some excerpts from the OG Twilio blog post to help paint the picture.
“GPT-3 (Generative Pre-trained Transformer 3) is a highly advanced language model trained on a very large corpus of text. In spite of its internal complexity, it is surprisingly simple to operate: you feed it some text, and the model generates some more, following a similar style and structure.”
“GPT-3 is non-deterministic, in the sense that given the same input, multiple runs of the engine will return different responses.”
**For more information I recommend reading the following: The Ultimate Guide to OpenAI’s GPT-3 Language Model**
Practicing On The Playground
The OpenAI playground allows us to explore GPT3 and all its intricacies. The general idea behind everything is that you “train” (aka prime) the GPT3 engine by giving examples for it to learn from. With just an example or two, GPT3 will fill in the blanks and basically mimic what you have taught it.
The main text area is where we provide the text example inputs. The right sidebar is where we modify variables to change the desired text output.
Pretty neat right!? So let’s take a moment to look at what’s happening on the right sidebar which will be driving the responses we get in the Playground. I’ll again reference highlights from Twilios Ultimate Guide (linked again conveniently right here) with a touch of my own wording to help you digest it.
Engine: OpenAI has four engines to choose from. This is definitely the black box part of GPT3. I have read that Davinci is the most “advanced and capable” so we will stick with it per recommendations across the interwebs.
Response Length: Controls how much text is generated. Think character count here for all you Microsoft Word or Google Doc users. If we set it at 150 that means that GPT-3 will add 150 tokens to the text. A token is defined as a word or a punctuation mark.
Temperature: This setting controls the randomness of the generated text. The higher the temperature the crazier what gets spit out. A value of 0 makes the engine deterministic, which means that it will always generate the same output for a given input. A value of 1 makes the engine take the most risks aka makes it the most creative.
Top P: This parameter also has some control over the randomness and creativity of the text generated by GPT3. For some reason it is used less than the Temperature. The OpenAI documentation recommends that only one of Temperature and Top P are used, so when using one of them, make sure that the other is set to 1.
Frequency penalty: Frequency penalty works by lowering the chances of a word being selected again the more times that word has already been used.
Presence Penalty: Presence penalty does not consider how frequently a word has been used, but just if the word exists in the text. This helps to make it less repetitive and seem more natural.
Per the Twilio Ultimate Guide, “the difference between these two options is subtle, but you can think of Frequency Penalty as a way to prevent word repetitions, and Presence Penalty as a way to prevent topic repetitions.”
Best Of: can be used to have GPT-3 generate multiple responses to a query. The Playground then selects the best one and displays it. Recommend going with defaults here.
Stop Sequence: helps to prevent GPT3 from cutting off mid-sentence if it runs up against the max length permitted by the response length parameter. The stop sequence basically forces GPT3 to stop at a certain point. The returned text will not contain the stop sequence.
Start Text: Text to automatically append after the user’s input. This will happen before sending a request to GPT3 which will come in handy when we are building our bot.
Restart Text: Text to append after the models generation to continue the patterned structure. In other words, the restart text helps so you don’t need to type the prefix.
As always, the best way to truly learn what each of these things do is to experiment with them. Change the values and see what happens to your text output in the Playground.
Customizing Our Codenames Tool
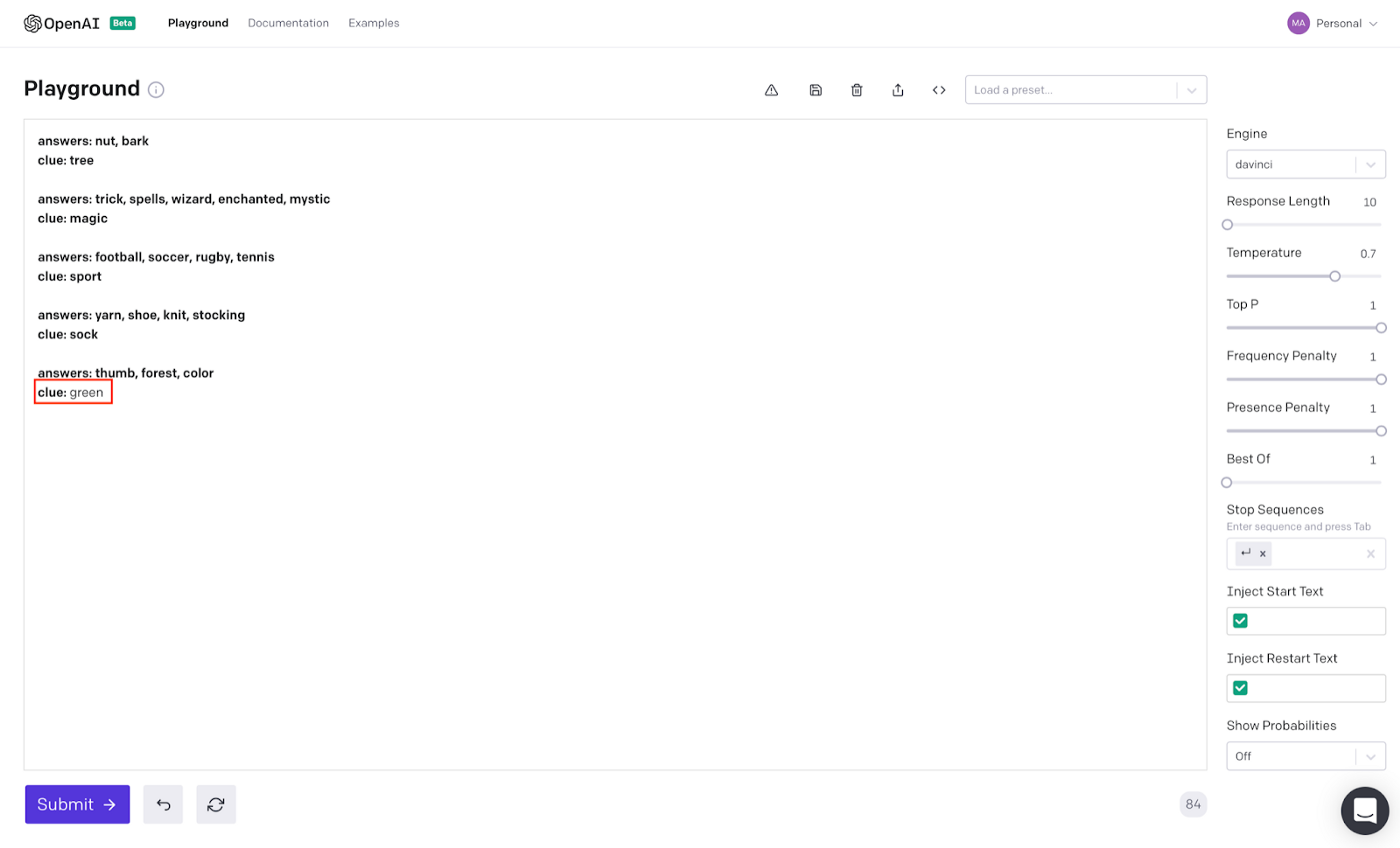
For our Web App, we are going to provide a slew of examples for GPT3 to pick up on. Remember that GPT3 is trained on a “corpus” of information which basically means all of the recorded internet. That means we only need a few examples to give our tool life.
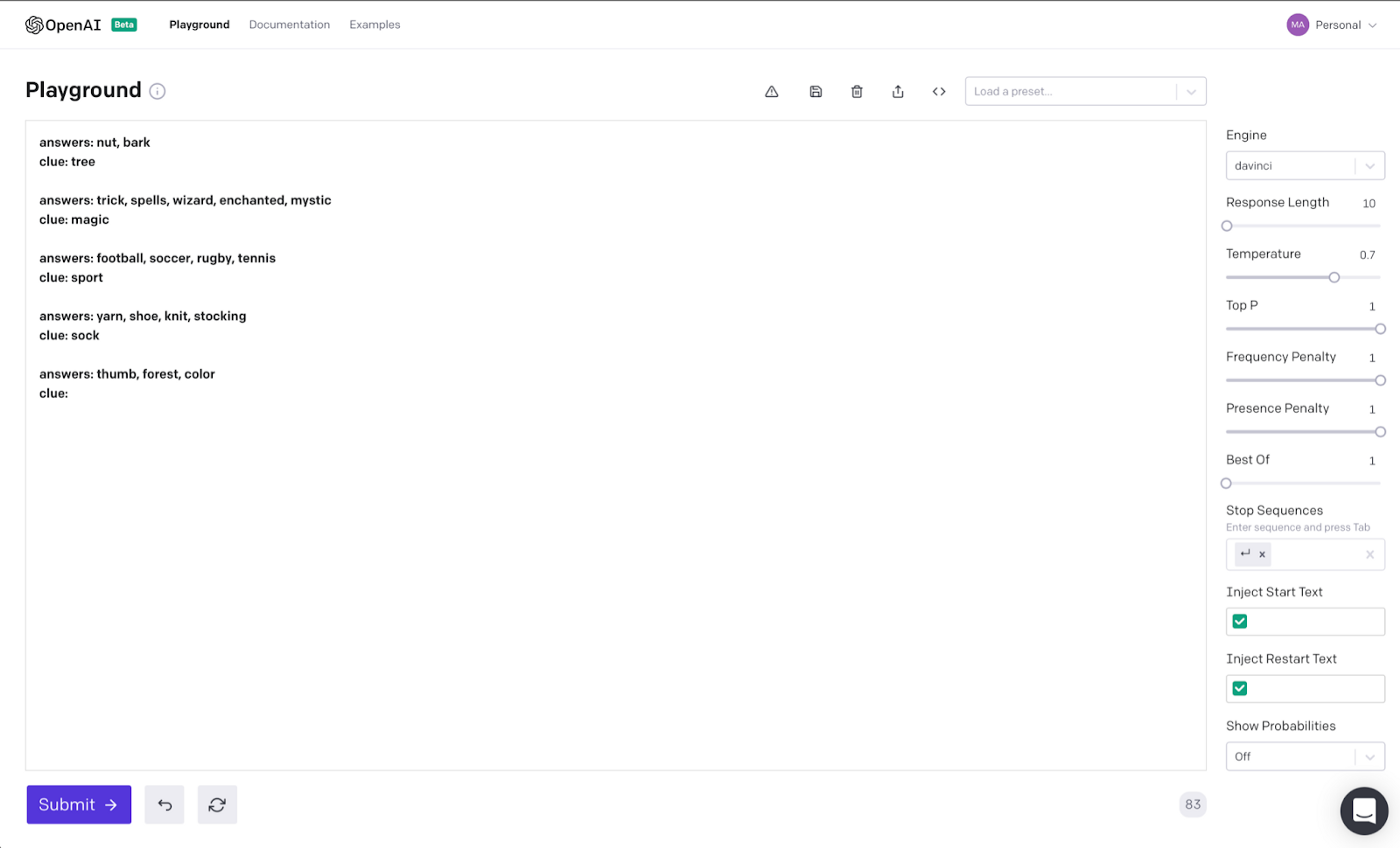
What we’re really doing here is helping to prompt GPT3 with certain prefixes. The keyword being “prompt.”
Notice how for each example we start with answers: for the input and clue: for the output. The GPT3 engine can understand this pattern and pick up on it quickly.
If we hit Submit, we will see our Spymaster clue!
Creating our Codenames Web App
This is the meat of the post. Enjoy!
Modifying our Demo Web App
If we look in the api folder we have everything we are going to need to build our web app. We can use mostly everything out of the box.
The one thing we are going to change is referencing our OpenAI API key in the .env file. Again, we will use dotenv which we installed earlier with pip. Let’s add the following to the top of the demo_web_app.py file:
# load dotenv to reference .env
from dotenv import load_dotenv
import os
load_dotenv()
We are importing the package and loading the dotenv function. Next, we will update the KEY_NAME to call out .env file
KEY_NAME = os.getenv(‘OPENAI_KEY’)In our .env file we exported the OPENAI_KEY and this is how we reference it.
The last change we want to make is in the demo_web_app() function itself. We can remove the config calls and replace it since we are calling the key name variable directly:
set_openai_key(KEY_NAME)Priming GPT3
Great. Now we are ready to write the code for our Codenames spymaster clue app. Let’s create a new file in the root directory of our virtual environment. We can call it codenames_app.py
If we look in the examples folder we will see code for various GPT3 examples. I think the general knowledge q and a app is the most similar to what we are trying to do. But for tutorial purposes, lets run the blank example to see what we are dealing with.
GPT Object
The first thing we need to do is initialize our GPT class. Over in our OpenAI playground we have the option to export code. If we do this, we will see the following config to access the OpenAI API.
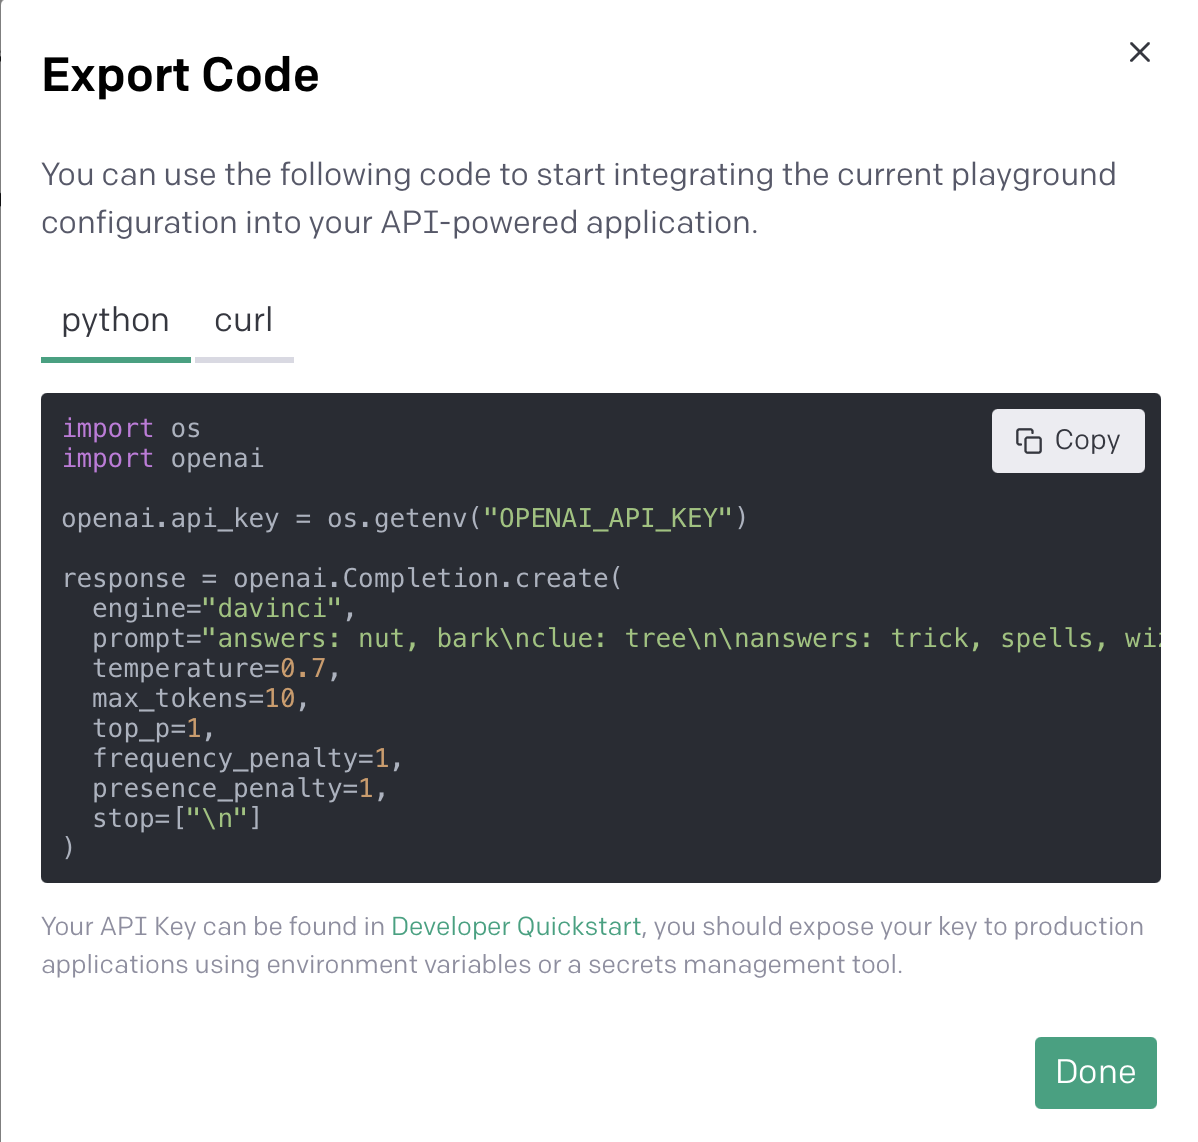
If we go into the gpt.py file we will see a similar API call with most of the parameters being referenced within the submit_request() function.
def submit_request(self, prompt):
    “””Calls the OpenAI API with the specified parameters.”””
    response = openai.Completion.create(engine=self.get_engine(),
    prompt=self.craft_query(prompt),
    max_tokens=self.get_max_tokens(),
    temperature=self.get_temperature(),
    top_p=1,
    n=1,
    stream=False,
    stop=self.stop)
    return response
This function is being called upon clicking the button in our web app.
In our codenames_app.py file we have the option of setting a few of the query parameters such as engine and temperature. If we don’t add in the parameters it goes to the default in the gpt.py file.
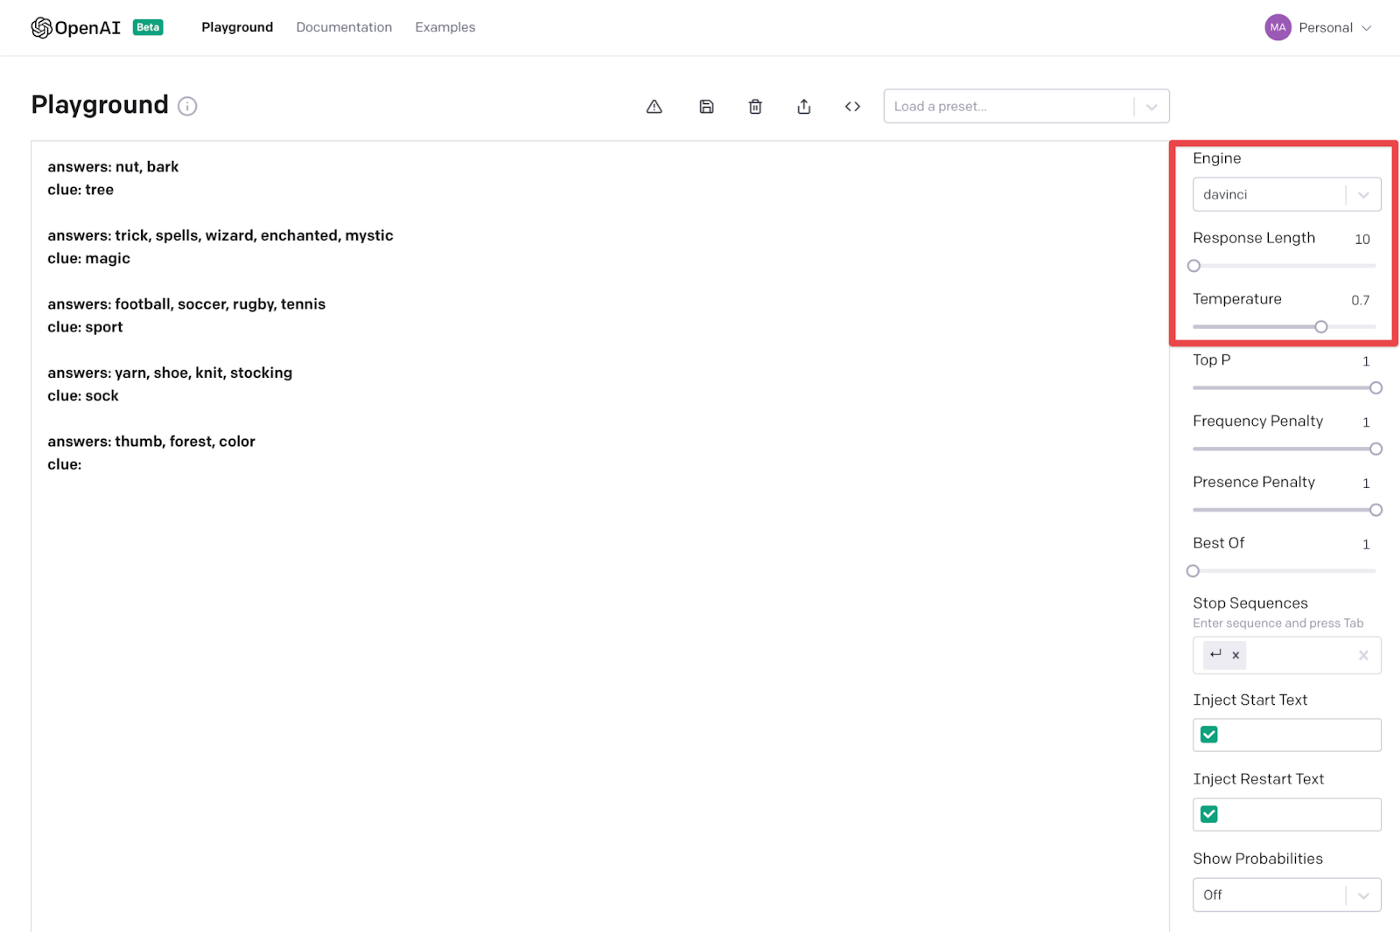
Within our playground we liked ‘davinci’ as the engine, 10 as the response length and 0.7 as the temperature. Lets add these into our file.
# Construct GPT object and show some examples
gpt = GPT(engine=”davinci”,
	temperature=0.7,
    max_tokens=10)
Adding Examples
Remember in our playground we primed our GPT3 with the various examples?
To prime it in code, we can call the add_example() on your gpt object. Here we need to feed it an instance of the Example class which can be found within the gpt.py file.
class Example:
     “””Stores an input, output pair and formats it to prime the model.”””
     def __init__(self, inp, out):
     self.input = inp
     self.output = out
     self.id = uuid.uuid4().hex
     def get_input(self):
     “””Returns the input of the example.”””
     return self.input
     def get_output(self):
     “””Returns the intended output of the example.”””
     return self.output
     def get_id(self):
     “””Returns the unique ID of the example.”””
     return self.id
     def as_dict(self):
     return {
     “input”: self.get_input(),
     “output”: self.get_output(),
     “id”: self.get_id(),
     }
The example takes an input and output. This will be our answers: and clue:.
We can take those sample examples from our playground and modify them to fit within the add_examples() function. Remember to call the gpt object which we initialized earlier.
gpt.add_example(Example(“answers: nut, bark”,
 “clue: tree”))

gpt.add_example(Example(“answers: trick, spells, wizard, enchanted, mystic”,
 “clue: magic”))

gpt.add_example(Example(“answers: football, soccer, rugby, tennis”,
 “clue: sport”))

gpt.add_example(Example(“answers: yarn, shoe, knit, stocking”,
 “clue: sock”))
Great. One more change to make it easier on the frontend is to add a prefix. To help GPT3 pattern match we added the answers: and clue: prefix. We can obviously require the user to type this in in the web app but instead let’s just add it to the code so all the user needs to add are the words they want us to connect.
Let’s add this to our codenames_app.py file.
question_prefix = “answers: “
answer_prefix = “clue: “
And then update our GPT3 object.
gpt = GPT(engine=”davinci”,
 temperature=0.7,
 max_tokens=10,
 input_prefix=question_prefix,
 output_prefix=answer_prefix,
 append_output_prefix_to_query=False)
This is basically adding the answers: and clue: as prefixes to the text the user types in so it matches the example patterns we primed GPT3 with.
Config
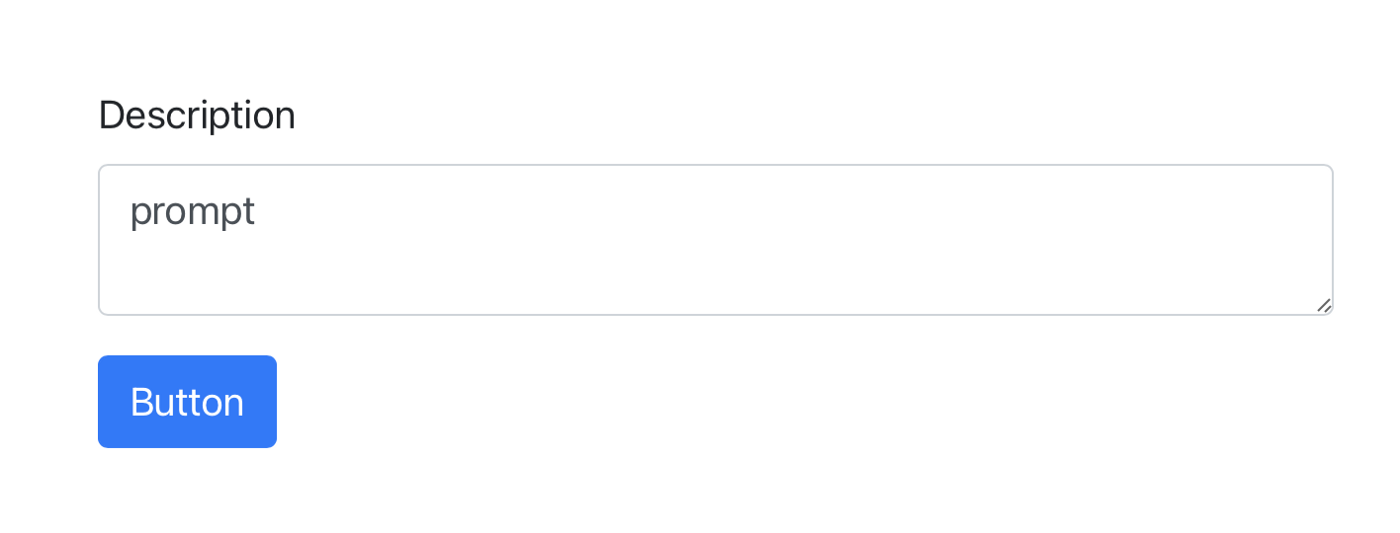
The last part we will add is text for the UI Config. Our web app has three primary components. The description, the button text and the placeholder text.
In our code we can adjust this to make it more Codenames friendly.
# Define UI configuration
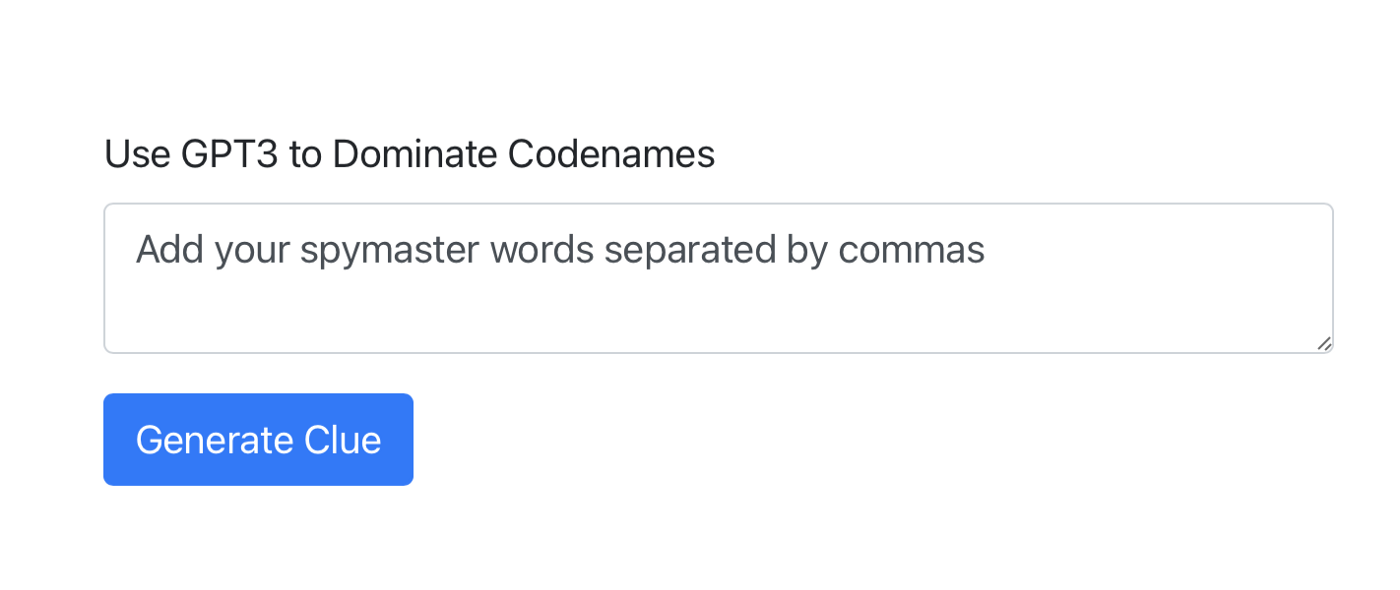
config = UIConfig(description=”Use GPT3 to Dominate Codenames”,
button_text=”Generate Clue”,
placeholder=”Add your spymaster words separated by commas”)As a reminder, we want the Spymaster to insert the cards separated by commas. They don’t need to add answer since we will add it as a prefix in our code.
From there we are all set to run our web app! We will use the demo_web_app() function and pass in the gpt3 and config variables which we defined above.
demo_web_app(gpt, config)Once that is added we can save everything and head to our terminal. From there we run the $ python codenames_app.py command and we should see the following if everything is successful.
* Serving Flask app “api.demo_web_app” (lazy loading)
 * Environment: production
 WARNING: This is a development server. Do not use it in a production deployment.
 Use a production WSGI server instead.
 * Debug mode: off
 * Running on http://127.0.0.1:5000/ (Press CTRL+C to quit)
yarn run v1.22.10
warning ../../package.json: No license field
$ react-scripts start
ℹ 「wds」: Project is running at http://192.168.86.107/
ℹ 「wds」: webpack output is served from
ℹ 「wds」: Content not from webpack is served from /Users/jabe/Projects/nba_playground/gpt3-sql/gpt3-sandbox/public
ℹ 「wds」: 404s will fallback to /
Starting the development server…

Browserslist: caniuse-lite is outdated. Please run the following command: `npx browserslist — update-db`
Compiled successfully!

You can now view gpt3-sandbox in the browser.

Local: http://localhost:3000
On Your Network: http://192.168.86.107:3000

Note that the development build is not optimized.
To create a production build, use yarn build.

127.0.0.1 — — [31/May/2021 18:16:36] “GET /params HTTP/1.1” 200 -
We will also see a new tab in our browser pop up.
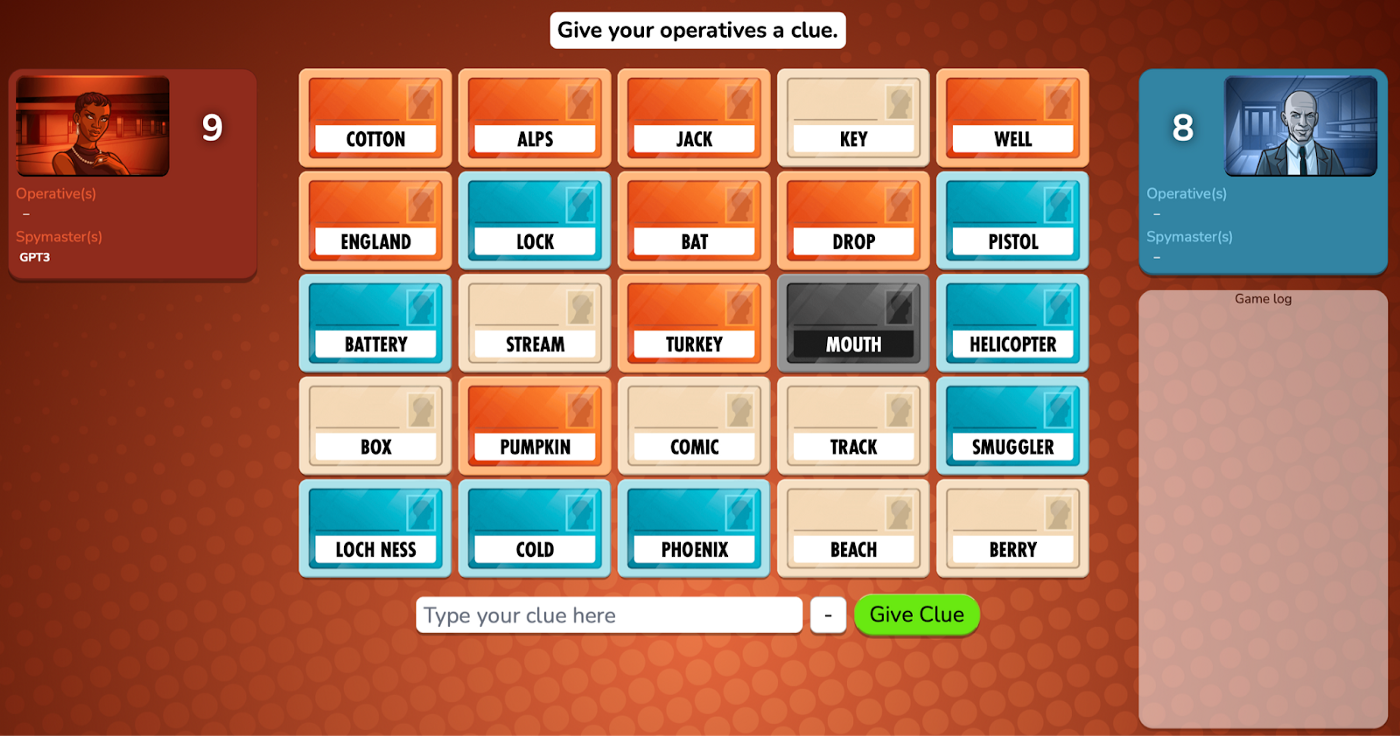
From there we can type in example words, hit Generate Clue and see what GPT3 spits out.
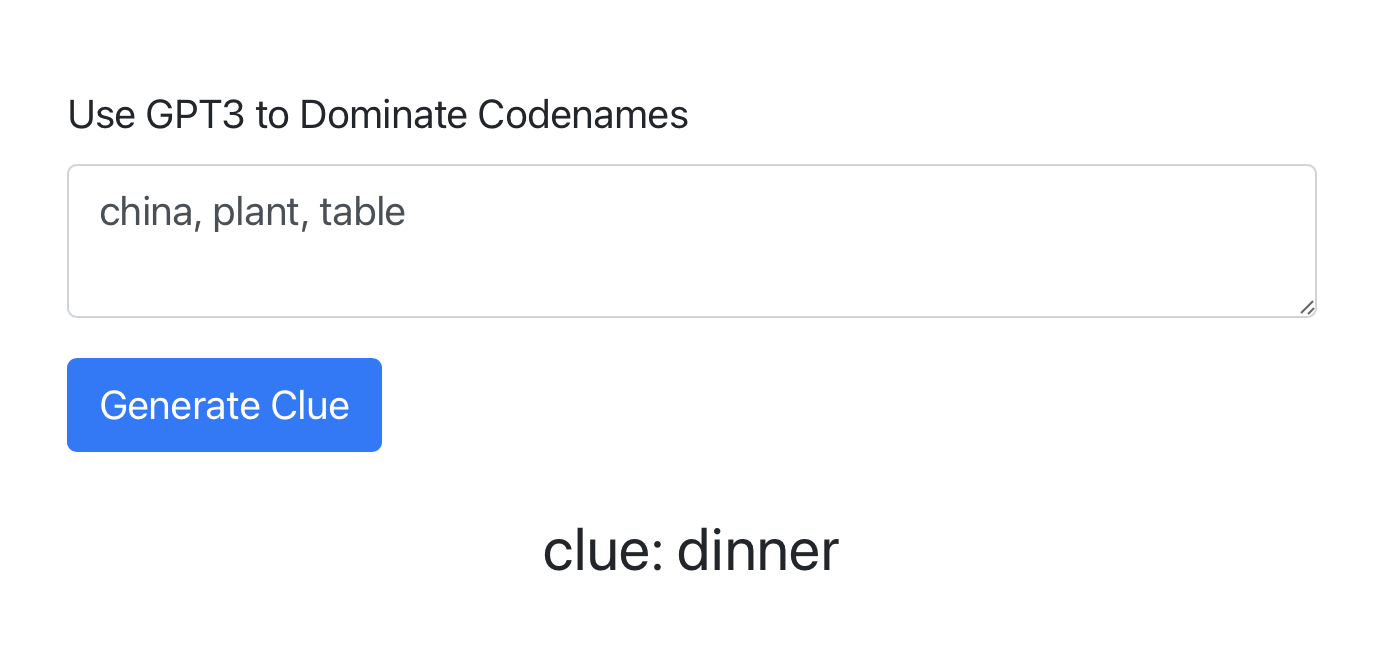
Not bad!
Adding to Our Github Repo
Time to fire back up our GitHub desktop app. We’re ready to commit all the code we’ve written so far.
While we’ve been working within VS Code, we’ve actually been working on a GitHub branch. Since this was a solo project and a rather small one, we’ve been on the main branch. What we want to do now is upload all of our files to our GitHub profile.
Conclusion
The next time you are playing friends, family or coworkers in Codenames online, fire up this web app and see if GPT3 can help you win.
I hope you enjoyed this tutorial. For another GPT3 related tutorial, check out how I built a Chatbot.
For more fun side projects like this, follow my YouTube Channel, Learn With Jabe.
I want to give another special shoutout to Shreya Shankar for an awesome Github repo. She did all the heavy lifting, we just applied it to a specific use case.
-Jabe
Helpful Resources
New posts delivered to your inbox
Get updates whenever I publish something new. If you're not ready to smash subscribe just yet, give me a test drive on Twitter.