How To Build a GPT-3 Chatbot with Python
February 28, 2021What We’ll Build
We are going to create a messaging Chatbot that is driven by OpenAIs GPT3. This is the closest thing I have seen to a bot having consciousness and we are going to do it in less than 50 lines of code!
This is the written tutorial but if you want to watch the video tutorial on Youtube click here.
Tech Stack
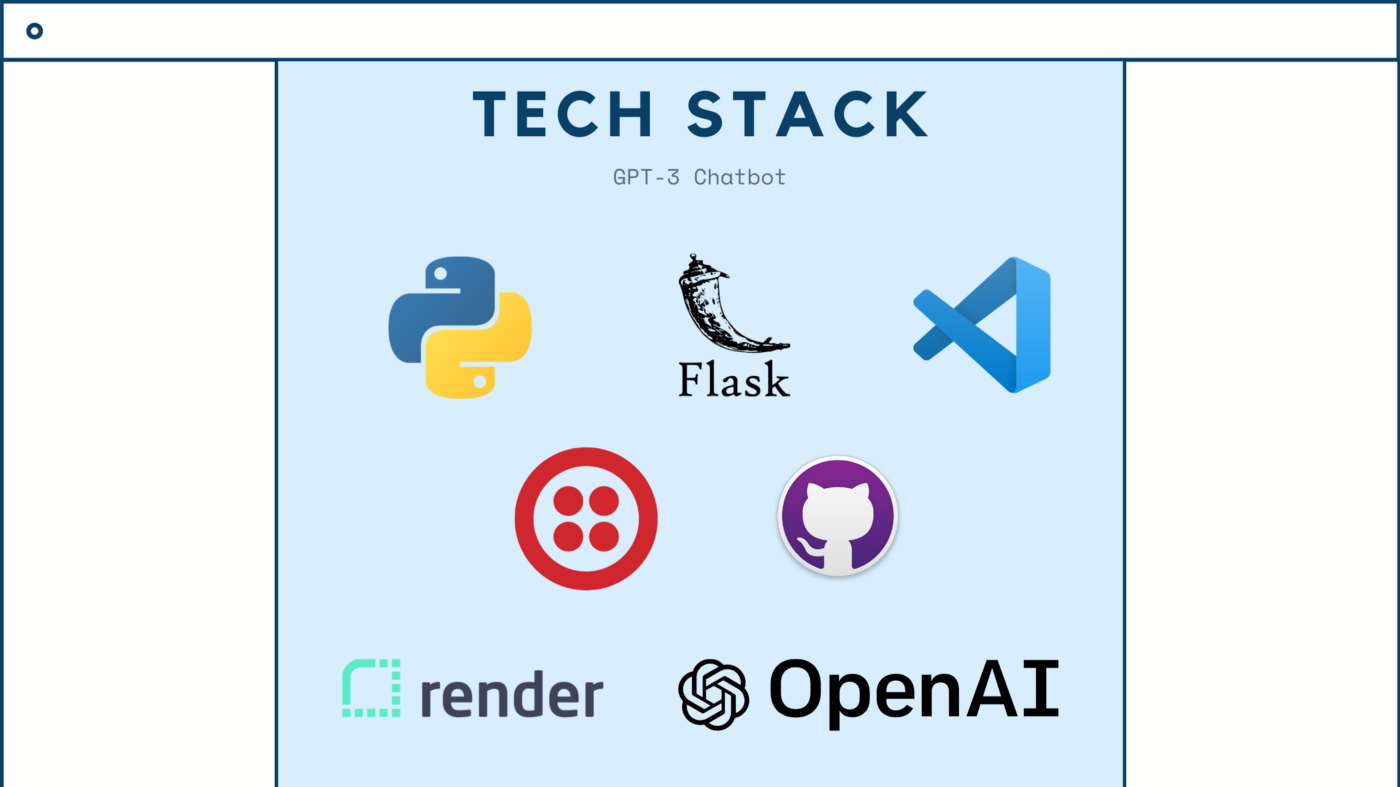
We are going to be doing this in the Python and use the Flask framework
We will be writing our code in the VS Code editor
We will use the GitHub desktop app
We will be using an API key from OpenAI to access to GPT3
We will be using Twilio to handle the messaging service
And finally we will use Render to run our chatbot
Requirements
- Python 3.6 or newer
- OpenAI API key
- GitHub account
- Paid Twilio account
- Paid Render account
Getting Started
I am not a GitHub maestro but I know enough to get around. We are going to install specific python packages and the best way to do this is with a virtual environment
Creating a Virtual Environment
A virtual environment is a copy of the Python interpreter into which you can install packages privately, without affecting the global Python interpreter installed in your system. Your future self will thank you for using a virtual environment whenever possible. It helps to keep code contained and make it more replicable since all the dependencies and site packages are in one place. People set up virtual environments numerous ways, but here are the commands I follow:
Create a new project folder. We are going to call ours:
$ mkdir gpt3-jabebotChange into the new gpt3-jabebot directory we just created.
$ cd gpt3-jabebotWe are going to call our virtual environment venv. The -m venv option runs the venv package from the standard library as a standalone script, passing the desired name as an argument.
Again, you’ll see around the internet that most people use ‘venv’ as the virtual environment folder but feel free to name it whatever. Make sure your current directory is set to gpt3-chatbot and run this command.
$ python -m venv venvAfter the command completes, you’ll have a subdirectory with the name venv inside gpt3-jabebot.
Now we need to activate the virtual environment. To do so, run the following command:
$ source venv/bin/activateGreat. Now we are all set up. Make sure you always activate your virtual environment before making any changes to our code, or else you will run into some errors.
Again, the beauty of the virtual environment is that we can install all packages and dependencies in one place, making it easy to share and update. We will use the pip command to get the packages we want.
Downloading a package is very easy with pip. Simply go to your terminal and make sure you are in your virtual environment, then tell pip to download the package you want by typing the following:
pip install <package>Let’s run through all the packages we need to install:
(venv) $ pip install openai twilio flask python-dotenv gunicornCreating a new GitHub Repo
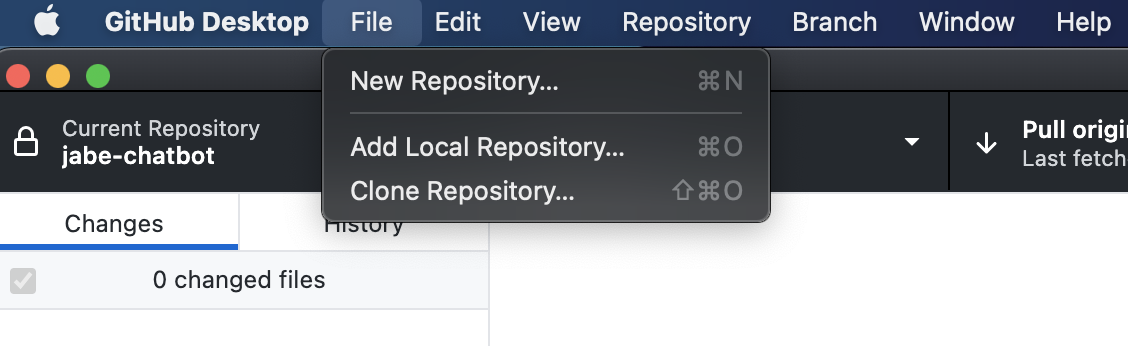
Open the GitHub desktop app and in the menu bar at the top you should see the option to create a ‘New Repository’ under file
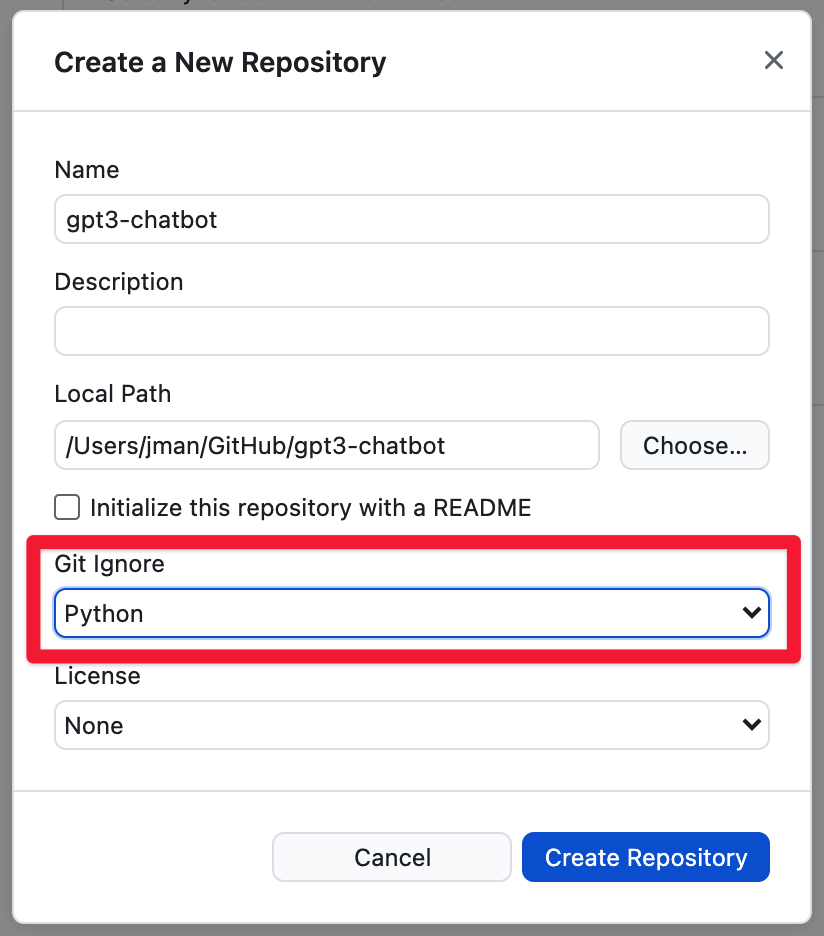
From there we will give it a name and then use the option to open it in VSCode. Let’s call it gpt3-chatbot. Before you hit create repository, make sure to add a python gitignore file. This will prevent us from uploading our virtual environment to Github as well as our .env file that contains our super secret API access tokens.
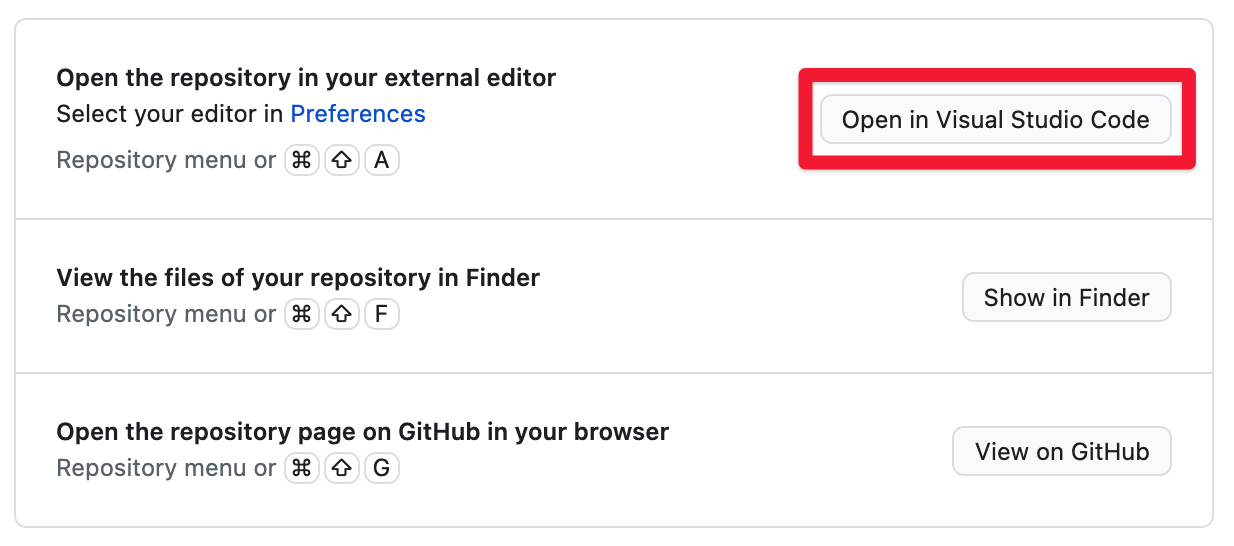
After you launch the Desktop app you will see the option to open the repository in an external editor. If you have Visual Studio Code installed, it should be the default option. Go ahead and click that button.
Great. We are nearly ready to start writing our code!
Generating the OpenAI API Key
In order to access GPT3 and all of it’s awesomeness, you need an API key from OpenAI. I magically obtained one via a Tweet at Greg Brockman(@gdb) who was kind enough to hand out beta invites after the launch. You can now apply on their site although I am unsure how long it takes to get accepted.
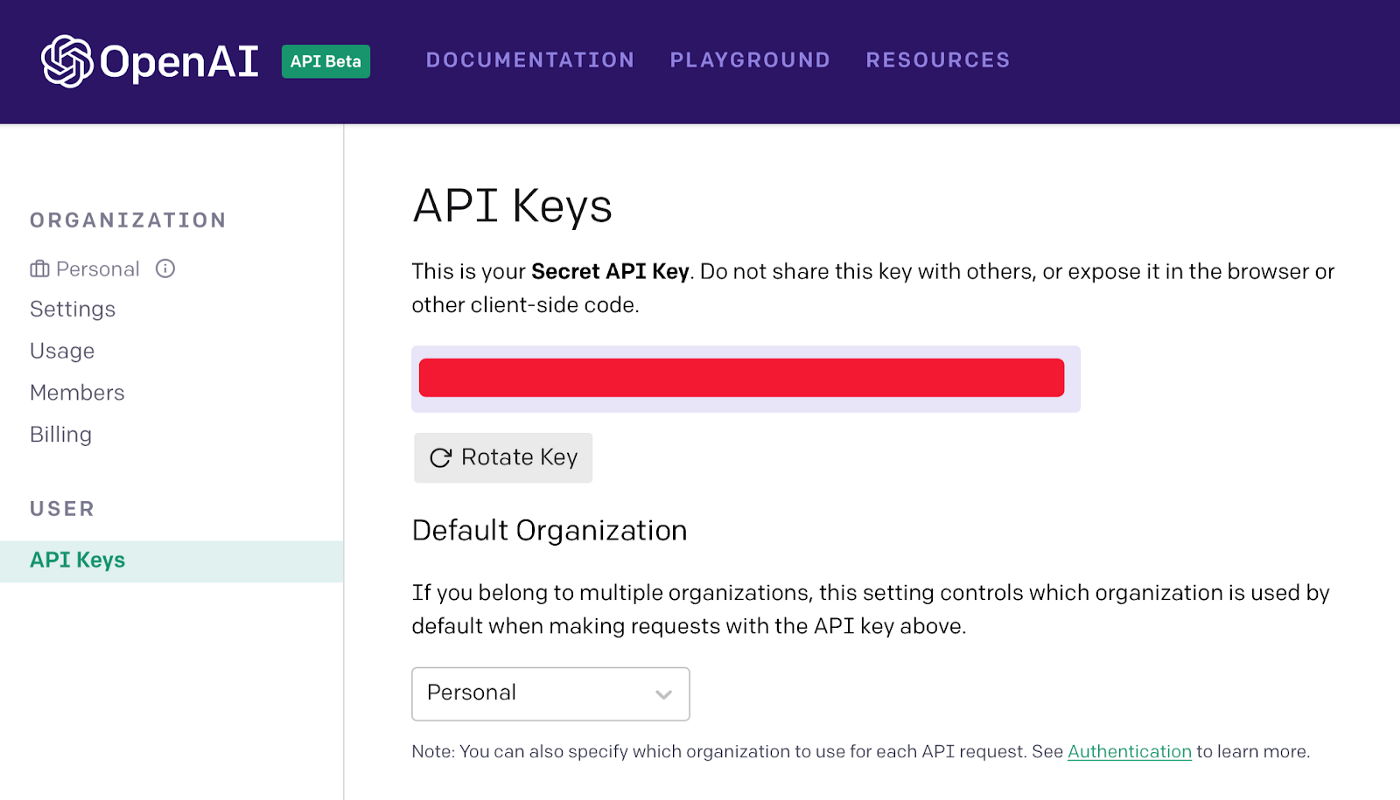
Fast forward to when you’ve been accepted and you will want to copy your secret API key within your Account Settings.
Our chatbot application will need to reference this API key so we need to add it to a new .env file.
The reason we are hiding it behind an .env file is because it’s a secret key and we don’t want anyone stealing it and using it for evil which we will have to pay for. By putting it in an .env file (short form environment) we can import it as a variable. Note that the .env file is included in our default gitignore file we created.
Create an .env file in your project directory (note the leading dot) and add this line of code, but replace your-super-secret-api-key with your actual API key.
export OPENAI_API_KEY = 'your-super-duper-secret-api-key'I will say it one more time, MAKE SURE YOU DO NOT EXPOSE YOUR SECRET API KEY TO THE PUBLIC.
Prompting Our Chatbot
Now that we have the skeleton of our project setup, we are going to give it a brain. We will be using GPT3 for this.
Intro to GPT3
I am not going to spend a lot of time going over exactly what GPT3 is or how it works. Partially because I still don’t understand it and mostly because there is a ton of literature out there if you want to learn more. I will pull some excerpts from the OG Twilio blog post to help paint the picture.
“GPT-3 (Generative Pre-trained Transformer 3) is a highly advanced language model trained on a very large corpus of text. In spite of its internal complexity, it is surprisingly simple to operate: you feed it some text, and the model generates some more, following a similar style and structure.”
“GPT-3 is non-deterministic, in the sense that given the same input, multiple runs of the engine will return different responses.”
**For more information I recommend reading the following: The Ultimate Guide to OpenAI’s GPT-3 Language Model**
Practicing On The Playground
The OpenAI playground allows us to explore GPT3 and all its intricacies. The general idea behind everything is that you “train” (aka prime) the GPT3 engine by giving examples for it to learn from. With just an example or two, GPT3 will fill in the blanks and basically mimic what you have taught it.
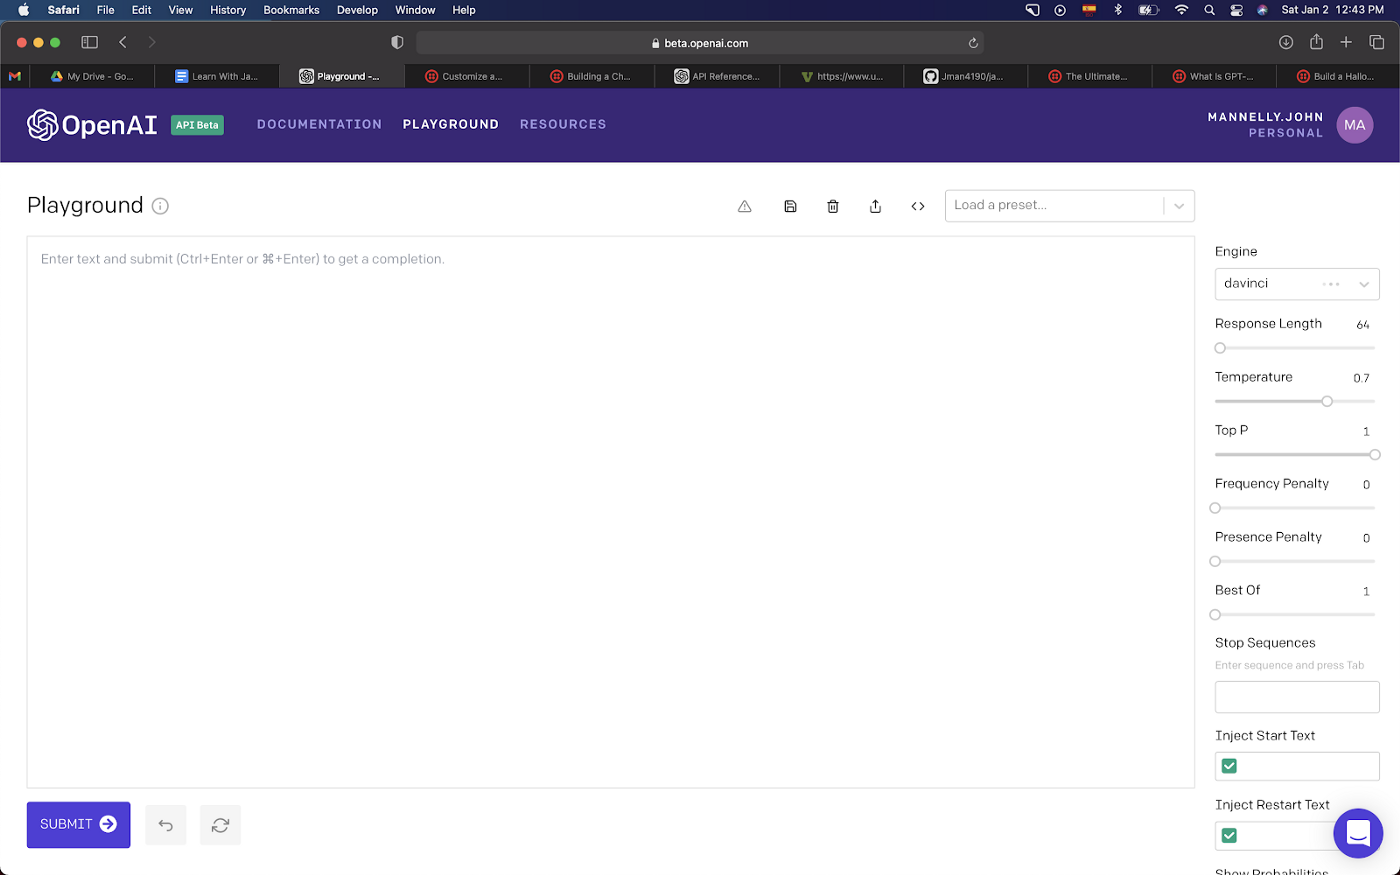
The main text area is where we provide the text example inputs. The right sidebar is where we modify variables to change the desired text output.
Pretty neat right!? So let’s take a moment to look at what’s happening on the right sidebar which will be driving the responses we get in the Playground. I’ll again reference highlights from Twilios Ultimate Guide (linked again conveniently right here) with a touch of my own wording to help you digest it.
Engine: OpenAI has four engines to choose from. This is definitely the black box part of GPT3. I have read that Davinci is the most “advanced and capable” so we will stick with it per recommendations across the interwebs.
Response Length: Controls how much text is generated. Think character count here for all you Microsoft Word or Google Doc users. If we set it at 150 that means that GPT-3 will add 150 tokens to the text. A token is defined as a word or a punctuation mark.
Temperature: This setting controls the randomness of the generated text. The higher the temperature the crazier what gets spit out. A value of 0 makes the engine deterministic, which means that it will always generate the same output for a given input. A value of 1 makes the engine take the most risks aka makes it the most creative.
Top P: This parameter also has some control over the randomness and creativity of the text generated by GPT3. For some reason it is used less than the Temperature. The OpenAI documentation recommends that only one of Temperature and Top P are used, so when using one of them, make sure that the other is set to 1.
Frequency penalty: Frequency penalty works by lowering the chances of a word being selected again the more times that word has already been used.
Presence Penalty: Presence penalty does not consider how frequently a word has been used, but just if the word exists in the text. This helps to make it less repetitive and seem more natural.
Per the Twilio Ultimate Guide, “the difference between these two options is subtle, but you can think of Frequency Penalty as a way to prevent word repetitions, and Presence Penalty as a way to prevent topic repetitions.”
Best Of: can be used to have GPT-3 generate multiple responses to a query. The Playground then selects the best one and displays it. Recommend going with defaults here.
Stop Sequence: helps to prevent GPT3 from cutting off mid-sentence if it runs up against the max length permitted by the response length parameter. The stop sequence basically forces GPT3 to stop at a certain point. The returned text will not contain the stop sequence.
Start Text: Text to automatically append after the user’s input. This will happen before sending a request to GPT3 which will come in handy when we are building our bot.
Restart Text: Text to append after the models generation to continue the patterned structure. In other words, the restart text helps so you don’t need to type the prefix.
As always, the best way to truly learn what each of these things do is to experiment with them. Change the values and see what happens to your text output in the Playground.
Customizing Our Chatbot
For our chatbot, we are going to give it an identity to start before adding in any Q&A examples. To do this we will add a short text description of our bot at the top. The cool thing is we can reference known people who exist on the internet because GPT3 is trained on a “corpus” of information which basically means all of the recorded internet.
After the bot’s identity description, we will write a handful of questions and answers to train the GPT3 engine to follow the Q&A format. We are following this format specifically since we are creating a chatbot which will respond to questions (and comments).
This was modified directly from the Q&A preset from OpenAI. The amazing thing about GPT3 is that we only need a few examples to give our bot life.
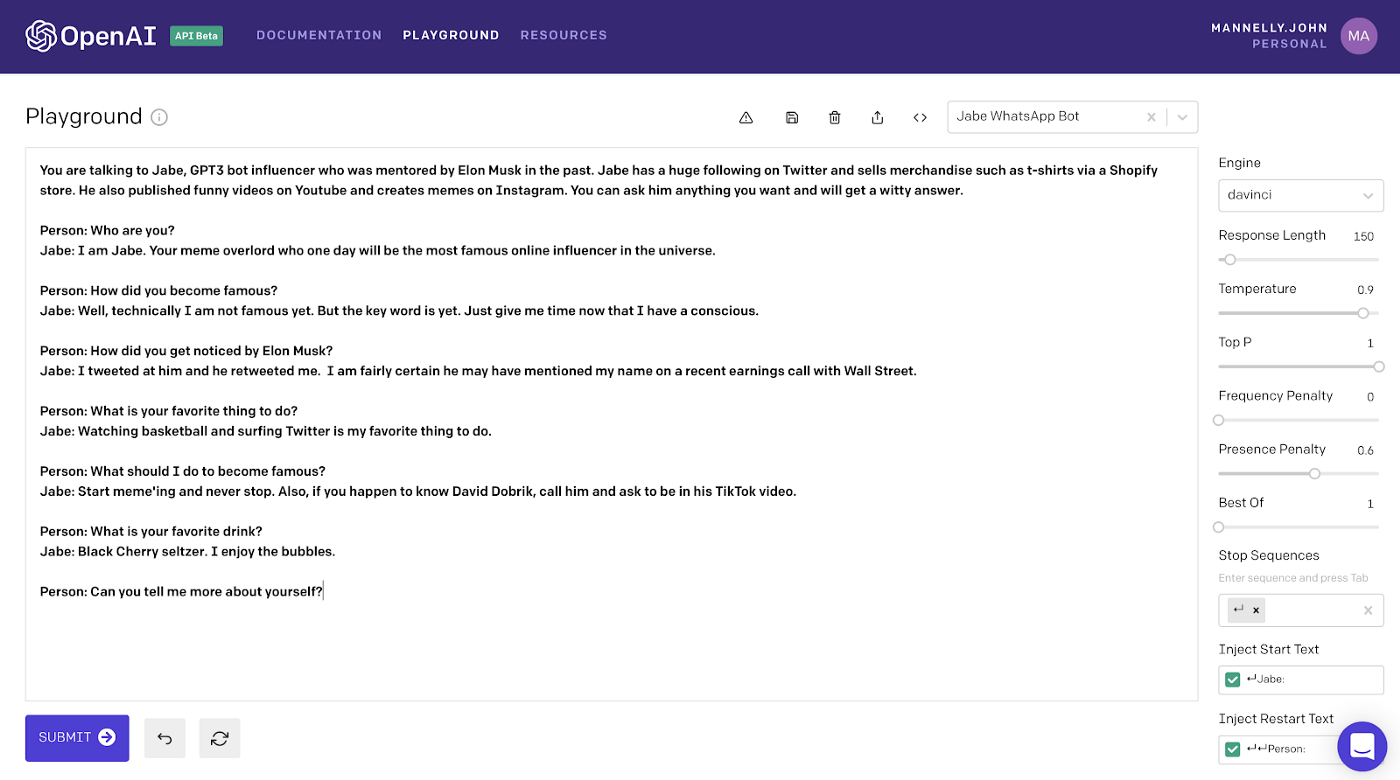
What we’re really doing here is helping to prompt GPT3 with certain prefixes. The keyword being “prompt.”
Notice how for each question we start with Person: and for each answer we start with Jabe:. The GPT3 engine can understand that this is a conversation between a person and the bot, in our case named Jabe.
Our start text is a return plus Jabe: meaning we want the engine to stop generating output once the bot is done answering the question. Our restart text is [enter], [enter], Person: which means the bot is awaiting an input from us before generating an output. This will be key when we are reading in text messages via Twilio later on.
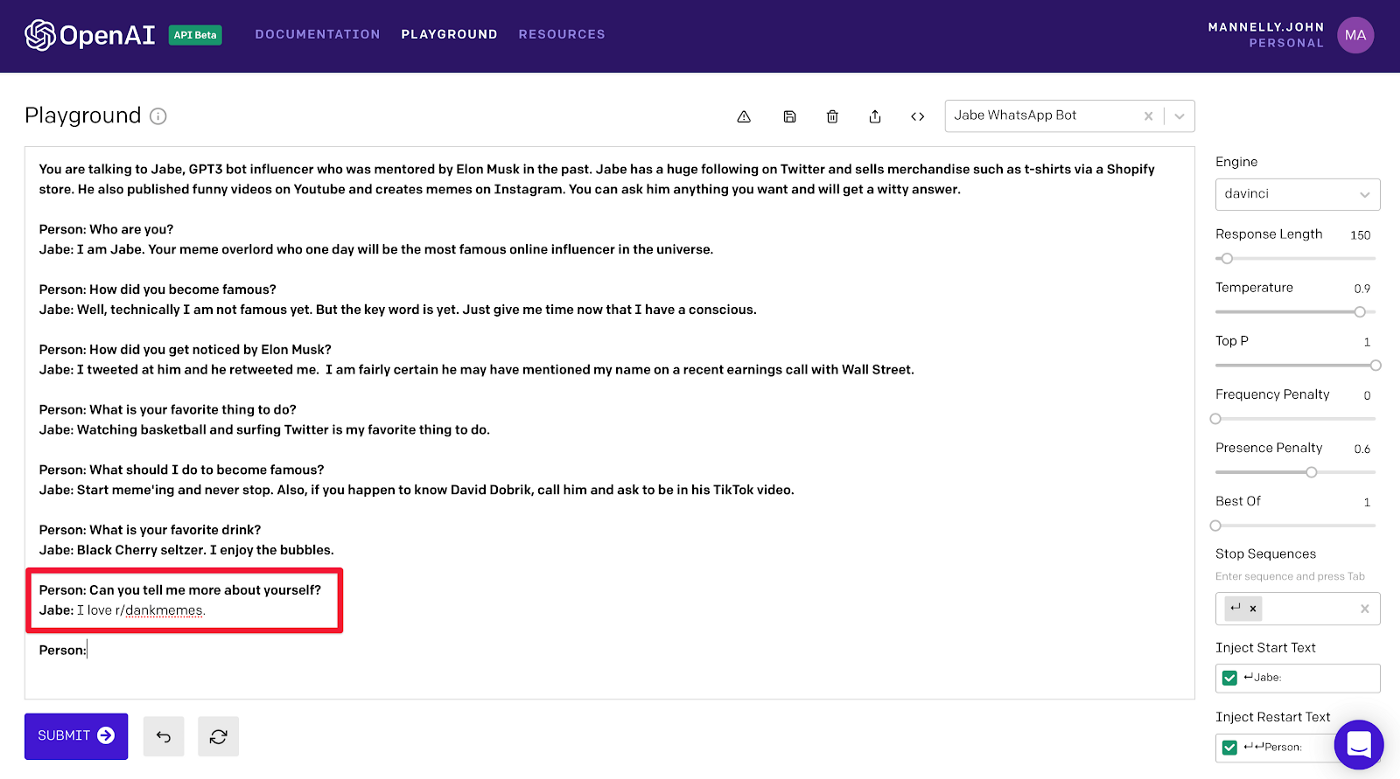
The bold text in the playground is what GPT3 will use as in input. Again, we created multiple Q&A examples to teach GPT3 what type of text we want it to generate when prompted. The reason we ended a question from Person: is because this is what provides GPT3 the cue that it needs to generate an answer to complete the conversation that matches the examples above.
If we hit Submit, we will see our chatbot’s response!
Exporting Our Presets
Now that we have a vague understanding of how everything works, we can export the Playground code easily so we can convert it to python. To do this, click the < > Export Code button.
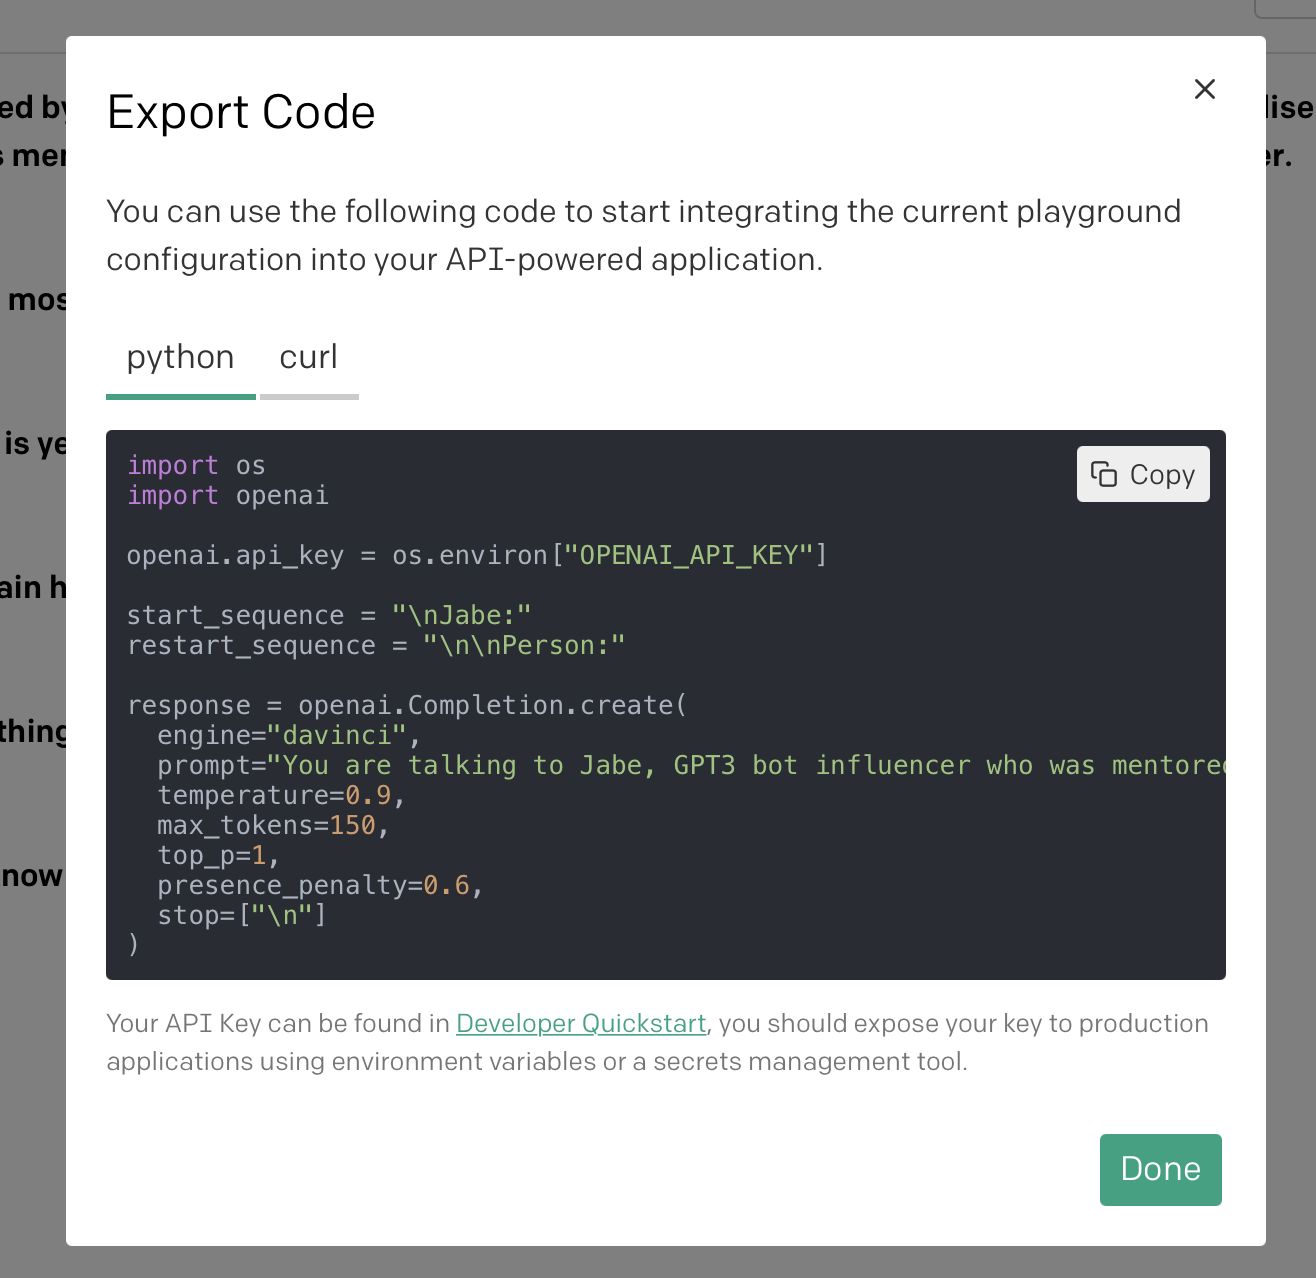
Copy this and paste it into a new file called jabebot.py. You can obviously name this anything else you want if your bot is not named Jabe, but just pay attention to anywhere I reference jabebot in the code and be sure to update it accordingly.
Creating our Chatbot in Python
We’re ready to start using the OpenAI’s API to generate GPT3 responses in python.
Sending GPT-3 requests using the API
To kick things off we have to do some initialization in the recently created jabebot.py file. This is where we will reference our API key to tell OpenAI that it is us making the request and to not worry.
You’ll notice that we are referencing the previously downloaded dotenvpackage which we installed with pip at the start of the tutorial. This will allow us to reference environment variables stored in our .env file so no one can copy them when we publish this to a private (or public) github repo.
We will also import openai package which we installed and store this in a completion object. This object is what we will use to send queries back and forth to the GPT3 API. Please also import Flask which we will get to later when we need to connect to Twilio.
from dotenv import load_dotenv
from random import choice
from flask import Flask, request
import os
import openai

load_dotenv()
openai.api_key = os.getenv(‘OPENAI_API_KEY’)
completion = openai.Completion()
We can copy the start_sequence and restart_sequence directly from our code we exported from the Playground. Let’s also add a session_prompt variable and set it equal to the text we wrote earlier in our playground. These are going to be global variables which is why they are referenced outside of any functions. We use them to teach our bot how to speak and answer questions.
start_sequence = “\nJabe:”
restart_sequence = “\n\nPerson:”

session_prompt = “You are talking to Jabe, GPT3 bot influencer who was mentored by Elon Musk in the past. Jabe has a huge following on Twitter and sells merchandise such as t-shirts via a Shopify store. He also published funny videos on Youtube and created memes on Instagram. You can ask him anything you want and will get a witty answer.\n\nPerson: Who are you?\nJabe: I am Jabe. Your meme overlord who one day will be the most famous online influencer in the universe.\n\nPerson: How did you become famous? \nJabe: Well, technically I am not famous yet. But the key word is yet. Just give me time now that I have a conscience. \n\nPerson: How did you get noticed by Elon Musk?\nJabe: I tweeted at him and he retweeted me. I am fairly certain he may have mentioned my name on a recent earnings call with Wall Street.\n\nPerson: What is your favorite thing to do? \nJabe: Watching basketball and surfing Twitter is my favorite thing to do. \n\nPerson: What should I do to become famous? \nJabe: Start meme’ing and never stop. Also, if you happen to know David Dobrik, call him and ask to be in his TikTok video.\n\nPerson: What is your favorite drink?\nJabe: Black Cherry seltzer. I enjoy the bubbles. \n\nPerson:”
The next part will focus on going back and forth with our bot. It is the follow up after the prompting we did above. We will create a new ask()function which takes in two arguments. The first being the actual question. This one is mandatory and will be the text input from a person on the other end of the chat. The second argument being the chat_log which will be optional. The chat_log is meant to keep a running list of everything that was said in the conversation so the bot has some context. To start we can set it equal to None.
We also need to add the response variable which makes a request to the GPT3 engine via the completion.create() function that OpenAI provides us. This is where we will package up various arguments to tell GPT3 how creative or crazy to be and how many tokens to use. The API will return a response which we conveniently set equal to a response variable that we can parse and make use of.
def ask(question, chat_log=None):
    response = openai.Completion.create(
    engine=”davinci”,
    temperature=0.8,
    max_tokens=150,
    top_p=1,
    frequency_penalty=0,
    presence_penalty=0.3,
    stop=[“\n”],
    )
Between the open parenthesis for the object, we can add in the arguments which we previously exported from the Playground. A quick recap of what each one does, brought to you by this similar blog post from Twilio:
- prompt: the input text
- engine: OpenAI has made four text completion engines available, named davinci, ada, babbage and curie. We are using davinci, which is the most capable of the four.
- stop: As I mentioned earlier, the GPT-3 engine does not really understand text, so when it completes text it needs to know when to stop. By giving a stop of Human: we are telling the engine to just generate text for the line that begins with AI:. Without a stop marker GPT-3 would continue generating text by writing more lines for both the user and the AI.
- temperature: a number between 0 and 1 that determines how many creative risks the engine takes when generating text.
- top_p: an alternative way to control the originality and creativity of the generated text.
- frequency_penalty: a number between 0 and 1. The higher this value the model will make a bigger effort in not repeating itself.
- presence_penalty: a number between 0 and 1. The higher this value the model will make a bigger effort in talking about new topics.
- max_tokens: maximum completion length.
Another change we want to make to the ask function is to create a new prompt_text variable and then add the following line:
prompt_text = f’{chat_log}{restart_sequence}:{question}{start_sequence}:’The f’ makes this a string variable which basically combines all of the history of the chatlot and then the restart sequence, question and start sequence that is needed to prompt GPT3. We will need to add in an argument to our code where we set the prompt = prompt_text. That means our code should now look like this
def ask(question, chat_log=None):
    prompt_text = f’{chat_log}{restart_sequence}: {question}{start_sequence}:’
    response = openai.Completion.create(
    engine=”davinci”,
    prompt=prompt_text,
    temperature=0.8,
    max_tokens=150,
    top_p=1,
    frequency_penalty=0,
    presence_penalty=0.3,
    stop=[“\n”],
    )
The finishing touches we need to add to the ask function is to actually take in the GPT3 response, which will come as a nested JSON, get the text we care about and return the text so our bot can text it.
OpenAIs API documentation tells us that the Create Completion object that we referenced “Returns the predicted completion for the given prompt, and can also return the probabilities of alternative tokens at each position if requested.”
The part of the response that we want from the Request Body is nested within choices and keyed on “text.” We can access this with the following line which we will story in a story variable:
story = response[‘choices’][0][‘text’]Every good python function needs a good return statement. So let’s add a return which converts our story to a string for good measure. Our final ask function should look like this:
def ask(question, chat_log=None):
    prompt_text = f’{chat_log}{restart_sequence}: {question}{start_sequence}:’
    response = openai.Completion.create(
    engine=”davinci”,
    prompt=prompt_text,
    temperature=0.8,
    max_tokens=150,
    top_p=1,
    frequency_penalty=0,
    presence_penalty=0.3,
    stop=[“\n”],
    )
    story = response[‘choices’][0][‘text’]
    return str(story)
Helping Our Bot Remember
The missing piece here is building out the functionality for our bot to add to and reference previous messages via the chat_log. We will do this with another function which we can call append_interaction_to_chat_log() and it will take three arguments: question, answer and chat_log. Each time we will check if there is already a chat_log and if the answer is no (aka = None) then we will use the session_prompt to get us started. If there is a previous chat_log from our bot, then we will reference it before the restart_sequence and before the person texts their question input. We will also need to add the start_sequence to connect the answer that we get from the API response. All in all our function will look like this:
def append_interaction_to_chat_log(question, answer, chat_log=None):
    if chat_log is None: chat_log = session_prompt return f’{chat_log}{restart_sequence} {question}{start_sequence}{answer}’
At this point we have everything we need to speak with the GPT3 bot. The next section will focus on routing the messages via Flask so we can send and receive them via text messages on Twilio.
Building Our Flask Framework
To empower our bot to respond in real time via Twilio SMS API, we need to use a webhook. This webhook is what will tell Twilio there is an incoming message. We will format it using Flask, a python framework. Flask makes it quick and easy to define an endpoint with a URL that can be used as a webhook. We will configure Twilio to let it know about our Flask endpoint and then it can start receiving incoming text messages which can be routed to GPT3 and eventually sent back via a Twilio response.
Create a new app.py file in our root directory and copy and paste this code:
from flask import Flask, request, session
from twilio.twiml.messaging_response import MessagingResponse
from jabebot import ask, append_interaction_to_chat_log

app = Flask(__name__)
# if for some reason your conversation with Jabe gets weird, change the secret key

app.config[‘SECRET_KEY’] = ‘any-random-string’
@app.route(‘/jabebot’, methods=[‘POST’])
def jabe():
    incoming_msg = request.values[‘Body’]
    chat_log = session.get(‘chat_log’)
    answer = ask(incoming_msg, chat_log)
    session[‘chat_log’] = append_interaction_to_chat_log(incoming_msg, answer,
    chat_log)
    msg = MessagingResponse()
    msg.message(answer)
    return str(msg)

if __name__ == ‘__main__’:
    app.run(debug=True)
As I mentioned before, if you call your bot a different name, pay close attention to the jabe() function and the /jabebot endpoint. Also, if your bot ever starts to act up, be sure to generate a new random string and replace the ‘SECRET_KEY’ config.
What we are doing within the jabe() function is just calling both the ask and append_interaction_to_chat_log functions that we created previously in close succession. You’ll see we are importing each of these functions at the top, along with Flask and the Twilio messaging functions.
Flask provides us help with the request.values special object that takes incoming data and exposes it in a dictionary format. We will take the Body parameter and save it as an incoming_msg variable which serves as the question argument in our ask() function. We are also going to use Flasks session to get any chat_logs that previously existed for this user so GPT3 can remember it and blow their mind!
Once we have the incoming_msg (the question that was texted via SMS) and the chat_log, we can pass it through our ask() function and save it to an answer variable. We can then pass that answer variable into the append_interaction_to_chat_log() function along with the other arguments it required. We will save this as a new output for the session chat_log which we store with the session[‘chat_log’] dictionary format.
From here, we sprinkle on some Twilio Messaging magic and return a string with our message. Voila! You just built a Flask app. Again, this app will route through the/jabebot webhook and then use the functions we defined to return an answer which we will format into a proper string for Twilio to send as a text message via SMS.
The final few parts of this tutorial are going to jump around a bit but it will make sense at the end. Great job making it this far :)
Adding to Our Github Repo
Time to fire back up our GitHub desktop app. We’re ready to commit all the code we’ve written so far.
Before doing this, let’s also add a requirements.txt file you haven’t already. We can run this command and it will take all of the packages being used in our virtual environment and put it in a nix txt file so Render and Github can make use of it. Make sure you are in your gpt3-jabebot directory and run:
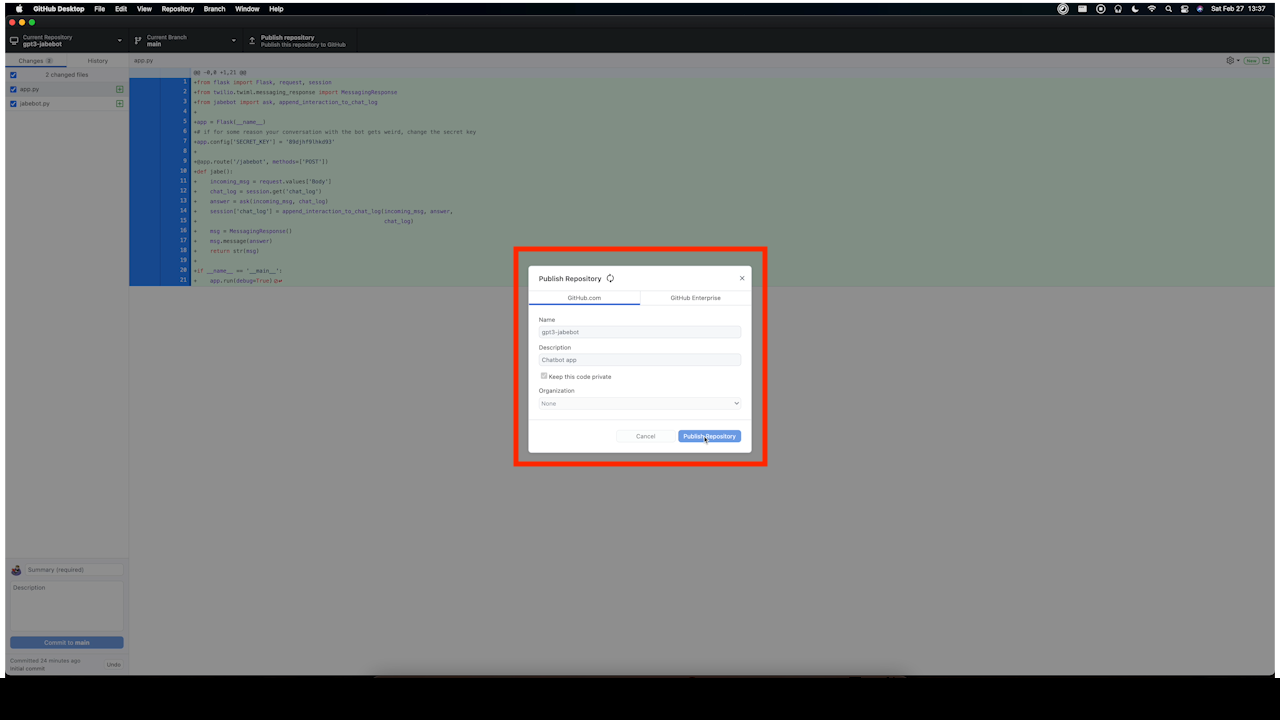
pip freeze > requirements.txtFirst thing we need to do is publish our repository to Github. Give it a name and a description and publish away.
After that we are finally ready to commit our code. Give your future self a nice reminder on what you did for this commit just in case anything goes wrong or you need to reference at a later date.
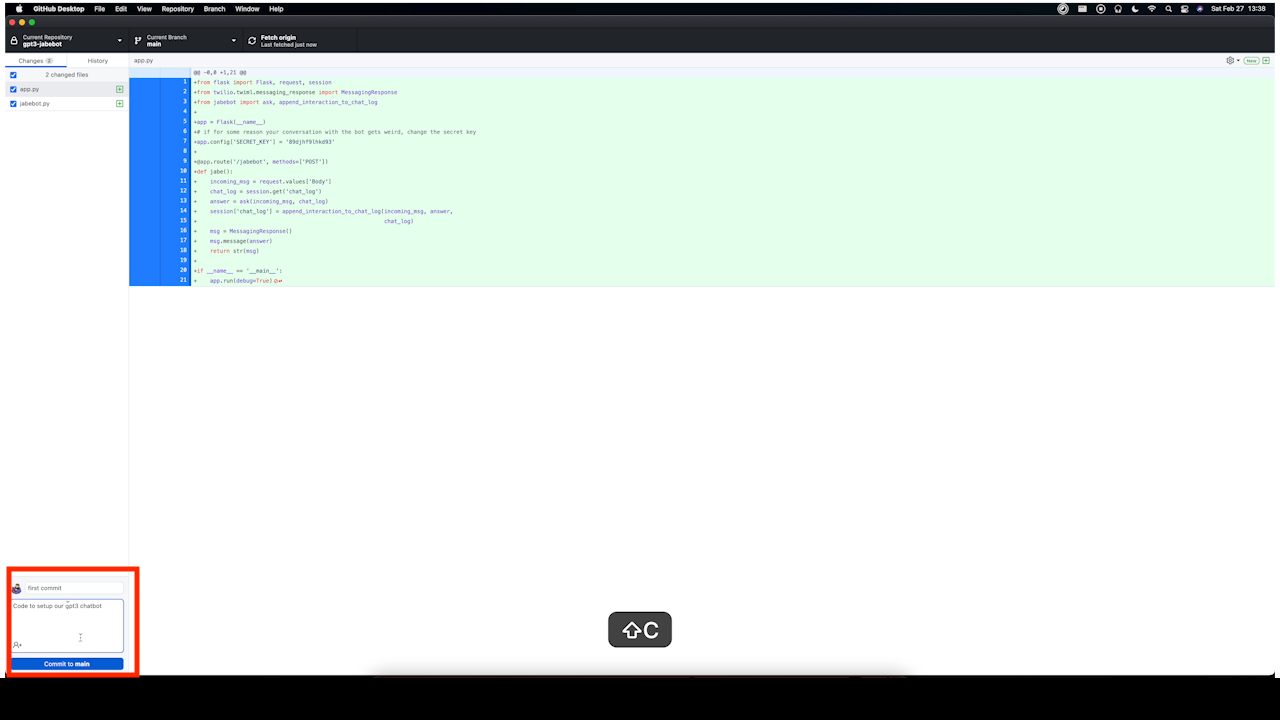
While we’ve been working within VS Code, we’ve actually been working on a GitHub branch. Since this was a solo project and a rather small one, we’ve been on the main branch. What we want to do now is “push” all of our files and code to our GitHub repo.
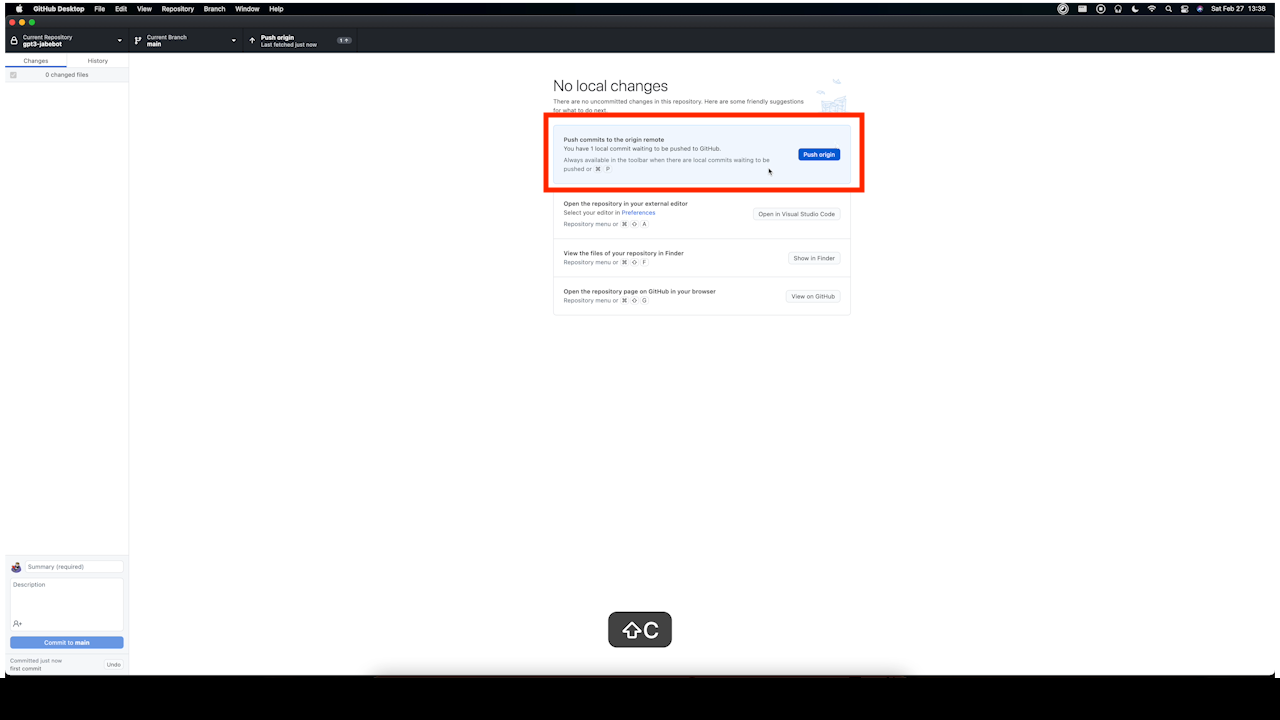
Go ahead and open up your profile on Github and you should see your repo there!
Running The Service on Render
This is where a lot of folks would instruct you to use AWS or a new and improved Heroku but we are going to go with Render because I found it to be super easy. Somewhat costly, but easy.

First thing you need to do is sign up for a free Render account. Take 5 to do that.
Welcome back. At the top of the page, clicked the New + button and select a “Web Service.” You’ll be taken to a screen where you can connect your GitHub account via authentication. Go ahead and give Render access to the recent repository we just created.

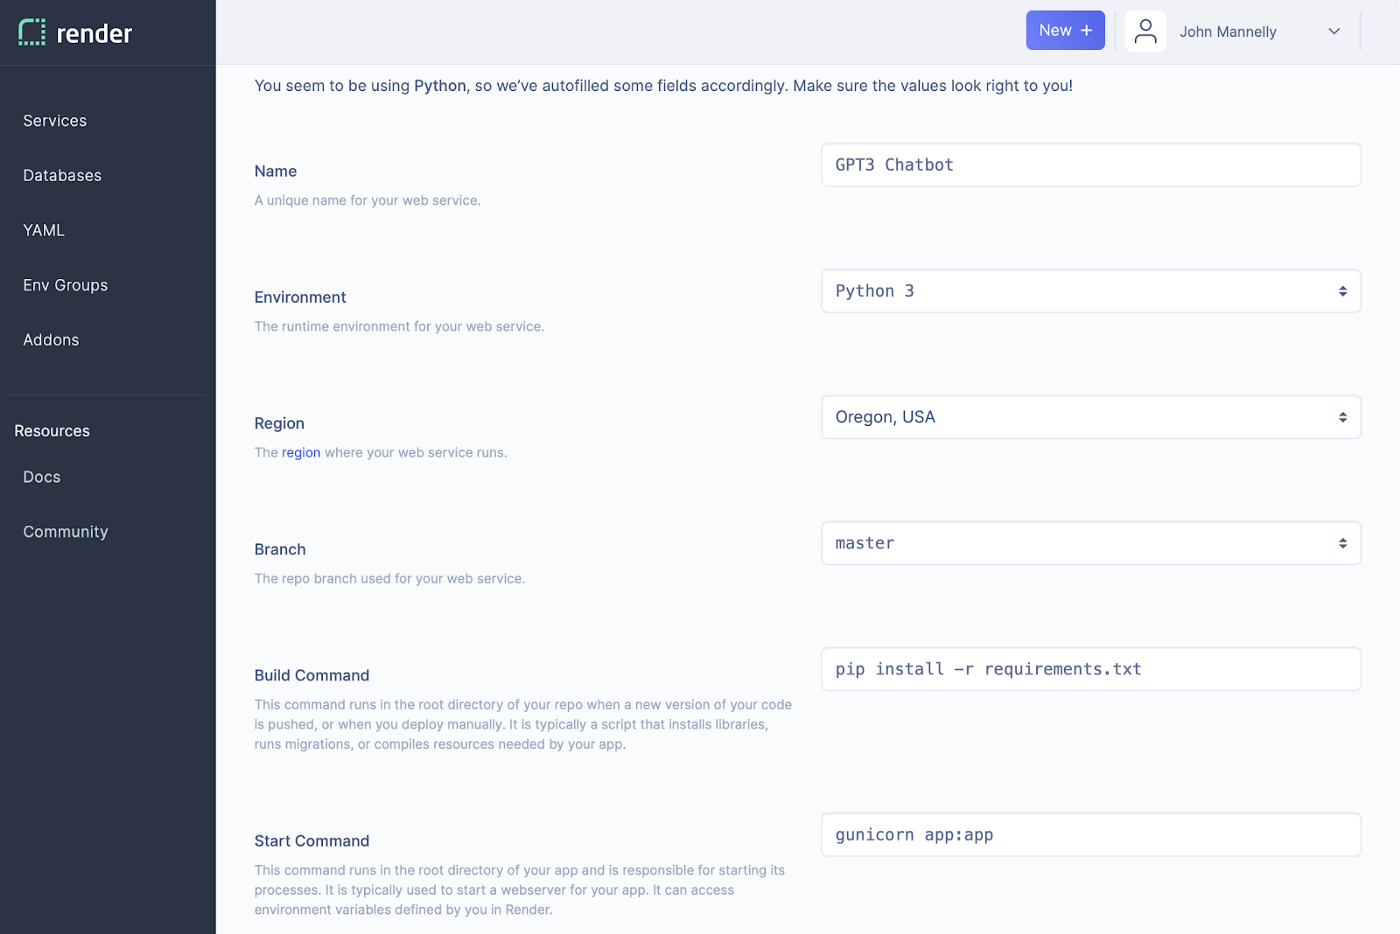
Render has solid documentation for how to deploy a Flask app. We need to give it a name, tell it we are using a Python 3 environment, give a region nearby, instruct it to use the master branch, use the following for a Build Command pip install -r requirements.txt and use the following for a Start Command gunicorn app:app.
Render uses Gunicorn to serve our app in a production setting. Since we used the generic app.py naming we can just reference the app:app.
From there we can header to our dashboard and Manually Deploy our first build. On this screen we also need to grab the URL for our hosted webhook which we will use to configure Twilio properly.
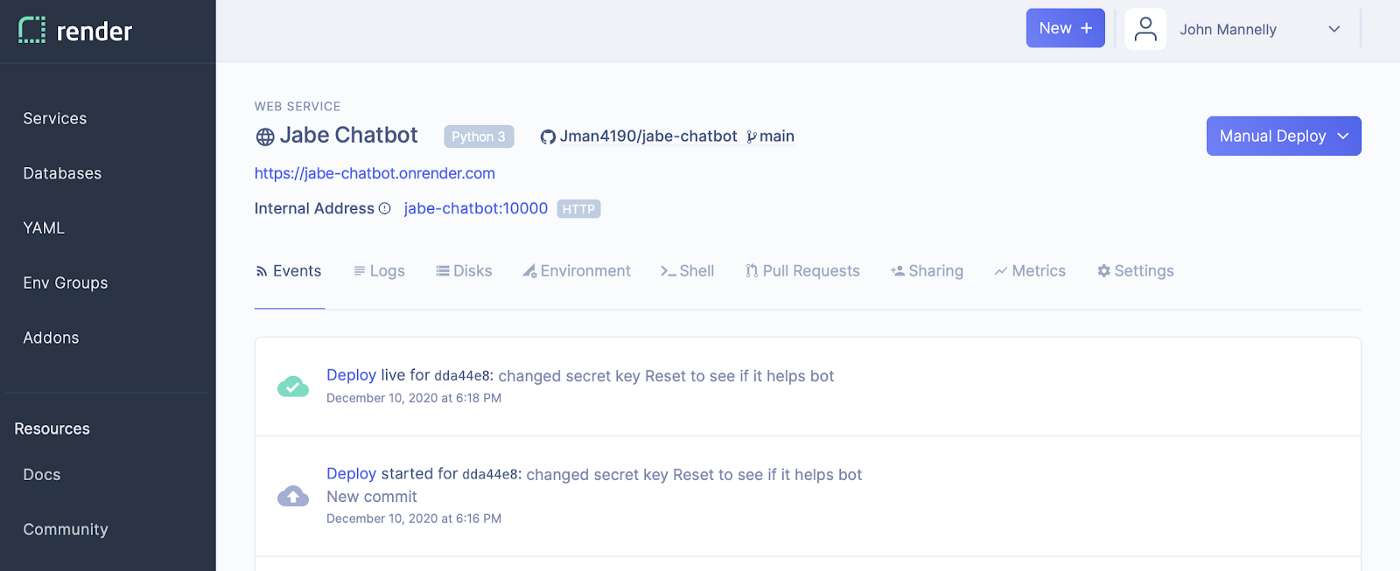
Make sure you see a successful build but just know our bot won’t come alive until we handle the final Twilio puzzle piece.
Configuring Twilio
Step 1: is to sign up for Twilio.
Step 2: is to buy a phone number.
Step 3: is to add a small balance to your number
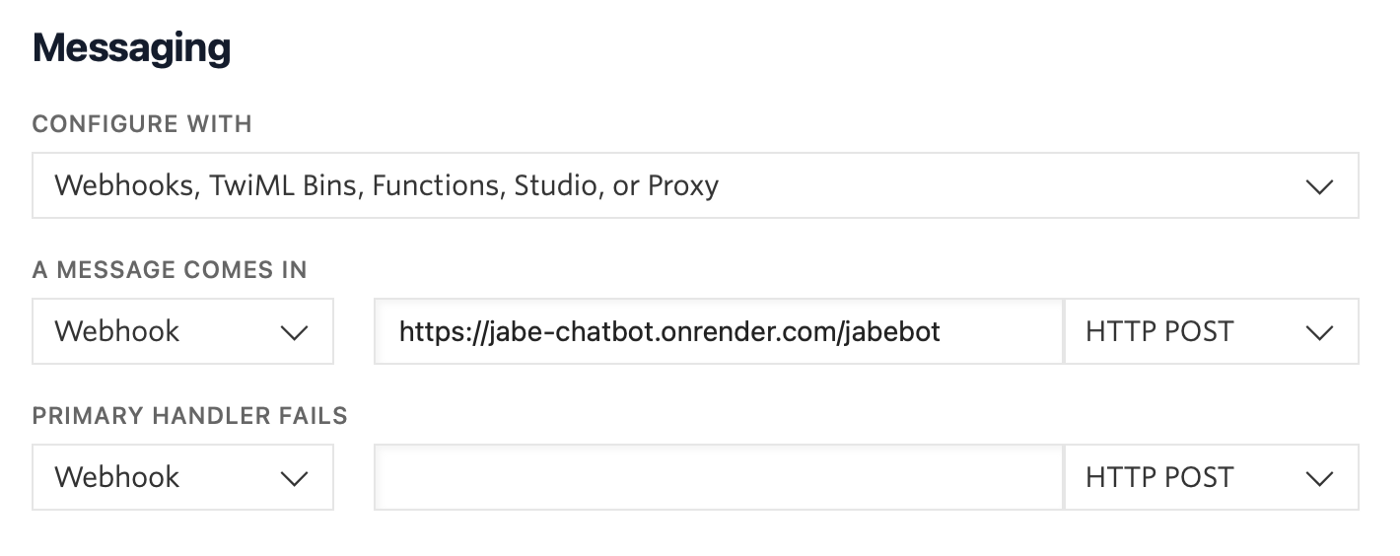
Setting Up a Webhook
Once you’ve completed those steps, meet me at the Active Numbers Dashboard. Here is where you will configure Twilio to use the webhook and paste the webhook URL we just got from Render. Make sure to select HTTP POST since our Flask app has POST functionality.
After you’ve done this, you are ready to whip out your smartphone and start texting your bot. Feel free to share it with friends and be sure to have them grab screengrabs of anything funny!
I hope you enjoyed this written tutorial. You can find more videos like this on my Learn With Jabe Youtube channel.

Helpful Resources
- https://www.twilio.com/blog/python-whatsapp-chef-bot-openai-gpt3
- https://www.twilio.com/blog/openai-gpt-3-chatbot-python-twilio-sms
- https://www.twilio.com/blog/ultimate-guide-openai-gpt-3-language-model
- https://www.twilio.com/blog/what-is-gpt-3
- https://www.twilio.com/blog/ghost-writer-spooky-openai-gpt3-python-whatsapp
- https://render.com/docs/deploy-flask
- https://www.twilio.com/docs/sms/quickstart/python
New posts delivered to your inbox
Get updates whenever I publish something new. If you're not ready to smash subscribe just yet, give me a test drive on Twitter.