Favorite Quotes, Emailed Daily
December 16, 2018My wife said I was spamming her too much. She wasn’t wrong. In a polite way she asked if I could reduce my automated emails from daily to weekly. Trying not to be offended, I decided to use it as an opportunity to revisit my original project, document it, then share it as a blog post. What I had created was a python script to email myself a random quote every morning. This was at ends with my inbox(0) mentality but a good way to serendipitously start each workday. The quotes came from a google sheet, which I continuously added my Kindle highlights to over time. If you’ve come this far and are interested in replicating or building on my approach, feel free to follow the steps below!
Creating a google sheet with quotes
Before we get to the juicy python part, you need a google sheet full of your favorite quotes! To make it easy you can copy my sheet here.
I am someone who reads 90% of his books on the Kindle app, so it is super easy to highlight my favorite quotes and then revisit them on the web via Your Highlights. From there I use a tool, Bookcision, to download all the quotes to a text file. Sprinkle in some Tiago Forte progressive summarization and voila, I have a google sheet full of quotes.
It’s always fun to see how a younger version of yourself interpreted a quote.
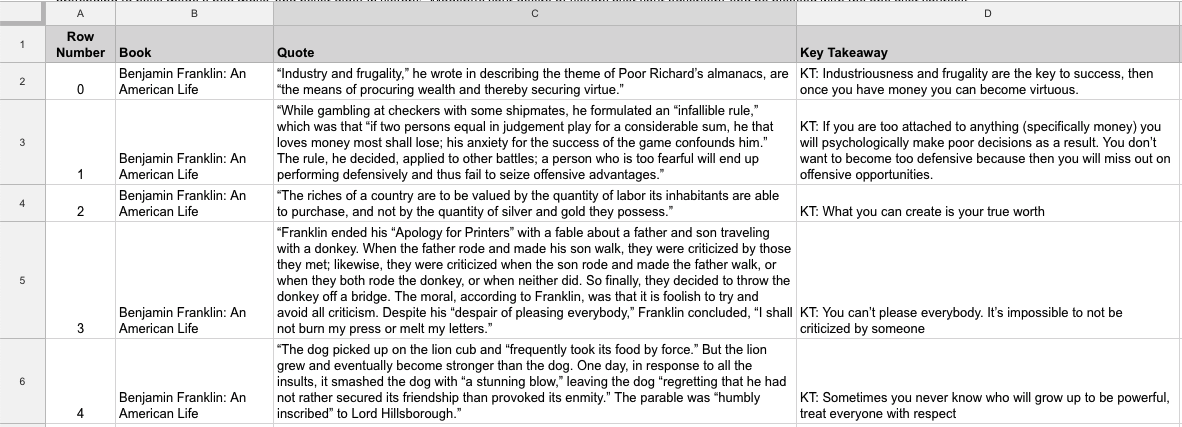
I titled the workbook ‘Daily Quote Email’ and the worksheet ‘Quotes’ — both of which will be referenced in our script.
Using a virtual environment
Your future self will thank you for using a virtual environment whenever possible. It helps to keep code contained and make it more replicable since all the dependencies and site packages are in one place. People set up virtual environments numerous ways, but here are the commands I follow:
Install pyenv using homebrew on macOS
$ brew install pyenvCreate a new project folder
$ mkdir daily_emailNavigate to a project folder and switch to python 3.6.6
$ cd daily_email$ pyenv shell 3.6.6Create virtual environment
$ python -m venv venvActivate virtual environment
$ source venv/bin/activateInstall modules
(venv) $ pip install gspreadConnecting to the Google Sheets API
Instead of using the Google Sheets API directly, I used gspread, which is a Python API wrapper for Google sheets. Their documentation is very clear, but I will add some commentary to make it more enjoyable.
Obtain OAuth Credentials Using Signed Credentials
Since we are editing spreadsheets for ourselves and not others, the easiest way to generate credentials is to use Signed Credentials.
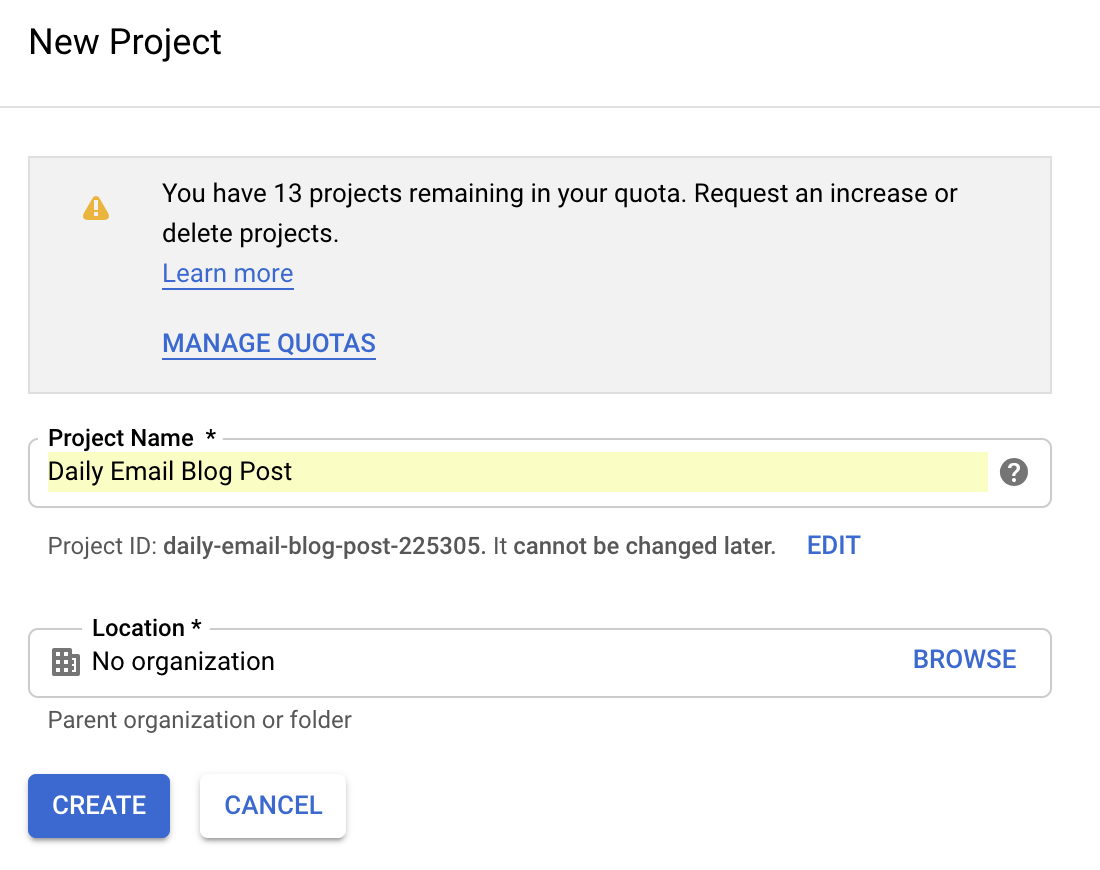
Head to Google Developers Console and create a new project.
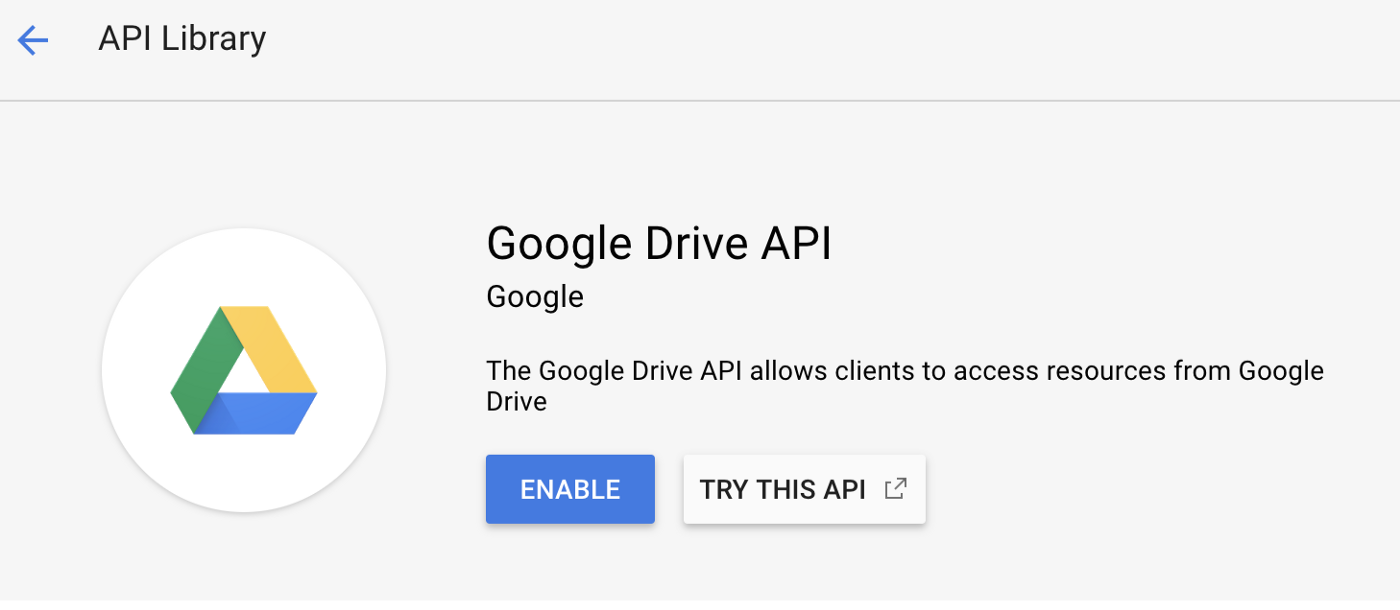
Navigate to the APIs and Services > Library on the left menu drawer and search for the ‘Drive API.’ Once found, enable it. Nice work enabling it.
Now head back to the left drawer and go to Credentials. Choose New Credentials > Service Account Key.

Fill out the necessary info and make sure the JSON key type is selected.
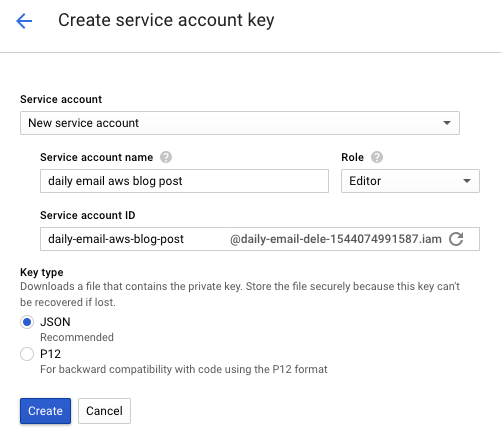
After hitting Create you will automatically download a JSON file with data you need.

Before opening it, rename the file client_secret.json. When you do open it up, it should look similar to this:
{
"type": "service_account",
"project_id": "project-name-1544074391587 "private_key_id": "2cd ... ba4",
"private_key": "-----BEGIN PRIVATE KEY-----\nNrDyLw ... jINQh/9\n-----END PRIVATE KEY-----\n",
"client_email": "daily-email-aws-blog-post@developer.gserviceaccount.com",
"client_id": "473 ... hd.apps.googleusercontent.com",
"auth_uri": "https://accounts.google.com/o/oauth2/auth",
"token_uri": "https://oauth2.googleapis.com/token",
}
With the json file open, copy the client_email from the file. Go to your ‘Daily Quotes’ google sheet and share it with the client_email. If you skip this step then you’ll get a SpreadsheetNotFound exception when trying to access this spreadsheet via gspread.
Finally, we need to install the oauth2client in our virtual environment:
(venv) $ pip install --upgrade oauth2clientWriting Python Script
Alas, we have arrived to the meat and bones of the project. Thank you for your patience up until now. If you have skipped ahead and are just joining me now, welcome.
At a high level, this python script will:
- Connect to our google sheet full of quotes
- Select a random row
- Read in columns from the row (book title, quote, key takeaway)
- Connect to gmail account
- Send outbound email to self address with column values
Let’s dive into it.
Import modules
The first step is to import our modules. Aside from gspread and oauth2client, we will need smtplib to send the email and randomint to generate a random number. If these aren’t in your standard python library, then you can install them in the virtual environment with pip.
import gspreadfrom oauth2client.service_account
import ServiceAccountCredentialsfrom random
import randintfrom httplib2
import Httpimport smtplib
Read in credentials from json file
Next we use our credentials to create a client to interact with the Google Sheets API. To be safe, let’s give it access to both google sheets directly and our drive more broadly.
scope = ['https://spreadsheets.google.com/feeds',        'https://www.googleapis.com/auth/drive']
credentials = ServiceAccountCredentials.from_json_keyfile_name('client_secret.json', scope)
Authorize gspread to access our google sheet
Connect to google sheets and authorize the credentials with the gspread.authorize()method.
gc = gspread.authorize(credentials)Select a worksheet
Open our workbook with gc.open()and then call the sheet by title. I named my google sheet Daily Quote Email and the worksheet Quotes.
wks = gc.open("Daily Quote Email")
sheet = wks.worksheet("Quotes")
Generate random number
We’ll use one column to get the length of the sheet. If you have a sheet with 15 rows filled out then it will be 16 (15 plus the column name). If you have 250 rows filled out then the length will be 251.
Let’s save it into a variable ‘x’ so we can use it as the upper bound for our random row generator. This means on any given day we will access a random row that is filled out, but never a blank row.
x = len(sheet.col_values(1))
randomRow = randint(0,x)
Get cell values
After we’ve selected a random row, we will read the cell values for each column. This includes the book title, the quote and the key takeaway. Save these into their own variables so we can call them in the email.
book = sheet.cell(randomRow, 2).value
quote = sheet.cell(randomRow, 3).value
kt = sheet.cell(randomRow, 4).value
Open SMTP connection
Next comes the outbound email to yourself. I recommend using SMTP and gmail to handle this. Create an insecure connection and then upgrade to TLS. This is done using the .starttls() method.
smtpObj = smtplib.SMTP('smtp.gmail.com', 587)smtpObj.ehlo()smtpObj.starttls()Authenticate with gmail
You just need your email and password. However, if you have 2-step verification enabled (hopefully you do), then you may need an app specific password.
gmail_user = 'you@gmail.com'
gmail_password = 'P@ssword!'smtpObj.login(gmail_user, gmail_password)
Create the email
Once authenticated, we insert our variables from above into the body.
sent_from = 'you@gmail.com'
to = ['me@gmail.com']
body = 'Subject: Daily Quote\n\n %s\n %s\n %s' % (book, quote, kt)
Sending the email
Final step is to call the .sendmail() method with the fields we filled out above. At the end I recommend ending the connection.
sendmailStatus = smtpObj.sendmail(sent_from, to, body.encode('utf-8'))
if sendmailStatus != {}:
	print('There was an error sending daily email')smtpObj.quit()
Our final script should look like this:
import gspread
from oauth2client.service_account import ServiceAccountCredentials
from random import randint
from httplib2 import Http
import smtplib
scope = ['https://spreadsheets.google.com/feeds',
        'https://www.googleapis.com/auth/drive']
credentials = ServiceAccountCredentials.from_json_keyfile_name('client_secret.json', scope)
gc = gspread.authorize(credentials)
wks = gc.open("Daily Quote Email")
sheet = wks.worksheet("Quotes")
x = len(sheet.col_values(1))
randomRow = randint(0,x)
book = sheet.cell(randomRow, 2).value
quote = sheet.cell(randomRow, 3).value
kt = sheet.cell(randomRow, 4).value
smtpObj = smtplib.SMTP('smtp.gmail.com', 587)
smtpObj.ehlo()
smtpObj.starttls()
gmail_user = 'you@gmail.com'
gmail_password = 'P@ssword!'
smtpObj.login(gmail_user, gmail_password)
sent_from = 'you@gmail.com'
to = ['me@gmail.com']
body = 'Subject: Daily Quote\n\n %s\n %s\n %s' % (book, quote, kt)
sendmailStatus = smtpObj.sendmail(sent_from, to, body.encode('utf-8'))
if sendmailStatus != {}:
    print('There was an error sending daily email')
smtpObj.quit()
Turning script into daily lambda function on AWS
Great job so far! Now that we have the script working locally on our machine, we are going to turn it into an AWS Lambda Function so we can run it daily from the cloud.
Create Function
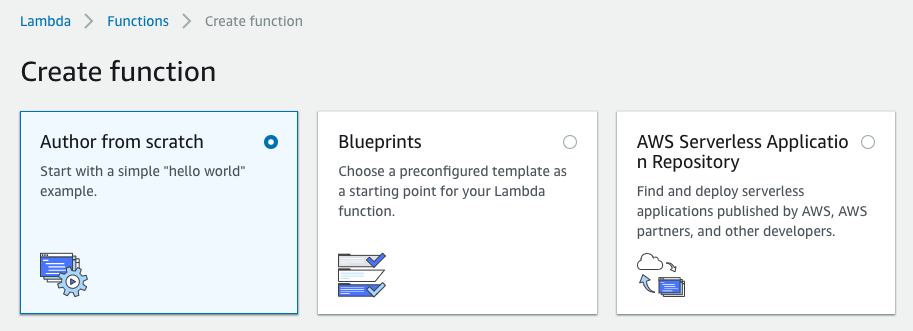
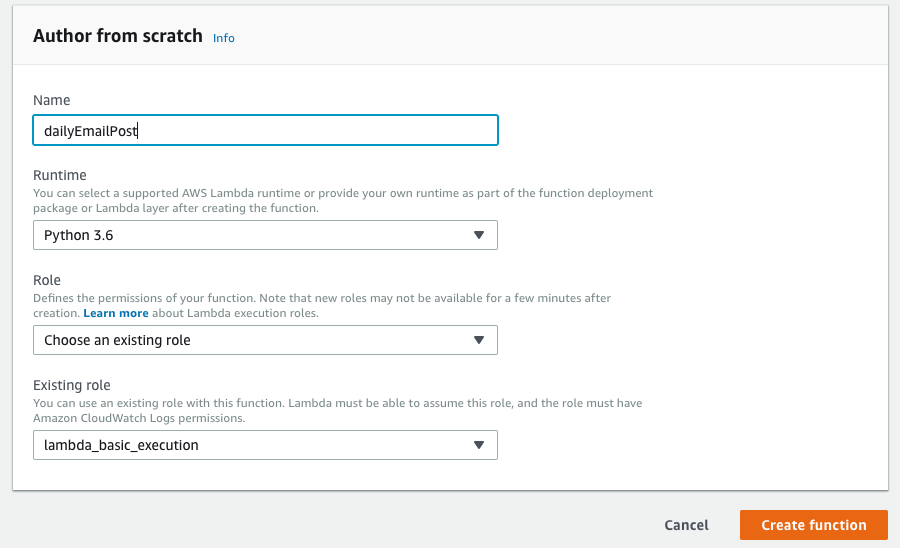
Sign in to AWS and head to the Lambda Management Console. Choose Create Function and select the Author From Scratch option.
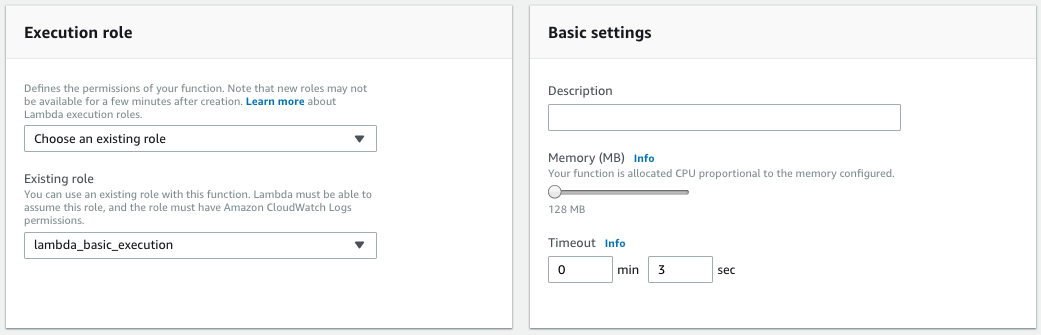
Give your function a name that is somewhat descriptive then select Python 3.6 for runtime. We will use an existing role for the permissions and that existing role will be the lambda_basic_execution option.
Configure Trigger
While configuring the function we will add a trigger from the predefined list. We are going to choose CloudWatch Events to set up our trigger.
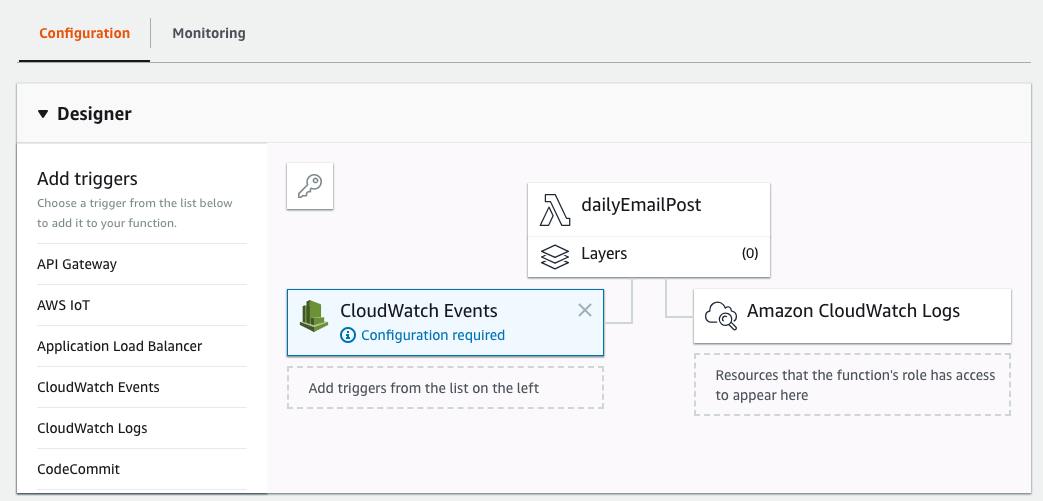
After selecting CloudWatch Events we are going to create a new rule and call it daily_email_trigger. Make sure to add a brief description and then choose the Schedule expression Rule Type so we can create a cron job to run each morning at the same time.

Function Code
Next, we are going to upload our function code that we worked on previously. But, before we do that, let’s go back to our script and add one more edit to make so AWS can handle everything on its end.
We need to select our code and turn it into an AWS Lambda function by adding this line:
def lambda_handler(event, context):With all the code below it selected, tab over once. Your final code should look like this:
import gspread
from oauth2client.service_account import ServiceAccountCredentials
from random import randint
from httplib2 import Http
import smtplib
def lambda_handler(event, context):
scope = ['https://spreadsheets.google.com/feeds',
'https://www.googleapis.com/auth/drive']
credentials = ServiceAccountCredentials.from_json_keyfile_name('client_secret.json', scope)
# connect to google sheets
gc = gspread.authorize(credentials)
# open Daily Quote Email workbook
wks = gc.open("Daily Quote Email")
# open sheet by title
sheet = wks.worksheet("Quotes")
# Get length of column to use in random
x = len(sheet.col_values(1))
# get random number
randomRow = randint(0,x)
# get cell values and place in variables
book = sheet.cell(randomRow, 2).value
quote = sheet.cell(randomRow, 3).value
kt = sheet.cell(randomRow, 4).value
# send outbound email, to myself, subject line is constant, body
smtpObj = smtplib.SMTP('smtp.gmail.com', 587)
smtpObj.ehlo()
smtpObj.starttls()
gmail_user = 'you@gmail.com'
gmail_password = 'P@ssword!'
smtpObj.login(gmail_user, gmail_password)
sent_from = 'you@gmail.com'
to = ['me@gmail.com']
body = 'Subject: Daily Quote\n\n %s\n %s\n %s' % (book, quote, kt)
sendmailStatus = smtpObj.sendmail(sent_from, to, body.encode('utf-8'))
if sendmailStatus != {}:
print('There was an error sending daily email')
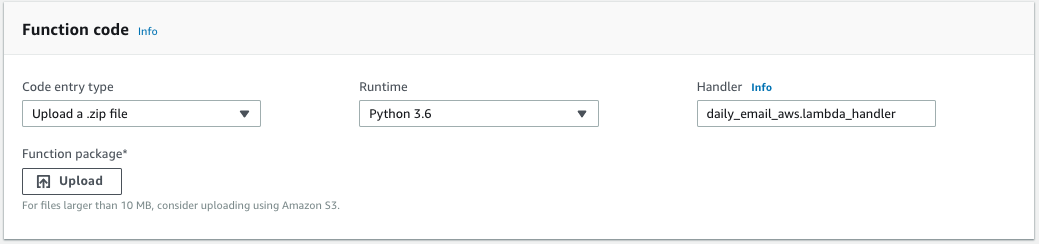
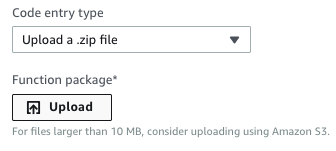
smtpObj.quit()Back in our AWS console, we are going to upload a .zip file for our code entry type, using a Python 3.6 Runtime. We also need to rename the Handler to reflect the name of our function followed by .lambda_handler.
AWS help describes it as:
The filename.handler-method value in your function. For example, “main.handler” calls the handler method defined in main.py.
Uploading a Zip File
This part is a little tricky, but I have found a version that works for me. Please note there could be a better way to do this, so feel free to leave recommendations in the comments.
You can find AWS instructions here. I follow these pretty closely, but leave the terminal to do some old fashioned copy → paste from the Finder window.
Make sure you followed the previous steps of creating a virtual environment and installing the necessary site packages. Either from the terminal or via the Finder window, navigate to your site packages folder within the virtual environment and add two files:
- daily_email_aws.py
- client_secret.json
You can copy → paste your most up-to-date function with the event handler in it, and your client_secret.json that authorizes gspread to interact with our google sheet.
With both these files in the site-packages folder, you can zip it.
Zip the files with the following commands (Or right click and zip it).
$ cd venv/lib/python3.6/site-packages/
$ zip -r9 ../daily_email_aws.zip .
Back in the AWS console we can now Upload our function package:
Adding Finishing Touches
I left Environment variables and Tags blank. Double check that you have the lambda_basic_execution role selected. I’d also recommend adding a 3 sec timeout within basic settings, just in case.
Testing Function
After we save our function, we are ready to test it! Simply click the test button and keep your fingers crossed until you see the following log:

If you get the opposite version that is red, I’d recommend revisiting the steps above. If you still can’t figure it out, leave me a note and I will try to answer any specific questions.
Enjoy your daily email!
And there you have it. One of your favorite quotes, emailed right to your inbox daily. The best part is you start your day with a new dot to connect. Sometimes the quote will feel timely and relevant to your day ahead, other times it will seem completely random. Either way, it’s a fun daily activity that really gets you reading and highlighting more so you can contribute to your google sheet.
Enjoy the gift that keeps on giving!
New posts delivered to your inbox
Get updates whenever I publish something new. If you're not ready to smash subscribe just yet, give me a test drive on Twitter.