Building an NBA MySQL Database With Python
August 2, 2020Let’s start with good news and bad news. The good news is, the NBA has a stats portal online where they keep data for current and historic NBA games. The bad news is, it’s embedded within the NBA web app where we can’t easily download and manipulate the data for personal fantasy basketball use.
Despite the bad news, there is a solution out there. That solution is laid out in this post. If Adam Silver purposely restricted access to the NBA API, that means the more this post gets shared, the more likely I get banned from all NBA arenas (if we ever go back). I am willing to risk that for you all. I shall do my best to walk you through, step-by-step, how to scrape the site and store all of the data locally. From there you can do as you please.
For those not willing to dig in with me, I am offering you an out. I’ve conveniently hyperlinked to my github repo. The repo has all of my code for you to enjoy. If you do take this shortcut, I only ask that you take a peak at my Python Udemy class. I am unable to offer it for free since it is longer than 2hrs, but DM me on Twitter and I’ll get you a code.
Okay, enough with the foreplay. Let’s get into the game.
Prerequisites:
- Light Python Knowledge
- A non-f’d up Python 3.6 environment
Introduction
First things first, we need a place to store the data. That means we need to create a database! For this project we will use the world’s most popular open source database, MySQL. If you are heavily Pro PostgreSQL and anti-MySQL, drop a line in the comments or DM me. I want to develop a database backbone because right now I’m a leaf blowing in the wind.
As a quick recap, a database is an organized collection of data. Within a database are tables. Tables have one entity on each row, with multiple columns that store more data about the entity. These rows and columns typically include relationships to entities in other tables.
To put this in NBA speak, the data would be the stats, the tables would be the types of stats being stored (e.g. Traditional, Advanced, Clutch) and the entities would be players, teams or games.
Downloading & Installing MySQL
We’ll refer to the MySQL documentation to help guide us through this setup. There is not one way to install MySQL. We will do it old school since I was able to do this when I was just starting to learn to code.
Download MySQL Community Server
We first need to download the MySQL community server which is free to use.
Install MySQL
Once the download is complete, open the file. You will want to select the option that says DMG Archive. After clicking download, you will eventually be given a temporary password. Be sure to jot this down in a TextFile or Notes App for your initial log-in.
Start MySQL
Next, we need to launch MySQL locally. To do this, open System Preferences.
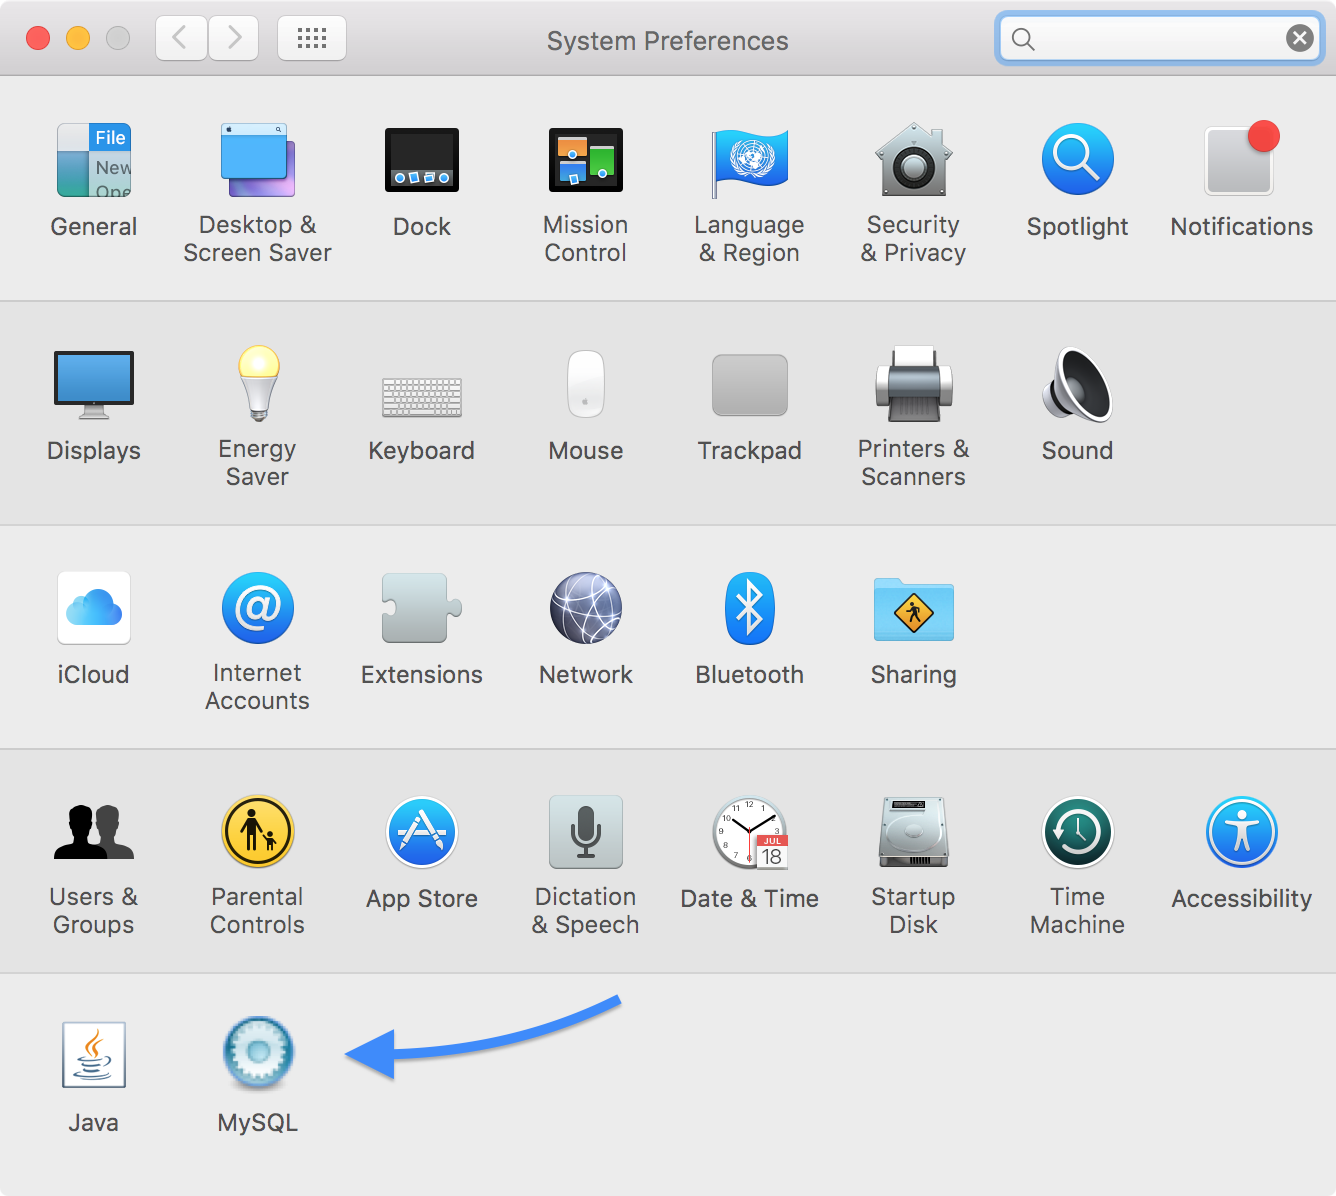
Navigate to the MySQL icon and then click “Start MySQL Server”
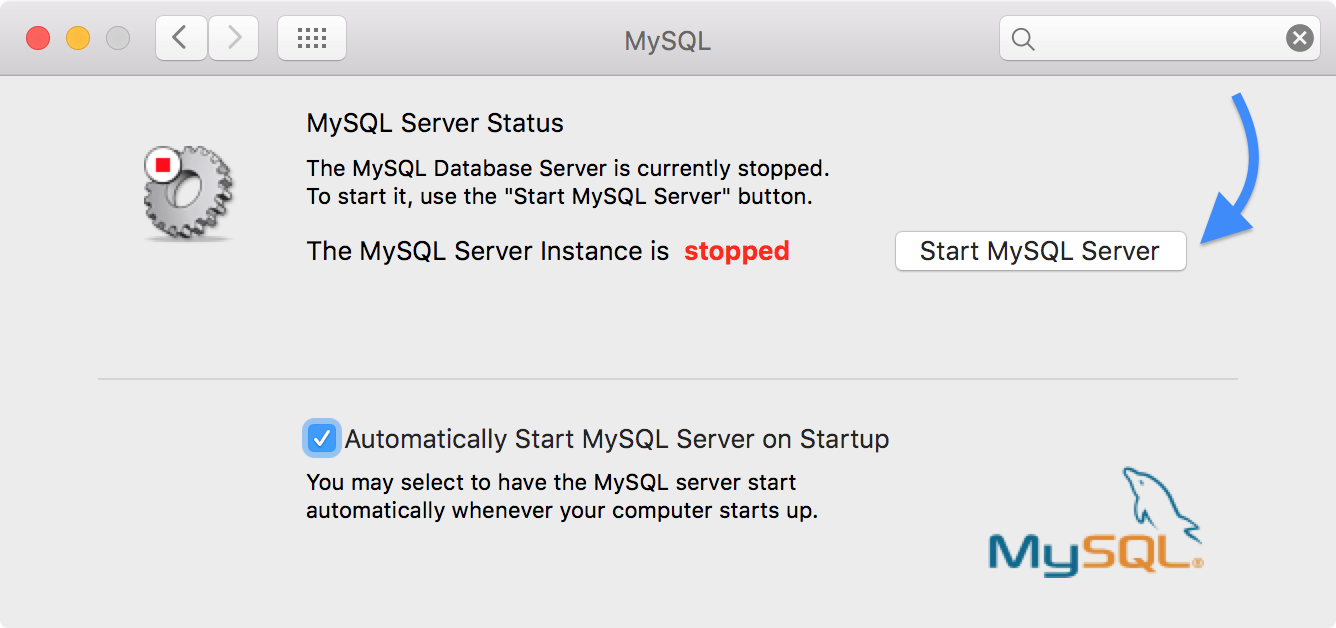
If your computer ever gets disconnected, you will need to revisit this step and launch the MySQL server again. I would recommend setting the default to automatically start the server every time your computer starts up.
What you need to do now is open a new Terminal window and run the following command
export PATH=$PATH:/usr/local/mysql/binYou can also add it to your bash_profile. I don’t have enough knowledge about bash profiles to comment on them but if you do, please reach out and I can update this post accordingly.
From here we can launch MySQL and create our account:
$ /usr/local/mysql/bin/mysql -u root -p
Enter your password: **********
Try not to forget your password as there is no easy email reset option…
Create a New NBA Stats Database
Now that we are in MySQL in our terminal, let’s create a database. This is really the only SQL we are going to write. Create a new database with the following command:
$ CREATE DATABASE nba_stats;I have plans and an early outline to go in-depth with SQL using NBA Stats. If you’re interested in getting access when that is ready you can sign up here.
Remember when I said we were only going to use one SQL command? I lied. Let’s check to make sure our database is there by typing:
$ SHOW DATABASES;Bravo.
Setting Up A Virtual Environment
A virtual environment is a copy of the Python interpreter into which you can install packages privately, without affecting the global Python interpreter installed in your system. Your future self will thank you for using a virtual environment whenever possible. It helps to keep code contained. It helps to make it more replicable since all the dependencies and site packages are in one place. People set up virtual environments numerous ways, but here are the steps I personally follow, which haven’t failed me yet:
Creating a new project folder
Let’s call ours nba-sql. We will create a virtual environment inside the nba-sql folder. Side note, I pronounce mkdir “MAKE-DUR.” Am I the only one? I’ve never heard it in spoken word before…
$ mkdir nba-sql
$ cd nba-sql
Creating the virtual environment
We can create a virtual environment without installing anything new. The -m venv option runs the venv package from the standard python library. We will run it as a standalone python script, passing the desired name as an argument. Our desired name is venv. Why? Because it’s trendy. You’ll see around the internet that most people use venv as the virtual environment folder name, but feel free to name it whatever. Like (insert Elon Musk baby name). Make sure your current directory is set to nba-sql and run this command:
$ python -m venv venvNow, we need to activate the virtual environment. To do so, we basically abra-kadabra it with the following command:
$ source venv/bin/activateGreat! Now we are all set up. Make sure you always activate your virtual environment before making any changes to our code, or else you will run into some errors. You know it is activated when you see (venv) to the left of the dollar sign.
Installing modules & packages
The beauty of the virtual environment is that we can install all packages and dependencies in one place, making it easy to share and update. We will be using pip to get the packages we want.
Pip is a package management system used to install and manage software packages written in Python. Since we are using Python 3.6.6, we don’t need to call pip3 since our environment is already using Python 3. Your terminal will tell you if the packages were successfully installed. Pray you hit no errors.
Downloading a Package
Downloading a package is very easy with pip. Simply go to your terminal and make sure you are in your virtual environment, then tell pip to download the package you want by typing the following:
$ pip install <package> # where package is the package you're trying to installNow, let’s install the packages we need. We’ll go through what each of these packages means and what it provides us later on.
Install modules
(venv) $ pip install requests
(venv) $ pip install peewee
(venv) $ pip install pymysql
(venv) $ pip install cryptography
(venv) $ pip install python-dotenv
The other way to handle this is to install the requirements.txt file from github. We don’t need to touch on that. You’re a simple google search away from knowing how to do it.
Inspecting nba.stats.com
Now that we have our environment setup, it is time to head into the wonderful world of stats.nba.com. This portion of the project was heavily inspired by a post from Greg Reda which you can read in full here. We’ll be using his instructions for finding the NBA stats API as a jumping off point.
Finding the API
Head to stats.nba.com in your Chrome browser. For simplicity’s sake, let’s start with the traditional player stats table.
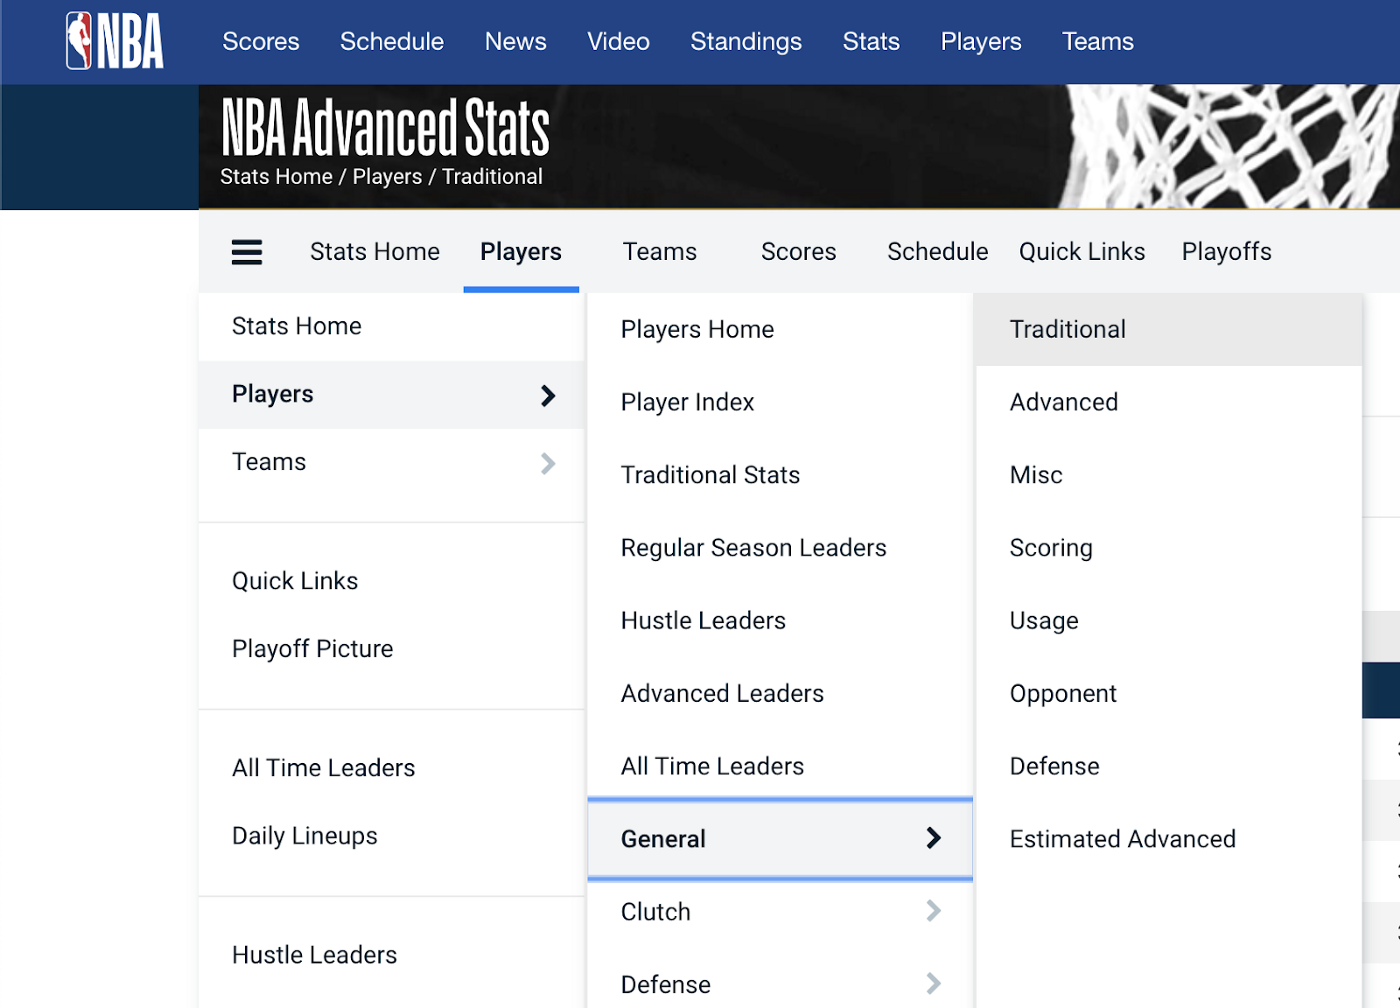
With the help of Chrome’s Developer Tools we can inspect where this treasure trove of NBA data is coming from. To access Chrome’s Developer Tools, go to View → Developer → Developer Tools. Or if you’re fancy, right click and inspect. Click the Network tab then hit refresh to populate.
The next steps come directly from Greg with screengrabs courtesy of yours truly (in dark mode too!).
Click on the XHR filter. XHR is short for XMLHttpRequest — this is the type of request used to fetch XML or JSON data. You should see a couple entries in this table (screenshot below). One of them is the API request that returns the data you’re looking for.
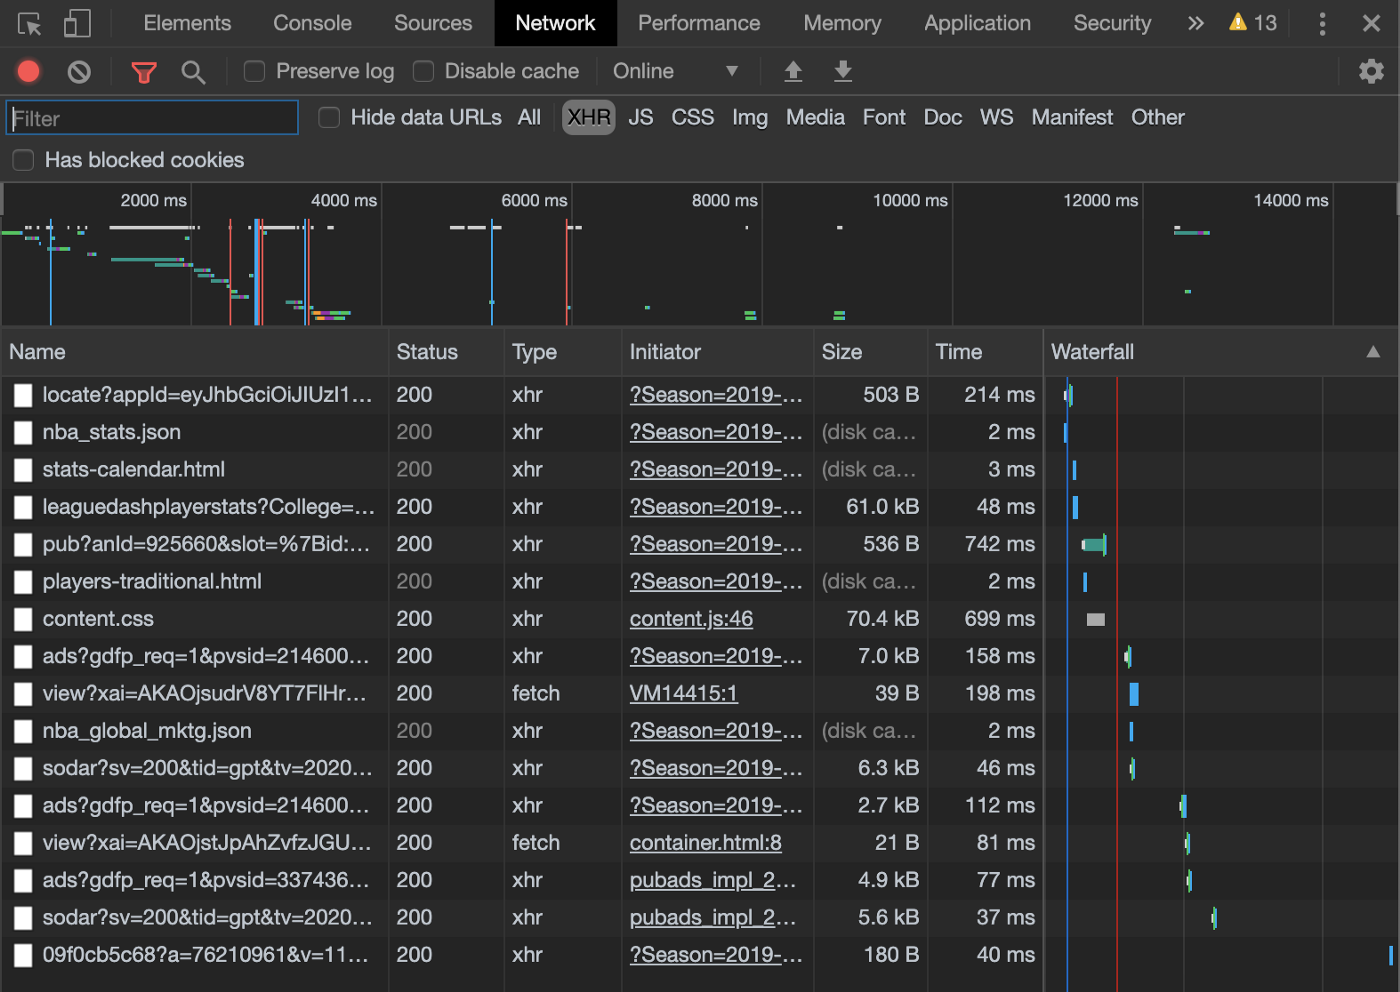
At this point, you’ll need to explore a bit to determine which request is the one you want. For our example, the one starting with “leaguedashplayerstats” sounds promising. Let’s click on it and view it in the Preview tab. Things should now look like this:
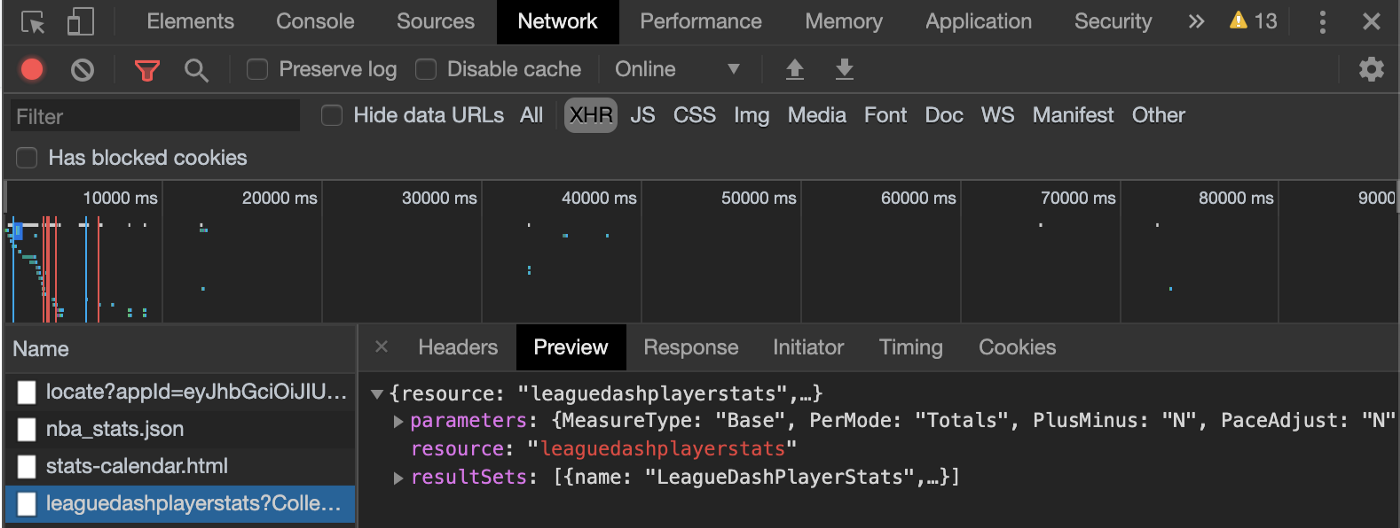
Bingo! We’ve found the API endpoint. This is like striking oil in the fields. Time to bring our rig over and capture the data. You know what they say after all, data is the new oil…
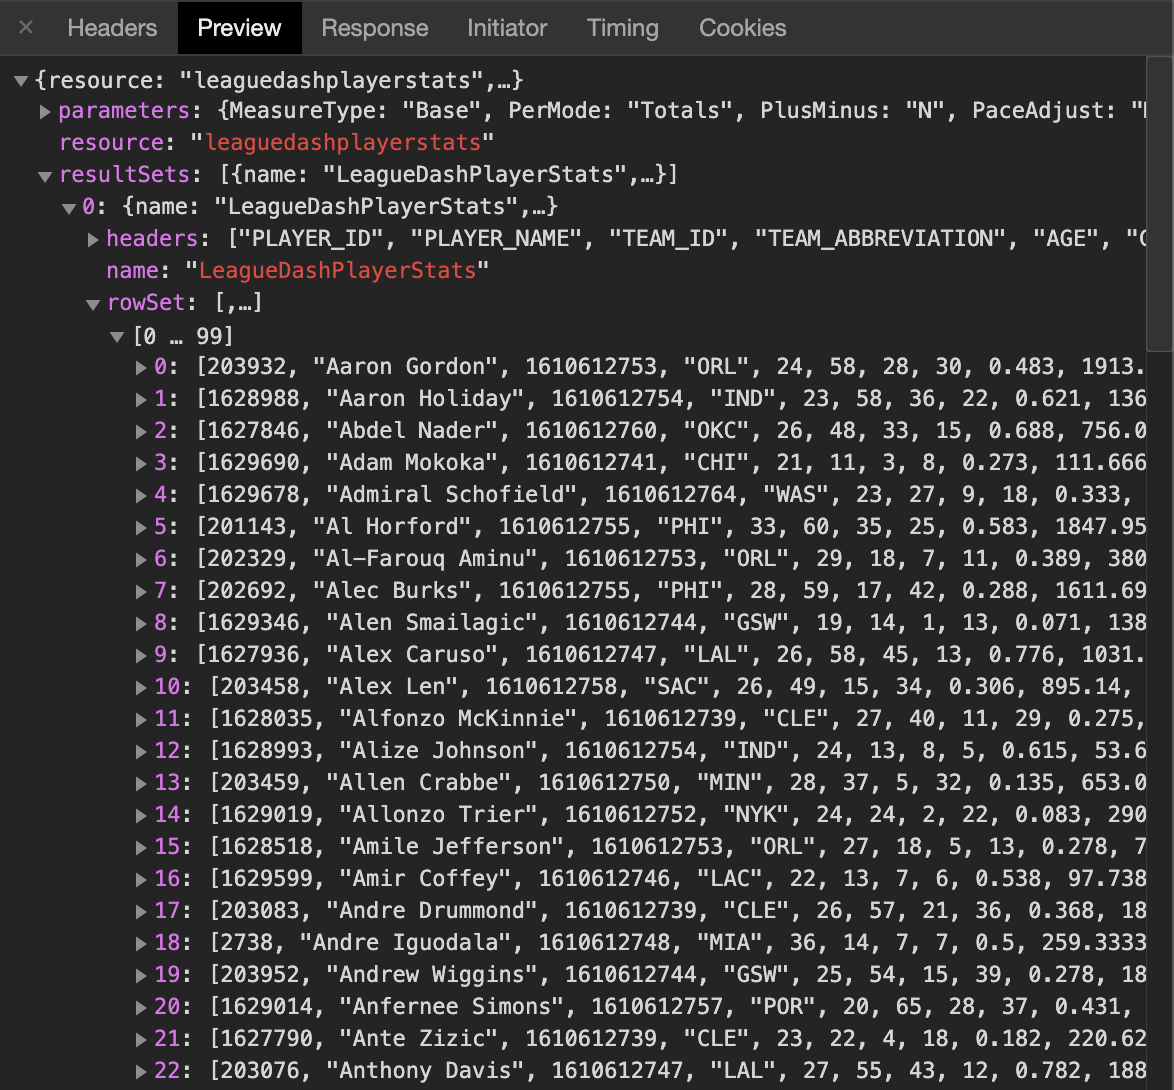
Previewing Results Set
We can use the Preview tab to explore the response. You should see a couple of objects:
- The resource name — “leaguedashplayerstats”.
- The parameters (you might need to expand the resource section). These are the request parameters that were passed to the API. You can think of them like the WHERE clause of a SQL query. This request has parameters of Season=2019–20 and PlayerID=202322 (among others). Change the parameters in the URL and you’ll get different data (more on that in a bit).
- The result sets. This is self-explanatory.
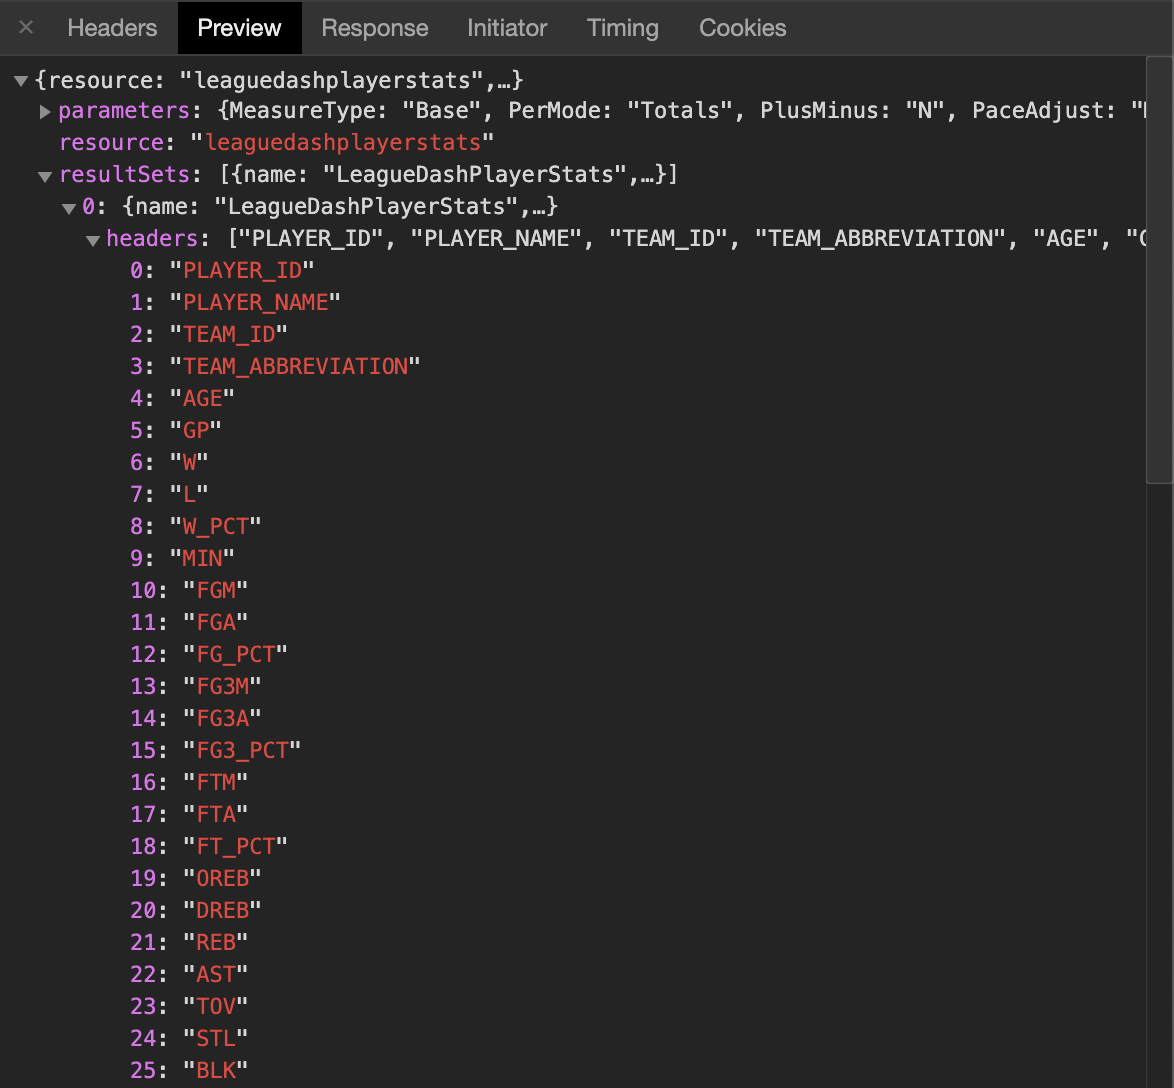
- Within the result sets, you’ll find the headers and row set. Each object in the row set is essentially the result of a database query, while the headers tell you the column order. We can see that the first item in each row corresponds to the “PLAYER_ID”, while the second is the “PLAYER_NAME”.
Back to Greg.
Now, go to the Headers tab, grab the request URL, and open it in a new browser tab. We’ll see the data we’re looking for (example below).
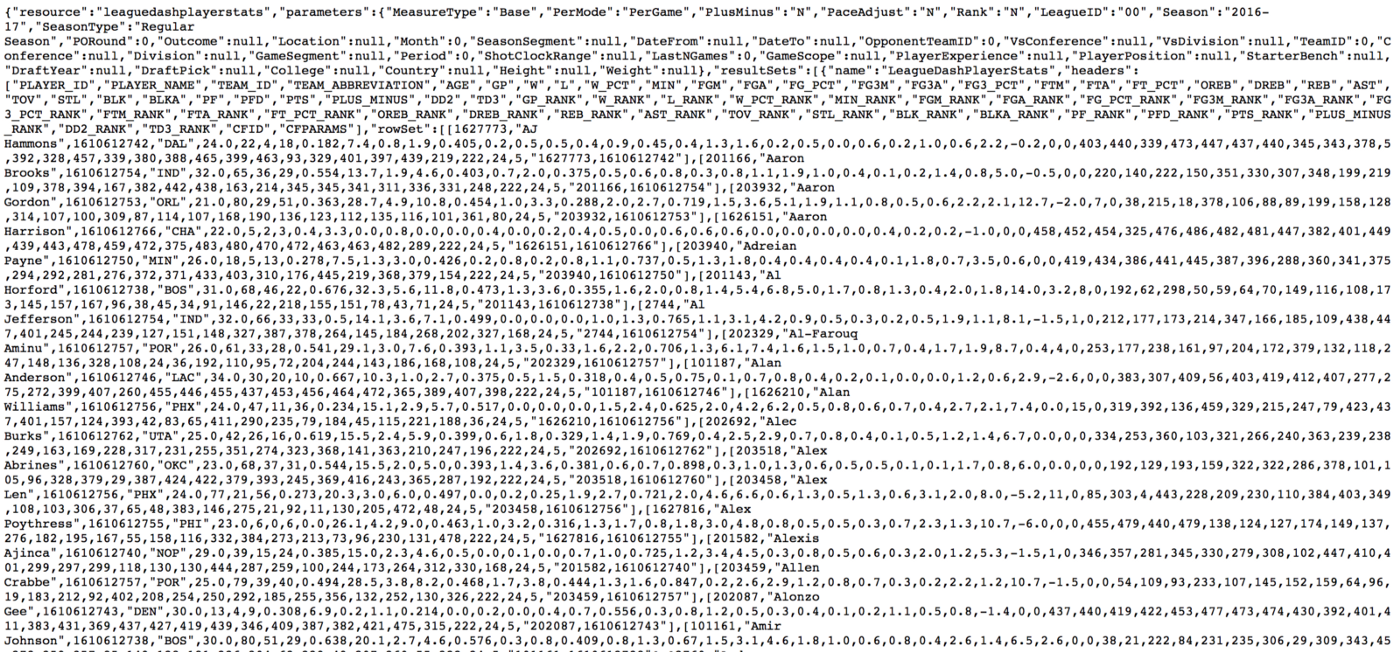
If you can’t see this, fear not, this is because the NBA is playing games with us. But we will get the last laugh.
Now we know where the data is. We can use Python requests to retrieve it, and then peewee to insert it into our database.
When double checking my work I noticed that the NBA added a new row called NBA_FANTASY_POINTS which also contains a rank. Be sure to add these two rows to your code!
Connecting to MySQL with PeeWee
Earlier I mentioned that we want to create a script that is easy to scale and can be used to grab any and all information from the NBA stats site. In order to use our Python script to get any stat (traditional, advanced, clutch) from the NBA website, we want to create classes and objects to make our life easier.
Initializing a Database
To bridge our database with our python script, we are going to be using the peewee module. Peewee supports multiple database engines. We will use mysql as mentioned before.
To connect, import the peewee module and all of its parts. Then fill out the necessary database parameters. The Database initialization method expects the name of the database as the first parameter. MySQL requires that we also specify the host, user and password to initialize. We also need to add the charset. Why? Because there are always tricky things with code. Once we have this all written, a mysql Database object will be created.
from peewee import *
DB_NAME = ‘nba_stats’
DB_HOST = ‘localhost’
DB_USER = ‘root’
DB_PASSWORD = ‘YOUR_PASSWORD’ # this is your password
db = MySQLDatabase(
    DB_NAME,
    host=DB_HOST,
    user=DB_USER,
    password=DB_PASSWORD,
    charset=’utf8mb4'
    )
Now bear with me here. We are going to create a new file and name it settings.py. We will add the code below into that file. It will have a class Settings and we will reference it to initiate our database connections. Said another way, we are converting the above into a settings.py file so we can easily reuse it throughout our code without needing to copy paste it each time.
**While reviewing this I realized I didn’t go into any detail regarding the installation and usage of the package, python-dotenv. python-dotenv is used to load our access keys and secrets from secret files so no one can steal it and hijack our code. Here is a short video from my free Twitter bot course that explains it in more detail.**
import os
from dotenv import load_dotenv
load_dotenv()
from peewee import *
DB_NAME = os.getenv(‘DB_NAME’)
DB_HOST = os.getenv(‘DB_HOST’)
DB_USER = os.getenv(‘DB_USER’)
DB_PASSWORD = os.getenv(‘DB_PASSWORD’)
class Settings:
def __init__(self):
    self.db = MySQLDatabase(
    DB_NAME,
    host=DB_HOST,
    user=DB_USER,
    password=DB_PASSWORD,
    charset=’utf8mb4'
    )
    self.user_agent = “Mozilla/5.0 (X11; Linux x86_64) AppleWebKit/537.36 (KHTML, like Gecko) Chrome/48.0.2564.82 Safari/537.36”
You probably noticed that we started our class definition off with the following function: __init__(). This function is required for classes, and it’s used to initialize the objects it creates. __init__() always takes at least one argument, self, that refers to the object being created. You can think of __init__() as the function that “boots up” each object the class creates.
Creating a base model class which specifies our database
Peewee recommends defining a base model class that points at the database object we want to use, and then all our models will extend it. If you don’t believe me, read this:
Best practice: define a base model class that points at the database object you wish to use, and then all your models will extend it.
Let’s create a new models folder with our MAKEDUR command and a new file called BaseModel.py.
Add the following to said file:
from peewee import *
from settings import Settings

settings = Settings()

class BaseModel(Model):
    class Meta:
        database = settings.db
To use our database above with our models, we need to set the database attribute on an inner Meta class. Meta configuration is passed onto subclasses, so our project’s models will all have a subclass that is BaseModel.
From here we will get our database name from our settings.py file by accessing the db directly. This is also what establishes the database connection.
Again, the reason for the BaseModel is to avoid redundancy since peewee requires us to pass the db in each Model class. This will start to make more sense when we get to the next section.
Defining our Models
In peewee we want to define our Model classes. Think of the Model classes as database tables. That means for each table on the NBA stats website we will want to create a class in our code.
The model class then defines one or more field attributes which correspond to the table’s columns. In our case, each column would represent a different statistic.
A basic class consists only of the class keyword, the name of the class, and the class from which the new class inherits in parentheses. For now, our classes will inherit from the object class, like so:
class NewClass(object):
	# Class magic here
This class magic gives us the powers and abilities of a Python object. By convention, user-defined Python class names start with a capital letter.
Before we get going, let’s build on what we already created by importing our BaseModel class to help define things. For our first table we will focus on Player General Traditional Stats and the Total Stats.
To create our first model (aka table) we need to define our model classes, specifying the columns as Fields instances on the class.
# import the BaseModel class to define it
# Within the basemodel script we have a Settings object which specifies the database

from peewee import *
from .BaseModel import BaseModel

class PlayerGeneralTraditionalTotals(BaseModel):
We are now extending the BaseModel class that we previously created to the PlayerGeneralTraditional model so it will inherit the database connection. Let’s dive deeper on the fields we need to add.
Fields
The Field class is used to describe the mapping of Model attributes to database columns (aka stats). Each field type has a corresponding SQL storage class (i.e. varchar, int). When creating a Model class, fields are defined as class attributes. As mentioned above, the Fields for us will be columns in a stats table.
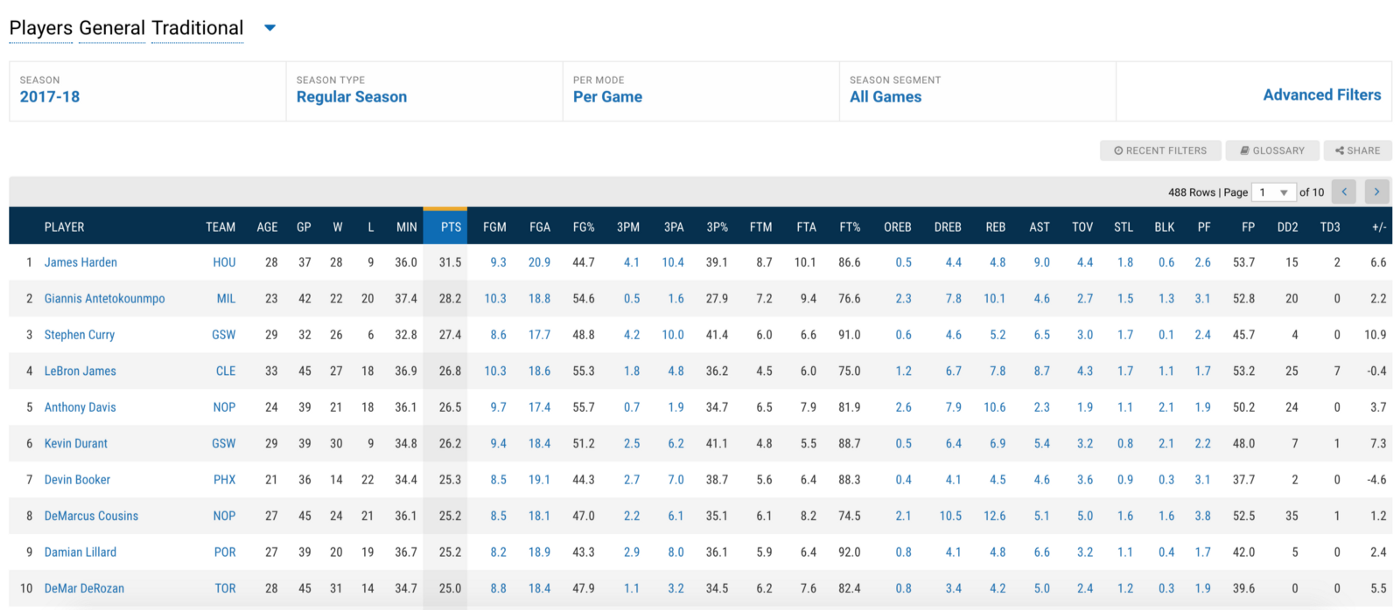
To get a better view of the class attributes which we’ll use as the fields, we can inspect the headers from our preview tab.
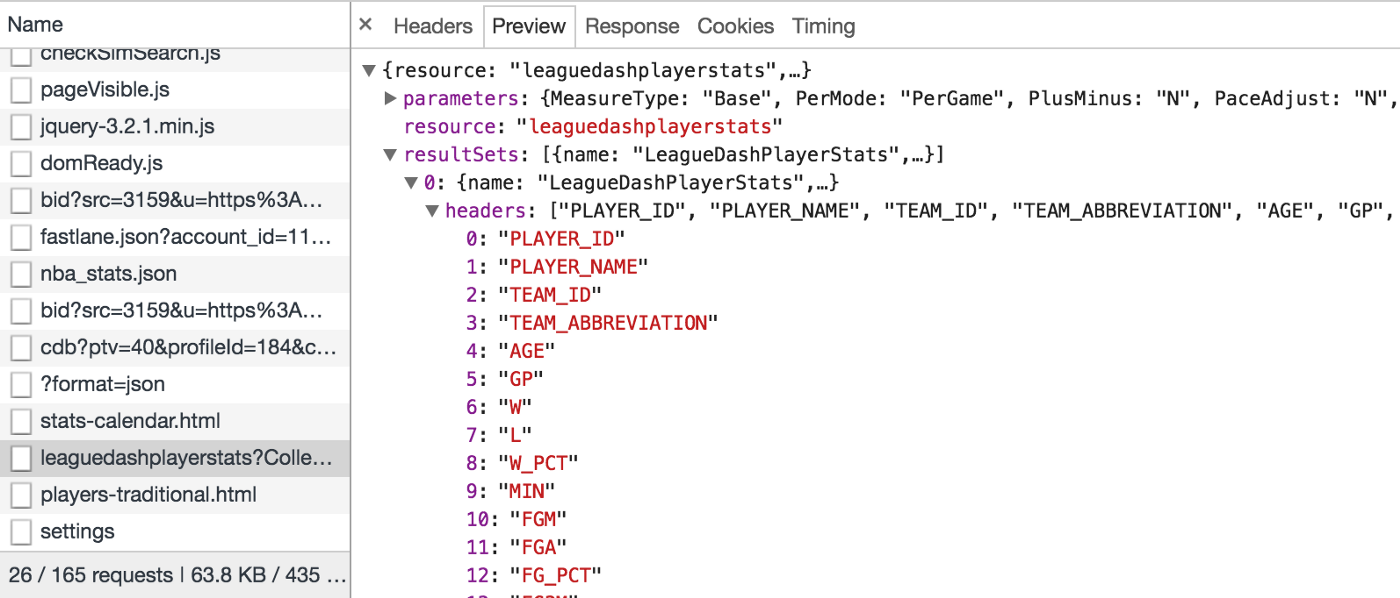
We will want to create a field for each of the headers like below.
# the user model specifies its fields (or columns) declaratively

class PlayerGeneralTraditionalTotals(BaseModel):
    season_id = CharField(null=True)
    player_id = IntegerField(null=True)
    player_name = CharField(null=True)
    team_id = IntegerField(null=True)
    team_abbreviation = CharField(null=True)
    age = IntegerField(null=True)
    gp = IntegerField(null=True)
    w = IntegerField(null=True)
    l = IntegerField(null=True)
    w_pct = FloatField(null=True)
    min = FloatField(null=True)
    fgm = FloatField(null=True)
    fga = FloatField(null=True)
    fg_pct = FloatField(null=True)
    fg3m = FloatField(null=True)
    fg3a = FloatField(null=True)
    fg3_pct = FloatField(null=True)
    ftm = FloatField(null=True)
    fta = FloatField(null=True)
    ft_pct = FloatField(null=True)
    oreb = FloatField(null=True)
    dreb = FloatField(null=True)
    reb = FloatField(null=True)
    ast = FloatField(null=True)
    tov = FloatField(null=True)
    stl = FloatField(null=True)
    blk = FloatField(null=True)
    blka = FloatField(null=True)
    pf = FloatField(null=True)
    pfd = FloatField(null=True)
    pts = FloatField(null=True)
    plus_minus = FloatField(null=True)
    nba_fantasy_points = FloatField(null=True)
    dd2 = FloatField(null=True)
    td3 = FloatField(null=True)
    gp_rank = IntegerField(null=True)
    w_rank = IntegerField(null=True)
    l_rank = IntegerField(null=True)
    w_pct_rank = IntegerField(null=True)
    min_rank = IntegerField(null=True)
    fgm_rank = IntegerField(null=True)
    fga_rank = IntegerField(null=True)
    fg_pct_rank = IntegerField(null=True)
    fg3m_rank = IntegerField(null=True)
    fg3a_rank = IntegerField(null=True)
    fg3_pct_rank = IntegerField(null=True)
    ftm_rank = IntegerField(null=True)
    fta_rank = IntegerField(null=True)
    ft_pct_rank = IntegerField(null=True)
    oreb_rank = IntegerField(null=True)
    dreb_rank = IntegerField(null=True)
    reb_rank = IntegerField(null=True)
    ast_rank = IntegerField(null=True)
    tov_rank = IntegerField(null=True)
    stl_rank = IntegerField(null=True)
    blk_rank = IntegerField(null=True)
    blka_rank = IntegerField(null=True)
    pf_rank = IntegerField(null=True)
    pfd_rank = IntegerField(null=True)
    pts_rank = IntegerField(null=True)
    plus_minus_rank = IntegerField(null=True)
    nba_fantasy_points_rank = IntegerField(null=True)
    dd2_rank = IntegerField(null=True)
    td3_rank = IntegerField(null=True)
    cfid = IntegerField(null=True)
    cfparams = CharField(null=True)

    # data is coming from nba_sql.db
    class Meta:
       db_table = ‘player_general_traditional_totals’
Peewee will automatically infer the database table name from the name of the class. You can override the default name by specifying a table_name attribute in the inner “Meta” class. So In this Meta class I am passing table names directly in the db_table property.
Default field values
Peewee can provide default values for fields when objects are created. For example, to have an IntegerField default to zero rather than NULL, you could declare the field with a default value. These fields are going to be different for every table you create, so be sure to inspect each table accordingly.
Create an __init__.py file
One thing we need to address to make sure this works as expected is creating an __init__ file. This file contains all of our classes we reference, including the BaseModel. I need to be real with you. I don’t really understand __init__ files. I am hoping a reader can try to explain it as if I am a second grader. If not, I will continue exploring the interwebs until I can explain it like I can explain the inplace parameter (which baffled me for a year until it clicked).
from .BaseModel import BaseModel
from .PlayerGeneralTraditionalTotals import PlayerGeneralTraditionalTotals
We did this for the Player General Traditional Totals table but we would go through the same exercise for each table we wanted. This includes Per Game tables or any other tables you created with other stats.
Bring it all together with a python script to scrape
Before we go any further, make sure your MySQL Server is running via system preferences.
Now that we’ve created our BaseModel and defined the model class, we can write the script that will actually scrape the NBA stats website.
We will use the requests module to get the json data from the NBA API and then use peewee to dynamically create our table and insert the data. I will share the code in it’s entirety first. Then we will run through examples in a jupyter notebook just so I can break it down cell by cell.
In the stats folder, create a new file player_general_traditional_totals.py. Add the following:
import requests
from settings import Settings
from models import PlayerGeneralTraditionalTotals
settings = Settings()
settings.db.create_tables([PlayerGeneralTraditionalTotals], safe=True)
headers  = {
    'Connection': 'keep-alive',
    'Accept': 'application/json, text/plain, */*',
    'x-nba-stats-token': 'true',
    'User-Agent': 'Mozilla/5.0 (Macintosh; Intel Mac OS X 10_14_6) AppleWebKit/537.36 (KHTML, like Gecko) Chrome/79.0.3945.130 Safari/537.36',
    'x-nba-stats-origin': 'stats',
    'Sec-Fetch-Site': 'same-origin',
    'Sec-Fetch-Mode': 'cors',
    'Referer': 'https://stats.nba.com/',
    'Accept-Encoding': 'gzip, deflate, br',
    'Accept-Language': 'en-US,en;q=0.9',
}
season_list = [
    '1996-97',
    '1997-98',
    '1998-99',
    '1999-00',
    '2000-01',
    '2001-02',
    '2002-03',
    '2003-04',
    '2004-05',
    '2005-06',
    '2006-07',
    '2007-08',
    '2008-09',
    '2009-10',
    '2010-11',
    '2011-12',
    '2012-13',
    '2013-14',
    '2014-15',
    '2015-16',
    '2016-17',
    '2017-18',
    '2018-19',
    '2019-20'
]
#per_mode = 'Per100Possessions'
per_mode = 'Totals'
#per_mode = 'Per36'
#per_mode = 'PerGame'
# for loop to loop over seasons
for season_id in season_list:
    print("Now working on "+season_id+ " season")
    # nba stats url to scrape
    player_info_url = 'https://stats.nba.com/stats/leaguedashplayerstats?College=&Conference=&Country=&DateFrom=&DateTo=&Division=&DraftPick=&DraftYear=&GameScope=&GameSegment=&Height=&LastNGames=0&LeagueID=00&Location=&MeasureType=Base&Month=0&OpponentTeamID=0&Outcome=&PORound=0&PaceAdjust=N&PerMode=' + per_mode +'&Period=0&PlayerExperience=&PlayerPosition=&PlusMinus=N&Rank=N&Season=' + season_id + '&SeasonSegment=&SeasonType=Regular+Season&ShotClockRange=&StarterBench=&TeamID=0&TwoWay=0&VsConference=&VsDivision=&Weight='
    # json response
    response = requests.get(url=player_info_url, headers=headers).json()
    # pulling just the data we want
    player_info = response['resultSets'][0]['rowSet']
    # looping over data to insert into table
    for row in player_info:
        player = PlayerGeneralTraditionalTotals(
            season_id=season_id, # this is key, need this to join and sort by seasons
            player_id=row[0],
            player_name=row[1],
            team_id=row[2],
            team_abbreviation=row[3],
            age=row[4],
            gp=row[5],
            w=row[6],
            l=row[7],
            w_pct=row[8],
            min=row[9],
            fgm=row[10],
            fga=row[11],
            fg_pct=row[12],
            fg3m=row[13],
            fg3a=row[14],
            fg3_pct=row[15],
            ftm=row[16],
            fta=row[17],
            ft_pct=row[18],
            oreb=row[19],
            dreb=row[20],
            reb=row[21],
            ast=row[22],
            tov=row[23],
            stl=row[24],
            blk=row[25],
            blka=row[26],
            pf=row[27],
            pfd=row[28],
            pts=row[29],
            plus_minus=row[30],
            nba_fantasy_pts=row[31],
            dd2=row[32],
            td3=row[33],
            gp_rank=row[34],
            w_rank=row[35],
            l_rank=row[36],
            w_pct_rank=row[37],
            min_rank=row[38],
            fgm_rank=row[39],
            fga_rank=row[40],
            fg_pct_rank=row[41],
            fg3m_rank=row[42],
            fg3a_rank=row[43],
            fg3_pct_rank=row[44],
            ftm_rank=row[45],
            fta_rank=row[46],
            ft_pct_rank=row[47],
            oreb_rank=row[48],
            dreb_rank=row[49],
            reb_rank=row[50],
            ast_rank=row[51],
            tov_rank=row[52],
            stl_rank=row[53],
            blk_rank=row[54],
            blka_rank=row[55],
            pf_rank=row[56],
            pfd_rank=row[57],
            pts_rank=row[58],
            plus_minus_rank=row[59],
            nba_fantasy_pts_rank=row[60],
            dd2_rank=row[61],
            td3_rank=row[62],
            cfid=row[63],
            cfparams=row[64])

        player.save()

print ("Done inserting player general traditional season total data to the database!")
For easier readability, take a look at my Jupyter notebook viewer.
First things first we need to import the modules we need. This includes the famous requests model and our settings and class model.
import requests
from settings import Settings
from models import PlayerGeneralTraditionalTotals
Next, let’s initialize our database and create a table based on our BaseModel.
settings = Settings()
settings.db.create_tables([PlayerGeneralTraditionalTotals], safe=True)
To start, let’s pick a specific season and a specific per mode, totals since we can always get per game data from the totals
season_id = ‘2018–19’
per_mode = ‘Totals’
Let’s dynamically insert our season_id and per_mode variables into the url. Remember, these are the parameters we saw earlier. We will get specific data based on the parameters we pass it. If we changed the season we would get different data from the NBA API endpoint.
player_info_url = ‘https://stats.nba.com/stats/leaguedashplayerstats?College=&Conference=&Country=&DateFrom=&DateTo=&Division=&DraftPick=&DraftYear=&GameScope=&GameSegment=&Height=&LastNGames=0&LeagueID=00&Location=&MeasureType=Base&Month=0&OpponentTeamID=0&Outcome=&PORound=0&PaceAdjust=N&PerMode='+per_mode+'&Period=0&PlayerExperience=&PlayerPosition=&PlusMinus=N&Rank=N&Season='+season_id+'&SeasonSegment=&SeasonType=Regular+Season&ShotClockRange=&StarterBench=&TeamID=0&TwoWay=0&VsConference=&VsDivision=&Weight='This is the magic right here. This is what lets us get around Adam Silver and his cronies. For whatever reason, if you add this to the requests headers, you are smooth sailing as of May 2020.
headers  = {
    'Connection': 'keep-alive',
    'Accept': 'application/json, text/plain, */*',
    'x-nba-stats-token': 'true',
    'User-Agent': 'Mozilla/5.0 (Macintosh; Intel Mac OS X 10_14_6) AppleWebKit/537.36 (KHTML, like Gecko) Chrome/79.0.3945.130 Safari/537.36',
    'x-nba-stats-origin': 'stats',
    'Sec-Fetch-Site': 'same-origin',
    'Sec-Fetch-Mode': 'cors',
    'Referer': 'https://stats.nba.com/',
    'Accept-Encoding': 'gzip, deflate, br',
    'Accept-Language': 'en-US,en;q=0.9',
}
This is the response we get back. We will save it into a response variable so we can access the specific json data.
response = requests.get(url=player_info_url, headers=headers).json()If you remember the requests we saw in the preview tab, we wanted the data which was nested a few layers deep. We need to go to results set, take the first set of data, then that specific rowSet.
player_info = response[‘resultSets’][0][‘rowSet’]We will save it into a new variable that allows us to for loop over it. Let’s match each column with the appropriate row. This is time consuming but just copy paste this ‘ish.
for row in player_info:
  player = PlayerGeneralTraditionalTotals(
      season_id=season_id, # this is key, need this to join and sort by seasons
      player_id=row[0],
      player_name=row[1],
      team_id=row[2],
      team_abbreviation=row[3],
      age=row[4],
      gp=row[5],
      w=row[6],
      l=row[7],
      w_pct=row[8],
      min=row[9],
      fgm=row[10],
      fga=row[11],
      fg_pct=row[12],
      fg3m=row[13],
      fg3a=row[14],
      fg3_pct=row[15],
      ftm=row[16],
      fta=row[17],
      ft_pct=row[18],
      oreb=row[19],
      dreb=row[20],
      reb=row[21],
      ast=row[22],
      tov=row[23],
      stl=row[24],
      blk=row[25],
      blka=row[26],
      pf=row[27],
      pfd=row[28],
      pts=row[29],
      plus_minus=row[30],
      nba_fantasy_pts=row[31],
      dd2=row[32],
      td3=row[33],
      gp_rank=row[34],
      w_rank=row[35],
      l_rank=row[36],
      w_pct_rank=row[37],
      min_rank=row[38],
      fgm_rank=row[39],
      fga_rank=row[40],
      fg_pct_rank=row[41],
      fg3m_rank=row[42],
      fg3a_rank=row[43],
      fg3_pct_rank=row[44],
      ftm_rank=row[45],
      fta_rank=row[46],
      ft_pct_rank=row[47],
      oreb_rank=row[48],
      dreb_rank=row[49],
      reb_rank=row[50],
      ast_rank=row[51],
      tov_rank=row[52],
      stl_rank=row[53],
      blk_rank=row[54],
      blka_rank=row[55],
      pf_rank=row[56],
      pfd_rank=row[57],
      pts_rank=row[58],
      plus_minus_rank=row[59],
      nba_fantasy_pts_rank=row[60],
      dd2_rank=row[61],
      td3_rank=row[62],
      cfid=row[63],
      cfparams=row[64])

  player.save()
Let’s run it and voila!
We’ll next squash it into a script and create a new list of season ids to loop over. After that we indent the script once and now we are cooking for each season.
season_list = [
    '1996-97',
    '1997-98',
    '1998-99',
    '1999-00',
    '2000-01',
    '2001-02',
    '2002-03',
    '2003-04',
    '2004-05',
    '2005-06',
    '2006-07',
    '2007-08',
    '2008-09',
    '2009-10',
    '2010-11',
    '2011-12',
    '2012-13',
    '2013-14',
    '2014-15',
    '2015-16',
    '2016-17',
    '2017-18',
    '2018-19',
    '2019-20'
]
#per_mode = 'Per100Possessions'
per_mode = 'Totals'
#per_mode = 'Per36'
#per_mode = 'PerGame'
Note the print statement to keep us updated throughout the script.
# for loop to loop over seasons
for season_id in season_list:
    print("Now working on "+season_id+ " season")
    # nba stats url to scrape
    player_info_url = 'https://stats.nba.com/stats/leaguedashplayerstats?College=&Conference=&Country=&DateFrom=&DateTo=&Division=&DraftPick=&DraftYear=&GameScope=&GameSegment=&Height=&LastNGames=0&LeagueID=00&Location=&MeasureType=Base&Month=0&OpponentTeamID=0&Outcome=&PORound=0&PaceAdjust=N&PerMode=' + per_mode +'&Period=0&PlayerExperience=&PlayerPosition=&PlusMinus=N&Rank=N&Season=' + season_id + '&SeasonSegment=&SeasonType=Regular+Season&ShotClockRange=&StarterBench=&TeamID=0&TwoWay=0&VsConference=&VsDivision=&Weight='
    # json response
    response = requests.get(url=player_info_url, headers=headers).json()
    # pulling just the data we want
    player_info = response['resultSets'][0]['rowSet']
    # looping over data to insert into table
    for row in player_info:
        player = PlayerGeneralTraditionalTotals(
            season_id=season_id, # this is key, need this to join and sort by seasons
            player_id=row[0],
            player_name=row[1],
            team_id=row[2],
            team_abbreviation=row[3],
            age=row[4],
            gp=row[5],
            w=row[6],
            l=row[7],
            w_pct=row[8],
            min=row[9],
            fgm=row[10],
            fga=row[11],
            fg_pct=row[12],
            fg3m=row[13],
            fg3a=row[14],
            fg3_pct=row[15],
            ftm=row[16],
            fta=row[17],
            ft_pct=row[18],
            oreb=row[19],
            dreb=row[20],
            reb=row[21],
            ast=row[22],
            tov=row[23],
            stl=row[24],
            blk=row[25],
            blka=row[26],
            pf=row[27],
            pfd=row[28],
            pts=row[29],
            plus_minus=row[30],
            nba_fantasy_pts=row[31],
            dd2=row[32],
            td3=row[33],
            gp_rank=row[34],
            w_rank=row[35],
            l_rank=row[36],
            w_pct_rank=row[37],
            min_rank=row[38],
            fgm_rank=row[39],
            fga_rank=row[40],
            fg_pct_rank=row[41],
            fg3m_rank=row[42],
            fg3a_rank=row[43],
            fg3_pct_rank=row[44],
            ftm_rank=row[45],
            fta_rank=row[46],
            ft_pct_rank=row[47],
            oreb_rank=row[48],
            dreb_rank=row[49],
            reb_rank=row[50],
            ast_rank=row[51],
            tov_rank=row[52],
            stl_rank=row[53],
            blk_rank=row[54],
            blka_rank=row[55],
            pf_rank=row[56],
            pfd_rank=row[57],
            pts_rank=row[58],
            plus_minus_rank=row[59],
            nba_fantasy_pts_rank=row[60],
            dd2_rank=row[61],
            td3_rank=row[62],
            cfid=row[63],
            cfparams=row[64])

        player.save()

print ("Done inserting player general traditional season total data to the database!")
Check MySQL database to make sure data is there
I don’t know why I keep lying about sql statements. Especially since I can edit this post as I please. But lo and behold, we have one more sql statement to check if our data is all there. Let’s select star to see how many rows we have.
mysql> SELECT count(*) from player_general_traditional_totals;
+ — — — — — +
| count(*) |
+ — — — — — +
| 11155 |
+ — — — — — +
1 row in set (0.01 sec)
Accessing our Database with a GUI
In the next post we will learn how to download and install Superset. We will use Superset to access our data and run SQL queries. Stay tuned for when it drops!
New posts delivered to your inbox
Get updates whenever I publish something new. If you're not ready to smash subscribe just yet, give me a test drive on Twitter.